Home » Recipes (Page 2)
Category Archives: Recipes
RECIPE: Salmorejo
Andalusian Cold Tomato Soup
In Spain, cold soups are perfect for a hot summer’s day. Gazpacho is probably the most well known – a blend of fresh tomatoes and other vegetables, such as cucumber, peppers and garlic. Salmorejo is another cold soup, which also originated in Andalusia. We first tried it in a tapas restaurant when we visit Seville and absolutely loved it. It is a blend of tomatoes but has the addition of bread which thickens the soup. It’s a great soup that also helps to avoid food waste as it works really well if the bread is slightly stale.
In the UK tomatoes aren’t that great. Supermarkets often sell perfectly round, perfectly red tomatoes that basically taste of water. We go to our local market for our toms or grow our own. (And home grown always taste better.) What is great about Salmorejo is that even if the tomatoes are a bit insipid, the flavourings ensure that the dish will be delicious.
Our recipe for salmorejo is really easy to make but you will need a blender. This will serve four if part of a wider tapas meal/starter or two hungry people. Also, it’s the sort of soup that you can make first thing in the morning and let the flavours infuse during the day. It even tastes great after being in the fridge overnight.
Ingredients
About 10 ripe tomatoes
3 slices of stale white bread
Clove of garlic (or another if you like garlic but we prefer subtle garlic here)
Good slosh of extra virgin olive oil
Salt and pepper
1 boiled egg per 2 servings
Couple of slices of ham
Method
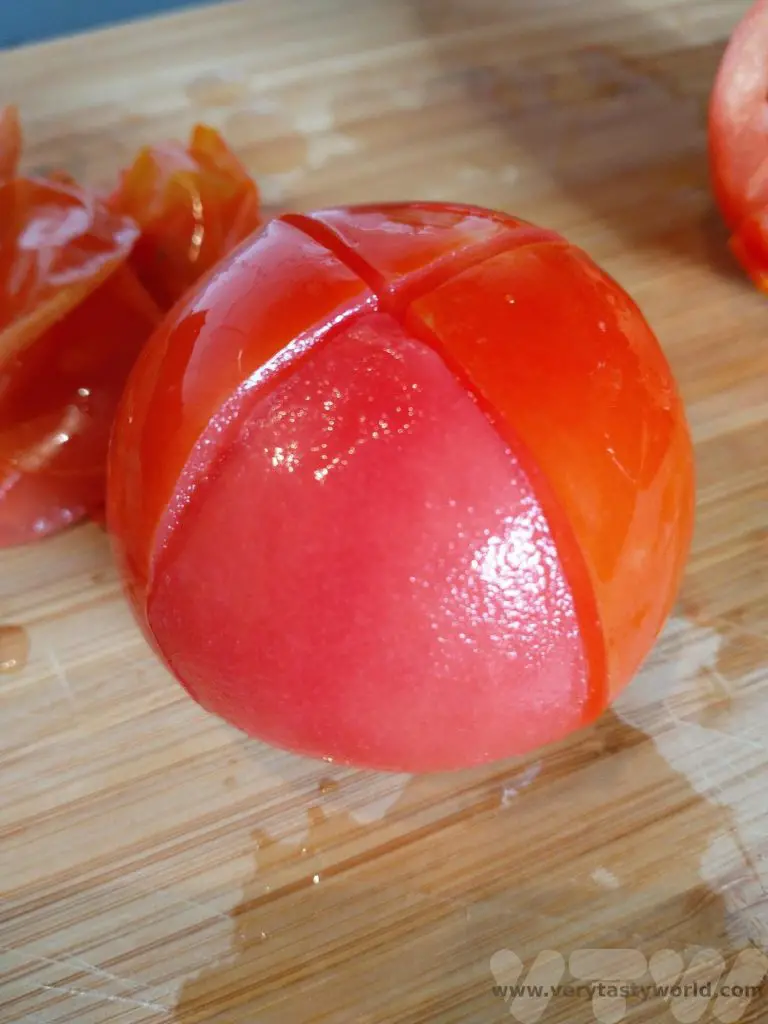
First of all the tomatoes need to be skinned. The easiest way to do this is to cut a cross at the end of the tomato (the opposite end to the stalk). It doesn’t need to be precise and it doesn’t matter if you cut into the tomato’s flesh -it’s all going to be blended anyway.

Pour boiling water over the tomatoes and let them sit in the water for a couple of minutes. Then transfer them to a bowl of cold water.
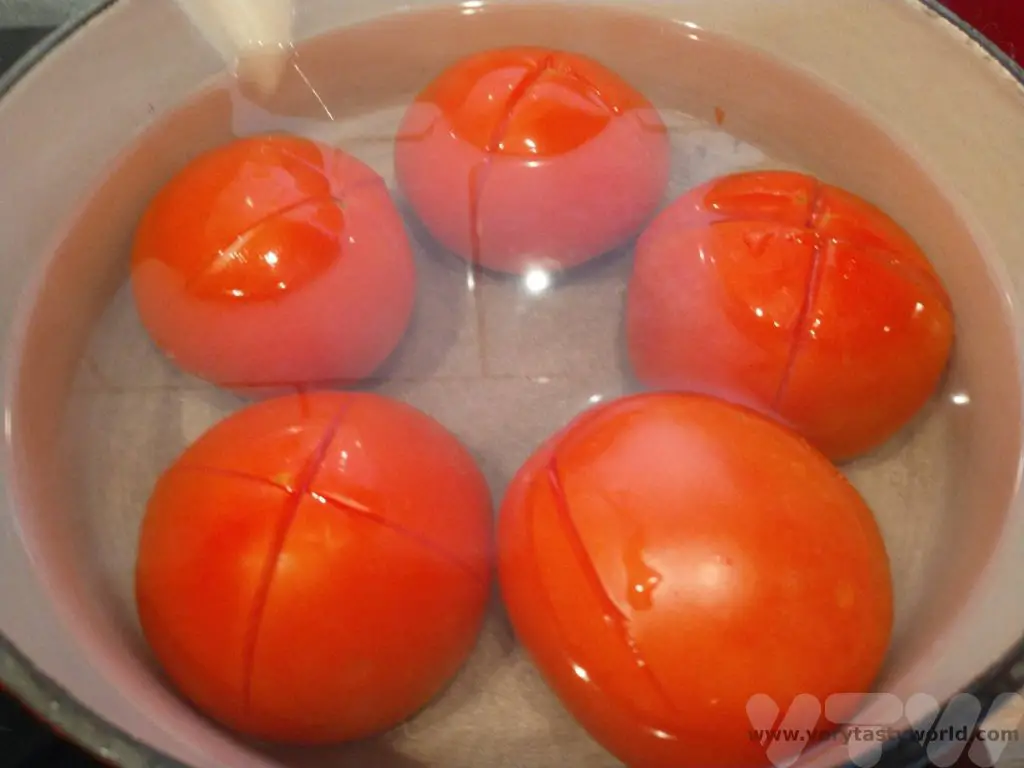
Grab a corner where the slice was made and the skins should just peel away. It’s not the end of the world if you don’t get all the skin off.
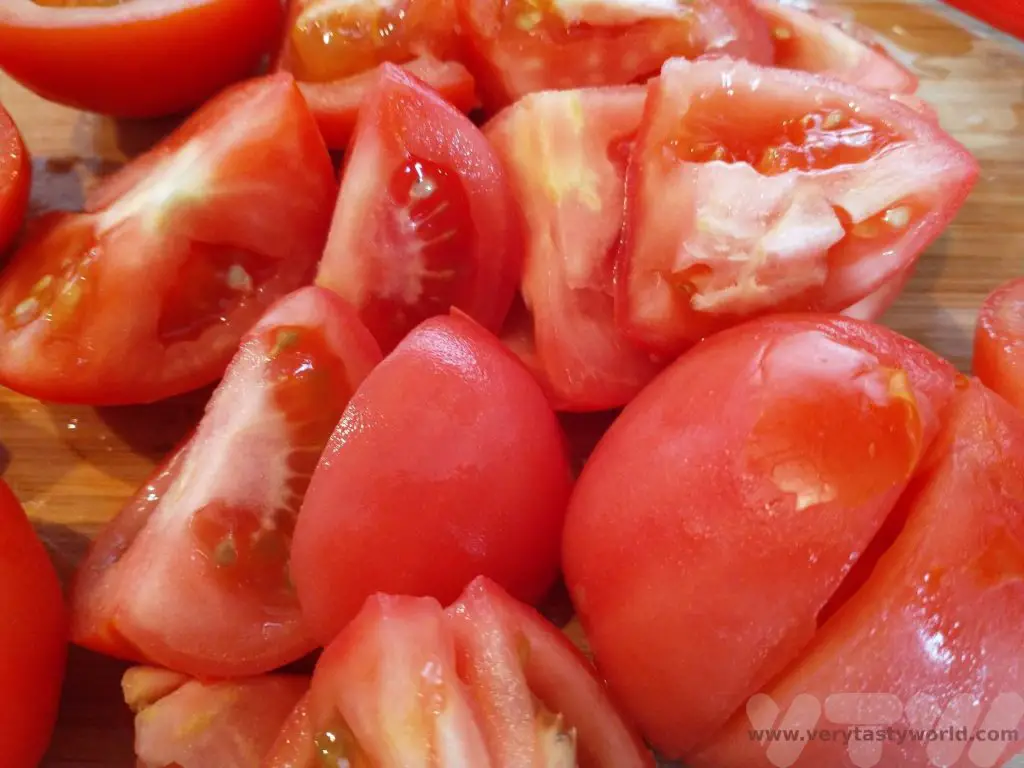
Put the tomatoes in the blender and give them a quick whiz.
Then tear the bread slices and add those, along with the garlic, oil, salt and pepper.
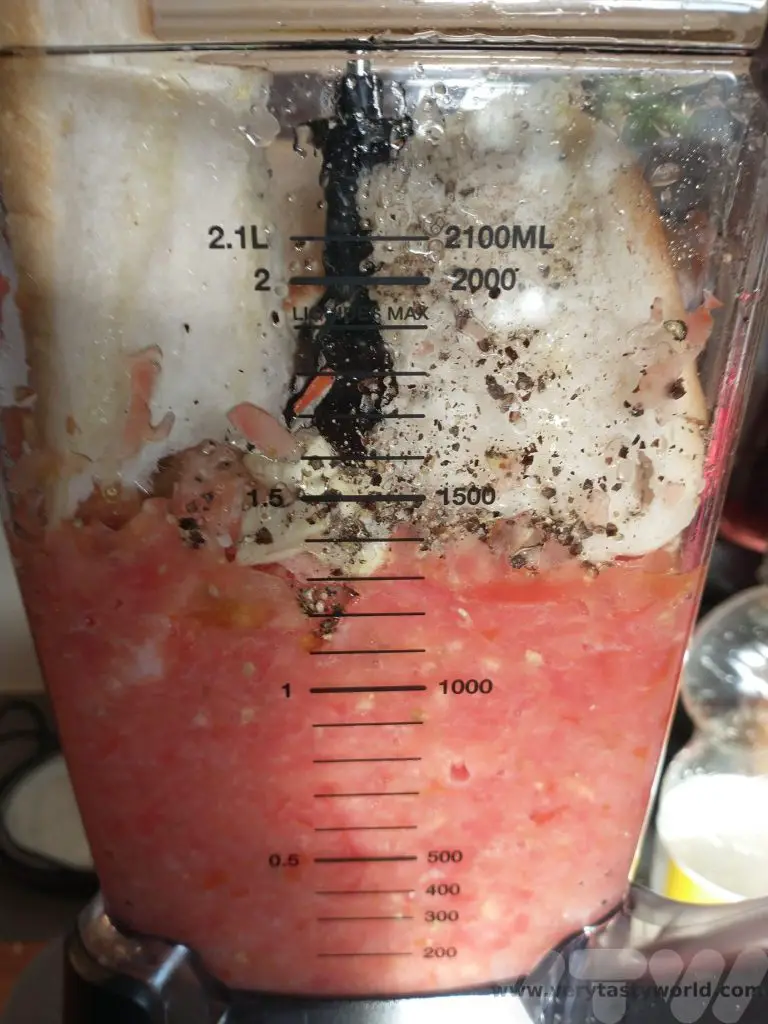
Blend again until you have a smooth, thick soup.
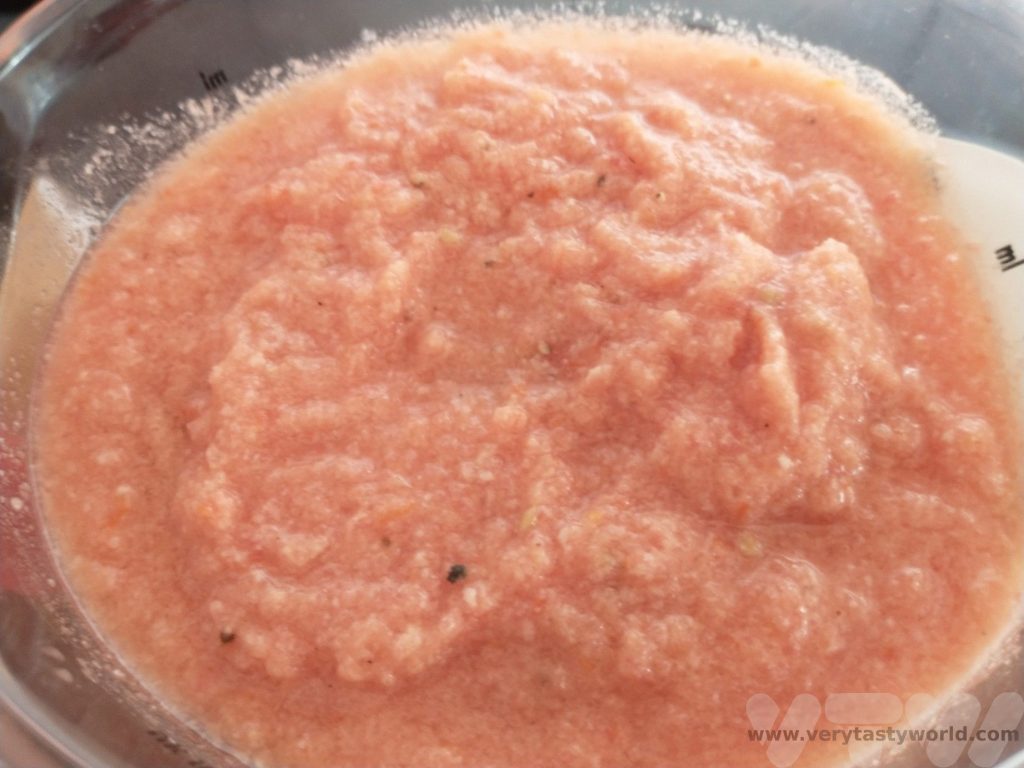
Pour into a jug then put into the fridge and let the flavours infuse.
Serve into individual bowls and garnish with chopped boiled egg and/or chopped ham.


- RECIPE Oyakodon Donburi

- Zero Waste Recipes Before Your Holiday
- RECIPE: Vegetable Biryani Tamil Nadu Style

- RECIPE: Vegan Wild Garlic Pesto
- Recipe: Venetian Pasta Sauce

- RECIPE: Biryani Raita Recipe

- RECIPE: How to Make Costa Rica’s Gallo Pinto

- Recipe: Japanese Simmered Pork Belly – Buta no Kakuni

- RECIPE: How to Make Umeboshi
RECIPE: Japanese Fried Chicken Karaage
Fried chicken is one of life’s great pleasures. And Japanese fried chicken karaage is no exception. In Japan, it is a tradition to eat fried chicken from KFC on Christmas Day before the traditional new year celebrations commence. However, we feel that JFC offers far superior fried chicken.
Always use chicken thigh meat. It has so much more flavour than breast meat and is guaranteed to be juicier and more succulent.

Making karaage isn’t difficult but it also isn’t a quick process. However the results are definitely worth taking the time to make the dish. The chicken absolutely needs to be marinated – this adds so much flavour. The word karaage refers to the cooking technique, that is frying the food in oil. You don’t need equipment such as a deep fat fryer – a frying pan will be just fine.
Recipe for Japanese fried chicken karaage:
Ingredients
Serves 4
800g boneless chicken thigh (skin-on is fine), each thigh cut into 4 pieces
For the marinade
4 tbs soy sauce
1 tbs mirin (if you can’t get this, add a little more sake/wine and a tsp of sugar)
1 tbs cooking sake (or white wine if you can’t get that)
1 inch of ginger (finely grated)
1-2 cloves of garlic (finely grated) depending on how garlicky you like your food
For the coating
Potato starch. If you can’t get this, fine rice flour or even cornflour will be fine. (Icing sugar would not!) We didn’t have quite enough potato starch so mixed in a little rice flour. About a cup’s worth (275ml) – as much as you need to coat all the chicken.
For the cooking
Vegetable oil (enough to get about 1 cm depth of oil in your pan)
Method
Place the chicken thigh pieces in a bowl and add the soy sauce, mirin, sake, ginger and garlic. Mix well and leave to marinate for at least an hour.

Pour the oil into a frying pan until it’s about 1 cm deep. Heat up. The oil will be hot enough when you put a little flour into it and it sizzles.
When the chicken has had a chance to acquire those lovely flavours pour the potato starch into a bowl.

Take each piece of chicken, dip both sides in the flour, shake any excess off, and then carefully place in the oil.

Repeat for further pieces of chicken. Do not overfill the pan – this is a process whereby the chicken should be cooked in batches. We tend to use a clock method – put a piece of chicken at the top, then go round the pan putting further pieces in in a clockwise direction so we know which piece was put in first. Cook the chicken for 5-7 minutes, turning occasionally, until the pieces are golden brown.
Then remove from the oil and place on kitchen paper to soak up excess oil. You can transfer the chicken from the first batches into a heatproof bowl in the oven set on a low heat to keep them warm.

Start the next batch and repeat until all the chicken has been cooked.

Serve with Japanese mayo. It’s not at all healthy but it’s oh, so decadent and delicious! If you’re feeling more health conscious, shredded cabbage is a popular accompaniment.
Karaage chicken is also yummy when served cold the following day. It often features in bento boxes.
Related Posts You May Enjoy


- RECIPE Oyakodon Donburi
- Zero Waste Recipes Before Your Holiday
- RECIPE: Vegetable Biryani Tamil Nadu Style
- RECIPE: Vegan Wild Garlic Pesto
- Recipe: Venetian Pasta Sauce
- RECIPE: Biryani Raita Recipe
- RECIPE: How to Make Costa Rica’s Gallo Pinto
- Recipe: Japanese Simmered Pork Belly – Buta no Kakuni
- RECIPE: How to Make Umeboshi
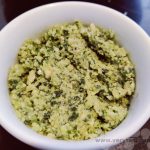
RECIPE: How To Make Wild Garlic Pesto
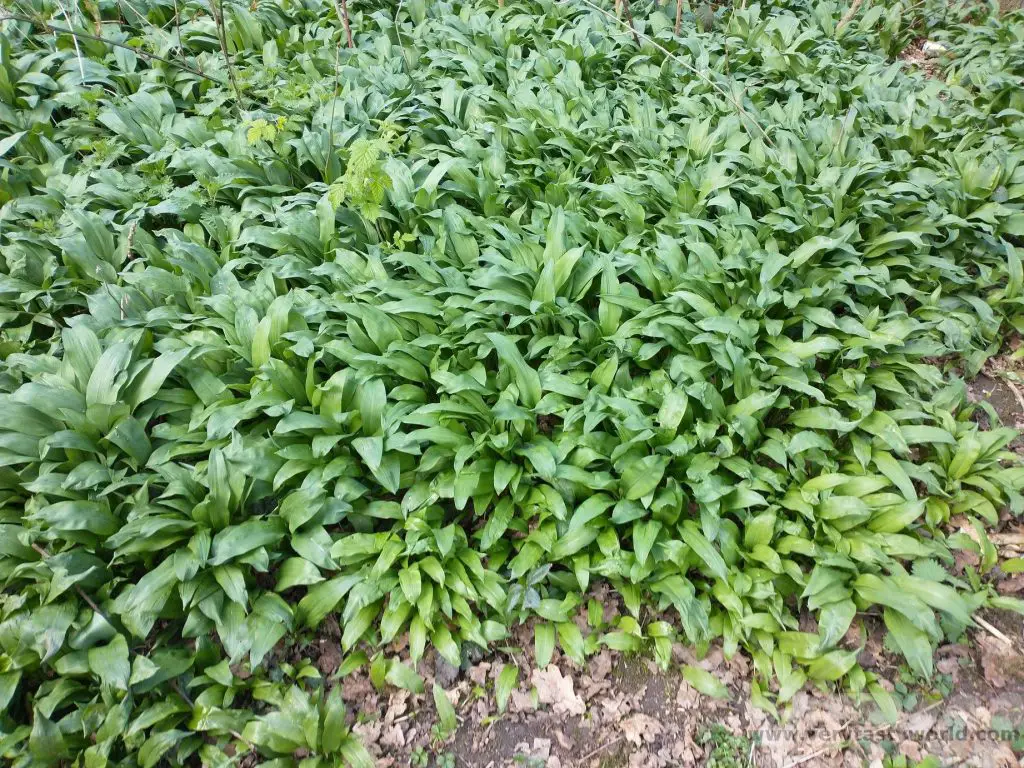
Spring is a fantastic time of year for walking in the English countryside. The weather is often warmer and the blossom on the trees provides a wonderful backdrop. We even get a bit of sunshine sometimes! It’s also a great time for foraging for the spring greens that start growing – there’s nothing like picking free food whilst on a walk. At the moment, nettles, ground elder, three cornered leek, garlic mustard (aka Jack-by-the-hedge) are all flourishing and they can all be used to create and add flavour to delicious dishes. Wild garlic is our favourite and we have a fabulous recipe for wild garlic pesto.
There are some basic rules to foraging in the UK. You are allowed to pick flowers, fruit and leaves but you are not allowed to dig up roots (e.g. horseradish) unless you have the landowner’s permission. We never take more food than we need.
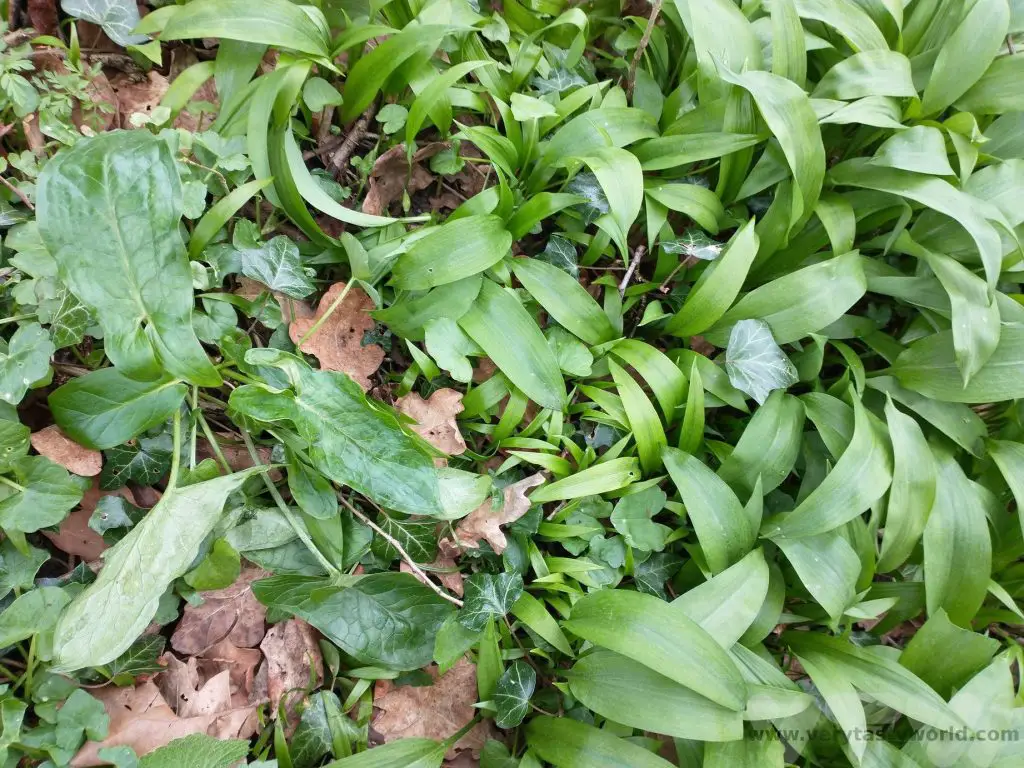
Wild garlic is an invasive plant and when it grows it spreads wildly, which is fantastic for a forager. It’s usually easy to recognise and has a very definite garlicky smell.
A few weeks after the leaves show through, delicate little white flowers will appear. These are edible too and have a very mild garlic flavour – they make a fantastic edible garnish. The buds can also be pickled and can be used as substitute for garlicky capers.
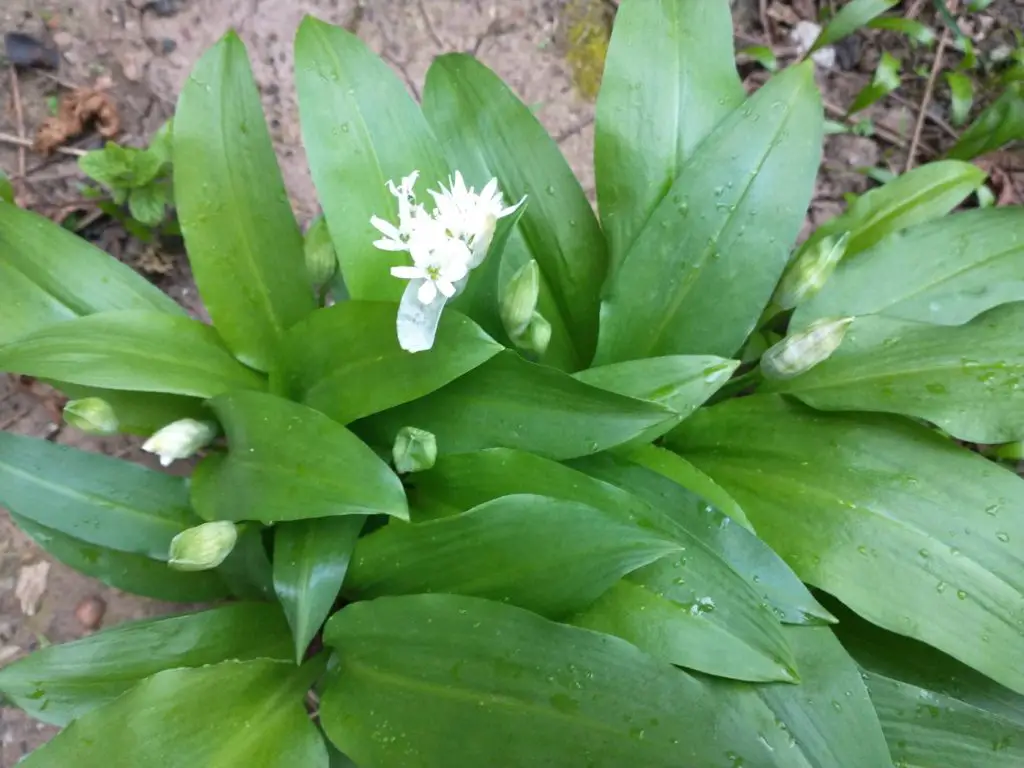
If you are foraging it is really important that you are 100% sure of what you are picking. Never eat anything if you are not certain about what it is. Many plants are poisonous and some can look very similar to edible species. Beware: there is a plant which looks very similar to wild garlic when it’s young and just peeping through the soil. Arum maculatum, also known as Lords and Ladies, is very toxic. Apparently even putting the leaves into your mouth will result in an immediate burning sensation. It sometimes grows worryingly close to the wild garlic. When it’s more mature it develops shiny arrow-head shaped leaves but when young, looks very similar to wild garlic.
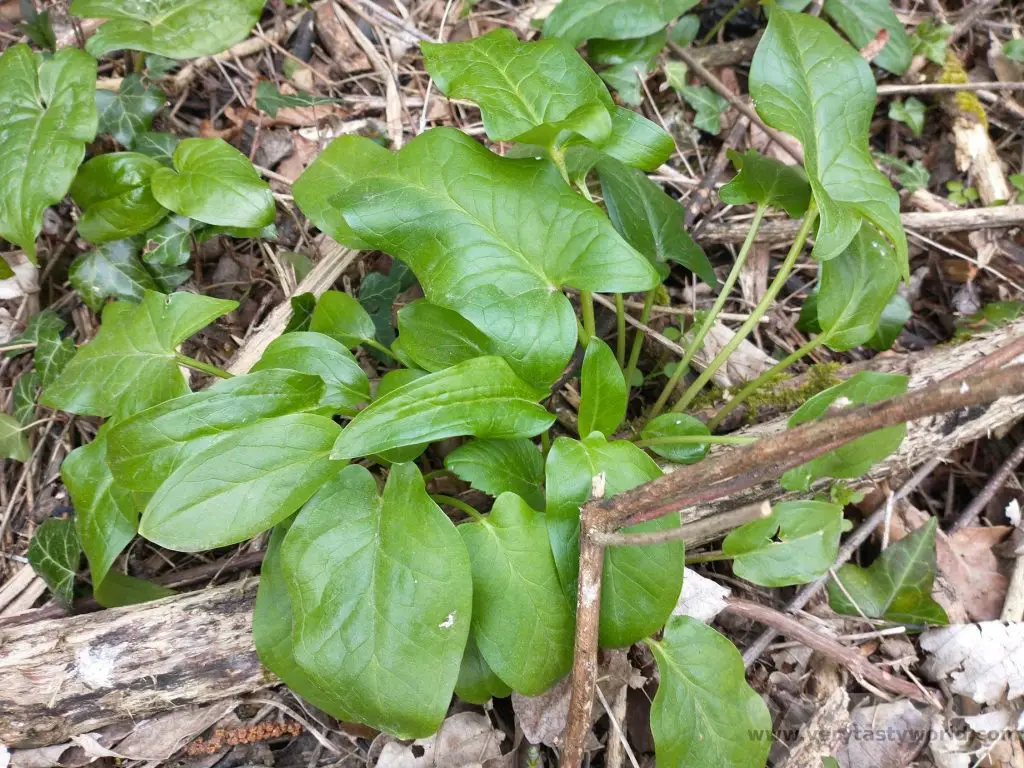
Bluebells, or their white-flowered counterparts, which can also easily be confused with wild garlic’s white flowers, can also grow nearby. Bluebells are extremely pretty but also poisonous.
Whenever we gather wild garlic we go through a process of washing it thoroughly and checking each leaf when we get home.
Wild Garlic Pesto Recipe
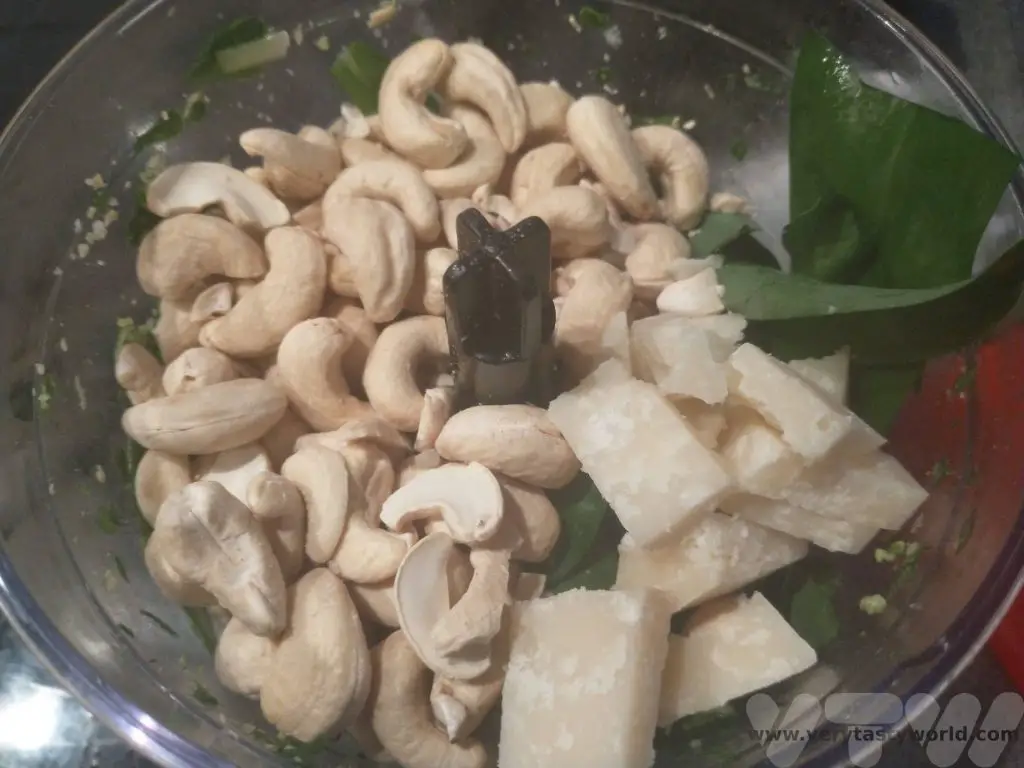
This is a recipe that is not at all accurate – it’s one where you can fling the ingredients together and end up with something delicious. Our wild garlic recipe uses cashew nuts instead of pine nuts. They are a lot cheaper and add a lovely creaminess to the pesto.
Ingredients
Bunch of wild garlic leaves
Handful of cashew nuts
Chunk of Parmesan or Grana Padano cheese
Slosh of extra virgin olive oil
Squeeze of lemon
Pinch of salt
Method
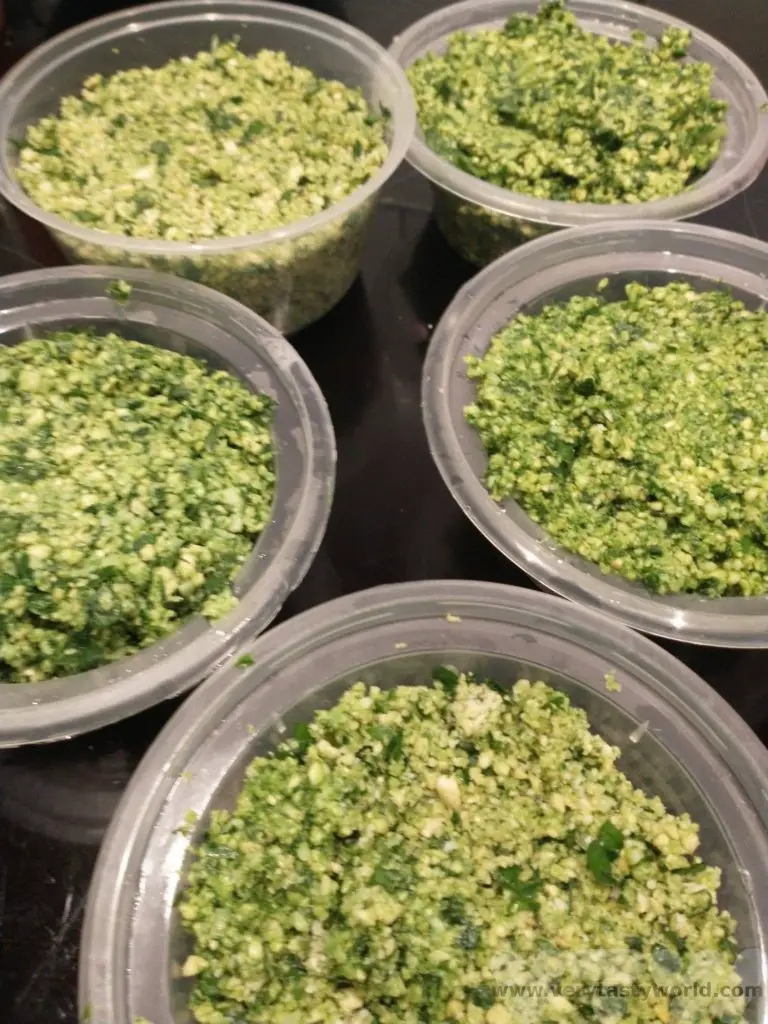
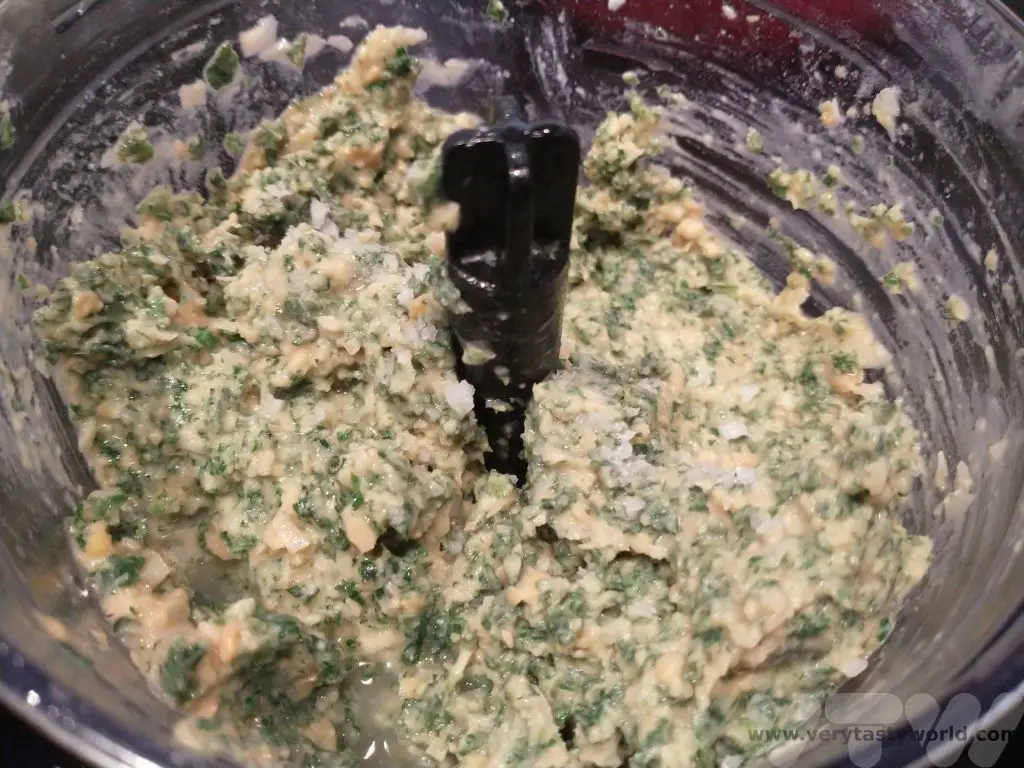
Roughly chop the wild garlic leaves and place into a blender. Throw in the nuts. Roughly chop the cheese into chunks and add these. We recommend adding the leaves first – to the bottom of the blender – so that the weight of the nuts and cheese ensures they get chopped up more finely.
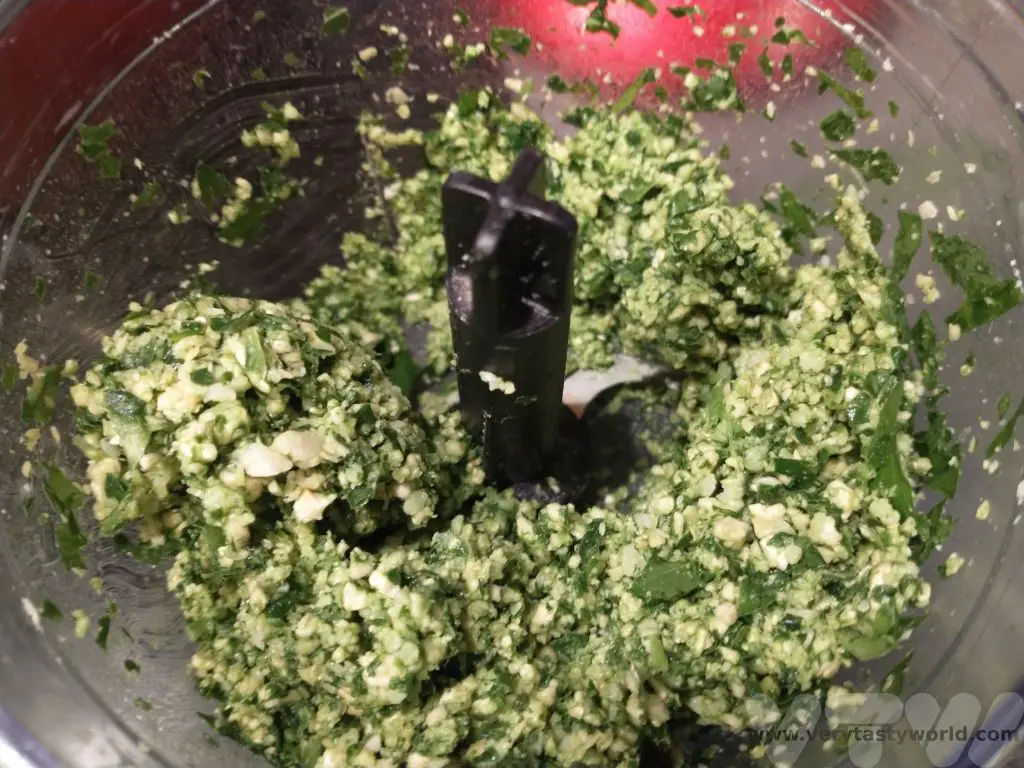
If you are planning to eat the pesto right away, add the oil, lemon juice and salt. The pesto freezes really well but if we are planning to freeze it we don’t add the oil or seasoning; instead we stir it in once it has defrosted.
Blend together until you get the texture you like – smooth or nutty – both work well.
If you are planning to freeze the pesto, decant into containers and pop into the freezer. We recycle plastic takeaway containers as they provide the perfect portion for two people.
We’ve tried variations using pistachio nuts and nutritional yeast, which can replace the cheese in order to develop a vegan version. Pistachio are more nutty in texture and their flavour is more pronounced in the finished pesto.
The great thing about this recipe is that is so easily adaptable – mix and match ingredients. It’s the underlying gentle garlicky flavour that the wild garlic leaves produce that make this such a brilliant pesto. We’ll be foraging and freezing for as long as the season lasts.
Related Posts You May Enjoy
- RECIPE Oyakodon Donburi
- Zero Waste Recipes Before Your Holiday
- RECIPE: Vegetable Biryani Tamil Nadu Style
- RECIPE: Vegan Wild Garlic Pesto
- Recipe: Venetian Pasta Sauce
- RECIPE: Biryani Raita Recipe
- RECIPE: How to Make Costa Rica’s Gallo Pinto
- Recipe: Japanese Simmered Pork Belly – Buta no Kakuni
- RECIPE: How to Make Umeboshi
RECIPE: How to Make Stinging Nettle Hummus
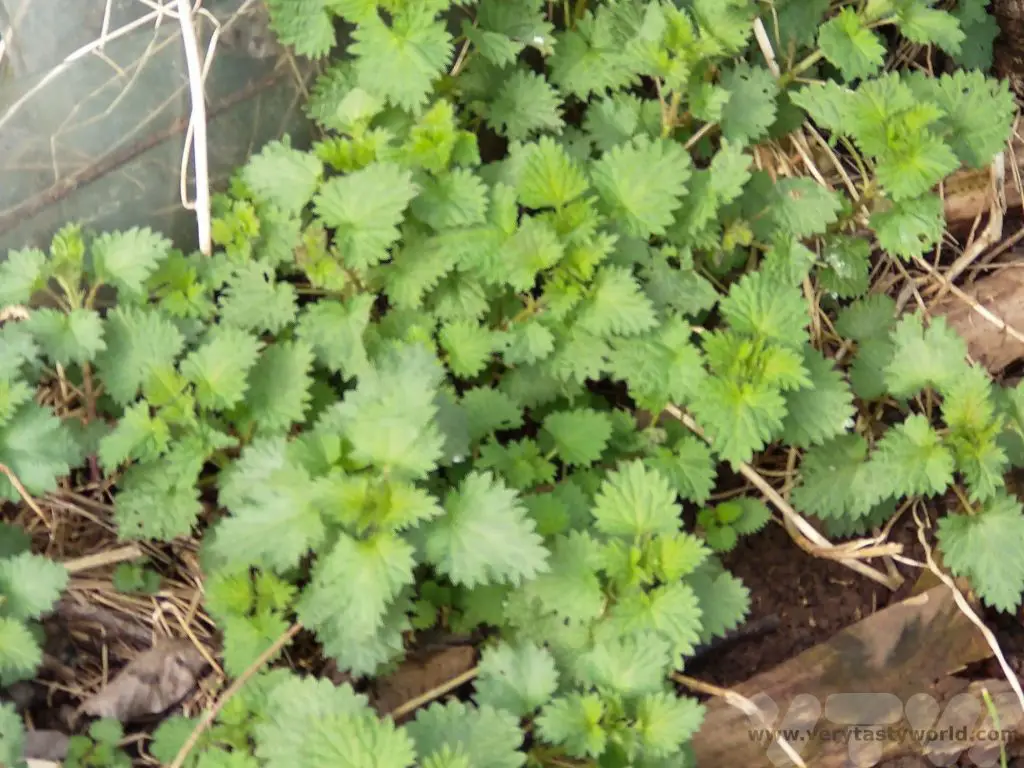
If there’s one thing that can ruin a walk in the lovely English countryside it’s stinging nettles. If you brush past them with bare skin you can get a painful sting which usually isn’t harmful for most people but hurts for a while. But you can exact revenge on them by eating them! Nettles are not only edible, they are highly nutritious – they contain iron, calcium and magnesium, as well as vitamins A and B. They are great in soup, can be dehydrated to make crisps, can be used like spinach in a variety of dishes such as stir fries and stews, and can also be used in dips and sauces. The process of cooking with them renders them harmless by getting rid of the sting. One of our favourite things to make with them is stinging nettle hummus and we have a recipe.
Despite them being found all over the British Isles nettles are not native plants, they were introduced by the Romans a couple of thousand years ago. Some stories suggest that they were used by Roman soldiers who would flog themselves with the nettle plants in order to use the stings to warm their skin in cold northern climes.
If you do get stung by a nettle there is a plant that you can use that helps soothe the pain. The standard view is that a dock leaf rubbed onto the sting will help. Actually it’s a plantain leaf (which used to be called dock in bygone times) which is more likely to help. Rubbing the sting with a dock leaf won’t harm but plantain will provide more relief.
It is the perfect time of year to go foraging for spring greens. We are already keeping an eye on our local patches of wild garlic, ground elder, mustard garlic, sorrel and three-cornered leek to see how they are growing, and also to plan lots of recipes for them. Stinging nettles are absolutely ready right now.
Preparing Stinging Nettles For Hummus
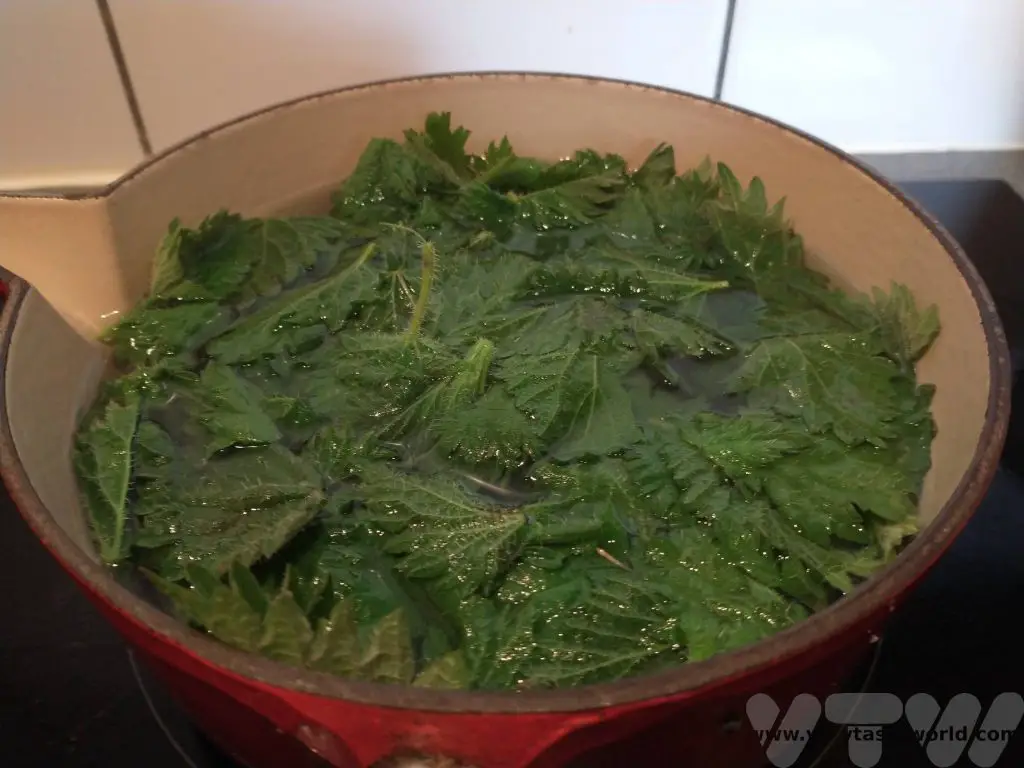
Go foraging for nettles. Try to find a patch where it’s unlikely that dogs may have been walking (just in case they have used that area for a toilet). Hardy foragers pick the nettles with their bare fingers but we use gloves to save ourselves from the stings. It’s best to pick in early spring to get the most tender leaves (the leaves will become quite tough as summer progresses). You need around half a carrier bag’s worth but you don’t need to be precise.
A word of warning – nettles are generally one of the easiest plants to identify but please be 100% sure that you have identified the correct plant. If you have the slightest doubt, don’t eat it. Plant identification apps aren’t always reliable either.
Wearing gloves, wash the nettles and have a look through them to see whether there are any leaves that should be discarded and look out for any insects to brush away. You can also make sure that no extraneous leaves from other plants. It’s quite common for grasses to end up in your bag as well.
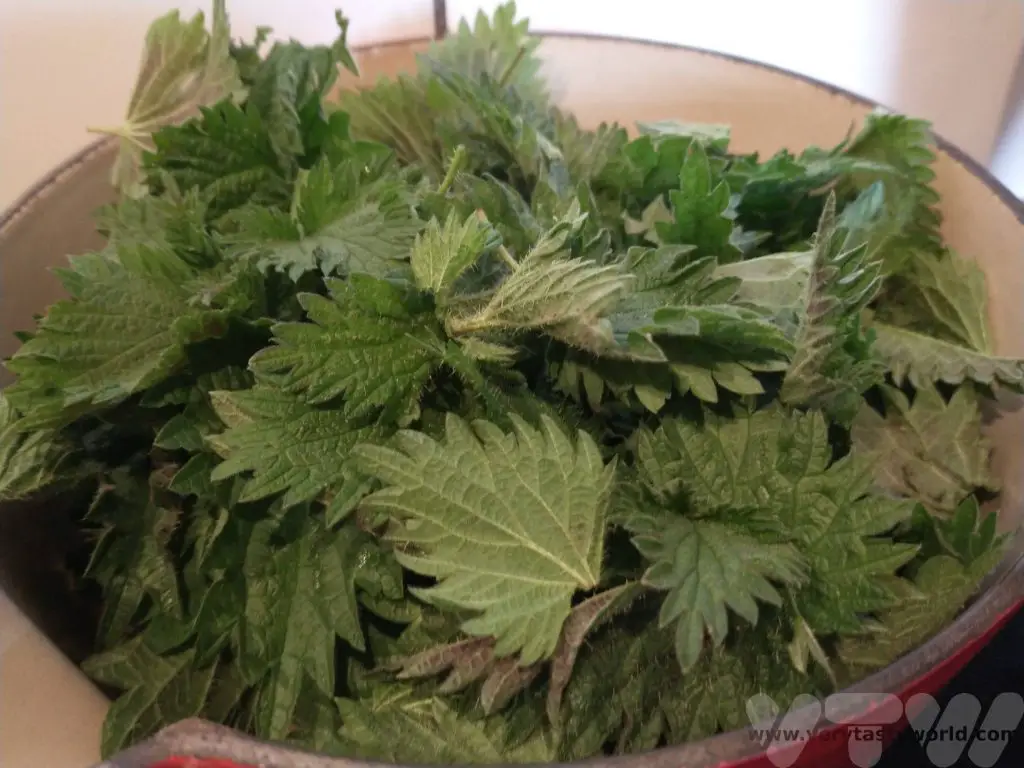
Place the nettles into a saucepan and pour boiling water over them to cover them. Stir for a minute or so. They will start wilting. This process gets rid of the sting and you can handle them with your bare hands from now on.
While they still have their lovely green colour, using a slotted spoon, transfer them into a bowl of cold water for a few minutes.
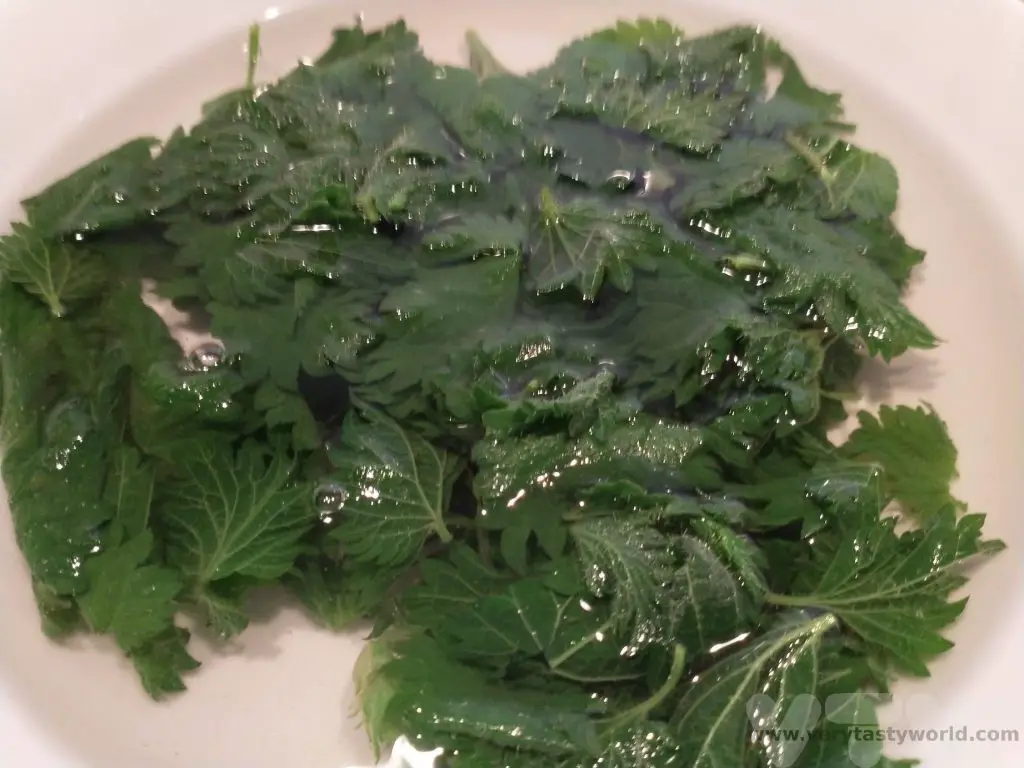
Keep the hot water from the saucepan and pour it into a mug – you can enjoy a nice cup of nettle tea, which has a mild, refreshing flavour and tastes a bit like green tea or coca tea. Then drain the nettles and let them dry naturally. They can then be used in our stinging nettle hummus recipe.

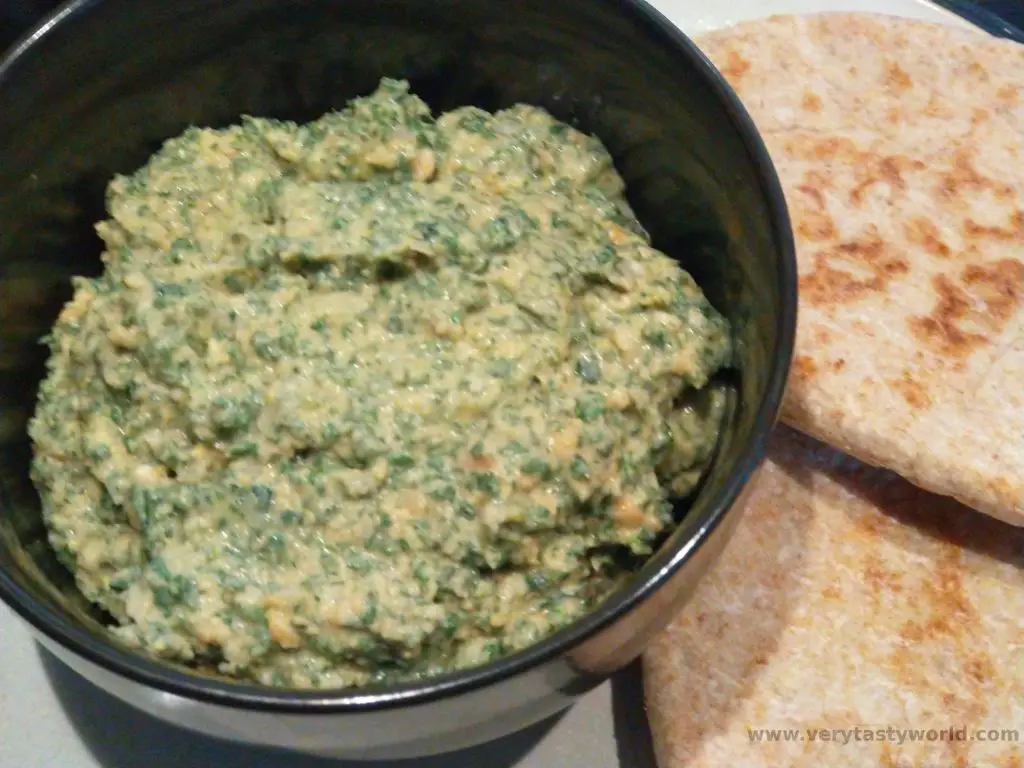
Stinging Nettle Hummus Recipe
Ingredients
Bowl of blanched stinging nettles
1 can of chickpeas, drained (if you’re keen to avoid food waste, you can keep the liquid, which is called aquafaba, which can be used to make vegan meringues)
1 large or 2 small cloves of garlic
Juice of 1 lemon
1 dsp peanut butter (you can substitute tahini, or omit completely if you can’t eat nuts)
Slosh of olive oil
Pinch of sea salt
Method
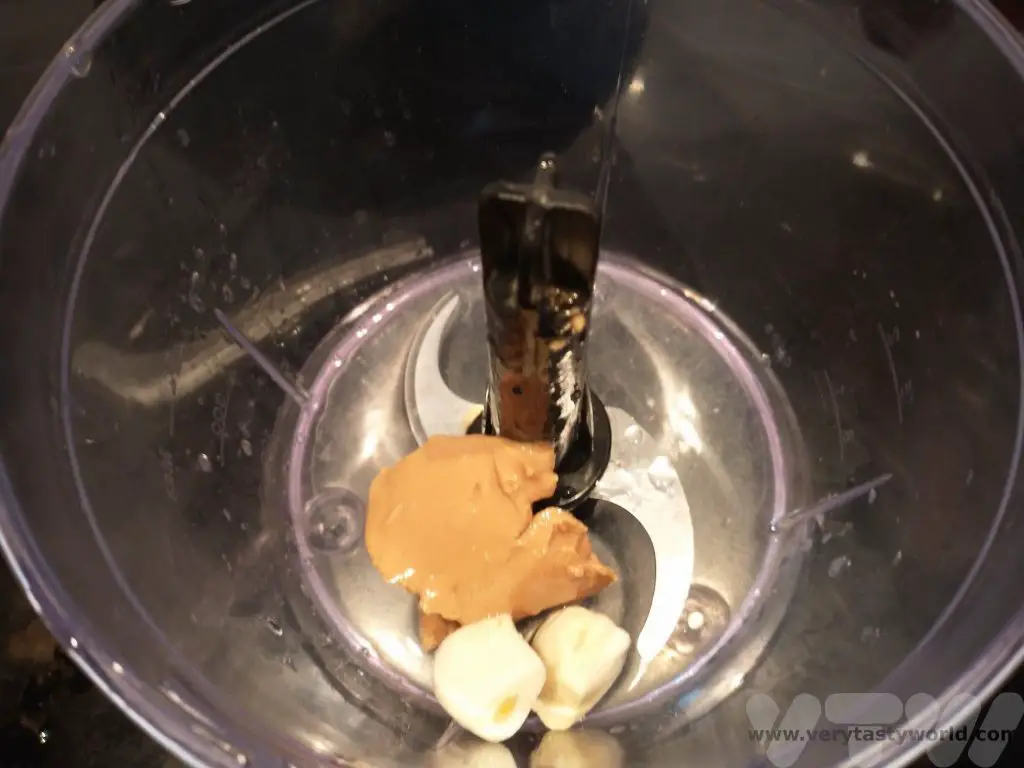
In a food processor or blender, combine the lemon juice, garlic and peanut butter. Give them a whizz.
Add half the chickpeas and half the nettles with a slosh of oil and blend again.
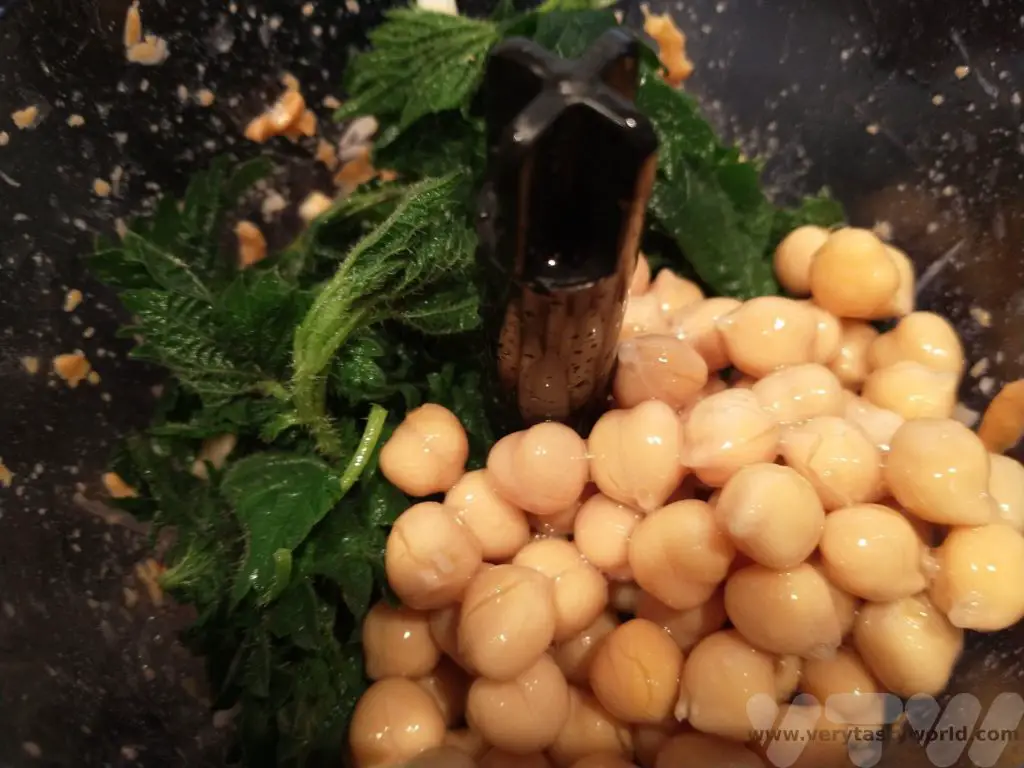
Scrape the sides of the bowl. Add the remaining nettles, chickpeas and a pinch of salt, and blend again.
Have a taste – does it need more lemon or salt? Add seasoning as necessary. We tend to like sour flavours so added the juice of an extra half lemon. You can decide how much you would like your blend depending on whether you prefer a smooth or chunkier texture.
Decant into a bowl and serve with warm pitta bread.
Related Posts You May Enjoy


- RECIPE Oyakodon Donburi
- Zero Waste Recipes Before Your Holiday
- RECIPE: Vegetable Biryani Tamil Nadu Style
- RECIPE: Vegan Wild Garlic Pesto
- Recipe: Venetian Pasta Sauce
- RECIPE: Biryani Raita Recipe
- RECIPE: How to Make Costa Rica’s Gallo Pinto
- Recipe: Japanese Simmered Pork Belly – Buta no Kakuni
- RECIPE: How to Make Umeboshi
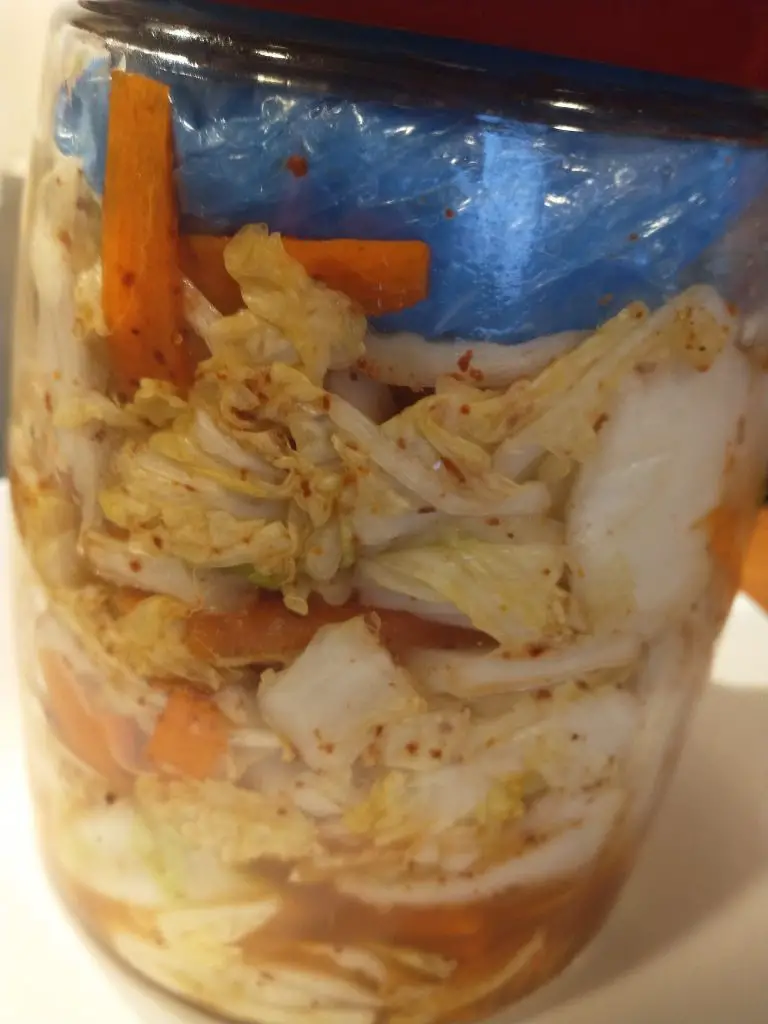
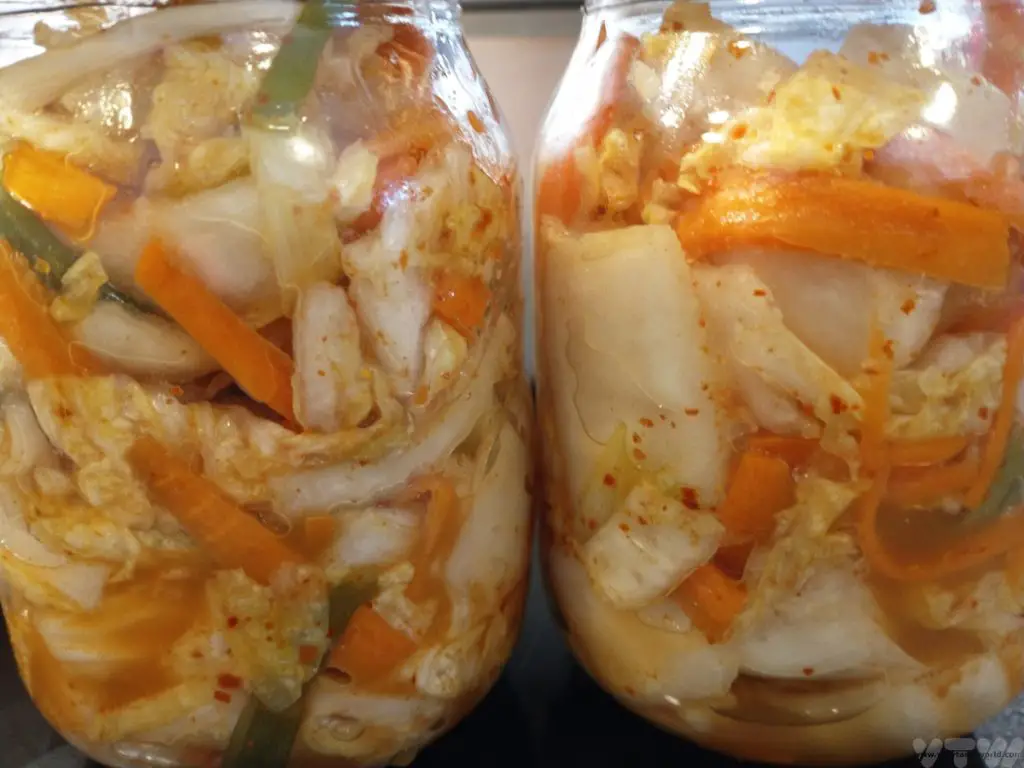
RECIPE: How To Make Kimchi
Kimchi is a fundamental part of society in Korea. It is Korea’s national dish and is usually eaten with most meals there. In fact, kimchi making has been assigned as a UNESCO cultural heritage and even has its own day – 22nd November. Kimchi is great fun to make and we have a recipe for how to make kimchi. It isn’t a traditional Korean style but it’s easy to make, is ready very quickly and we reckon it’s much more delicious than shop-bought.
We first tried kimchi over 20 years ago and it was love at first bite – sour, spicy and crunchy, it has a unique flavour. Being a fermented food it is also purported to have properties that are beneficial for your gut health but, far more importantly, it’s delicious.
It’s surprisingly easy to make but it does take a while to ferment and you do have to watch out for potential explosions but that is what makes it so exciting! (Don’t worry, we’ve been making it for years and have never had an explosion – we have some advice on the best equipment to use at the end of this post.) We have tried fermenting lots different foods over the years, including miso, and it’s a very satisfactory process.
Kimchi is made via a lacto fermentation process whereby good bacteria, known as lactic acid bacteria, convert the sugars in vegetables into lactic acid. The joy of fermentation is that it isn’t a precise art. You need a bit of patience while the bacteria do their thing but once fermentation is complete, the finished product will last for many months, if not years – that is, if you don’t eat it straight away!
Ingredients For Making Kimchi
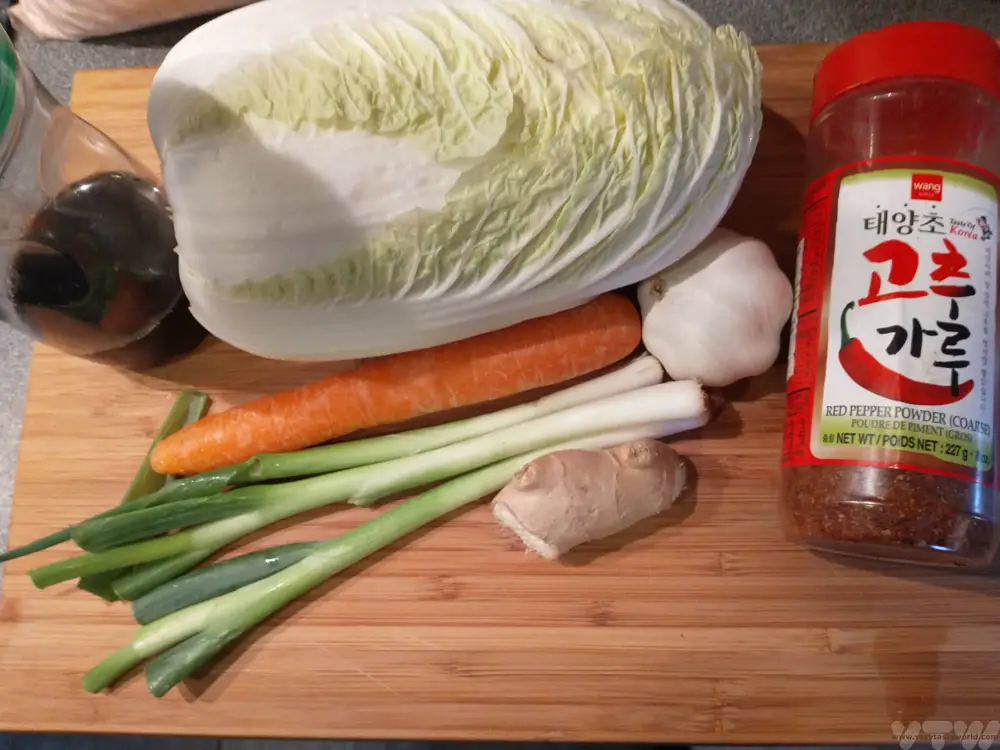
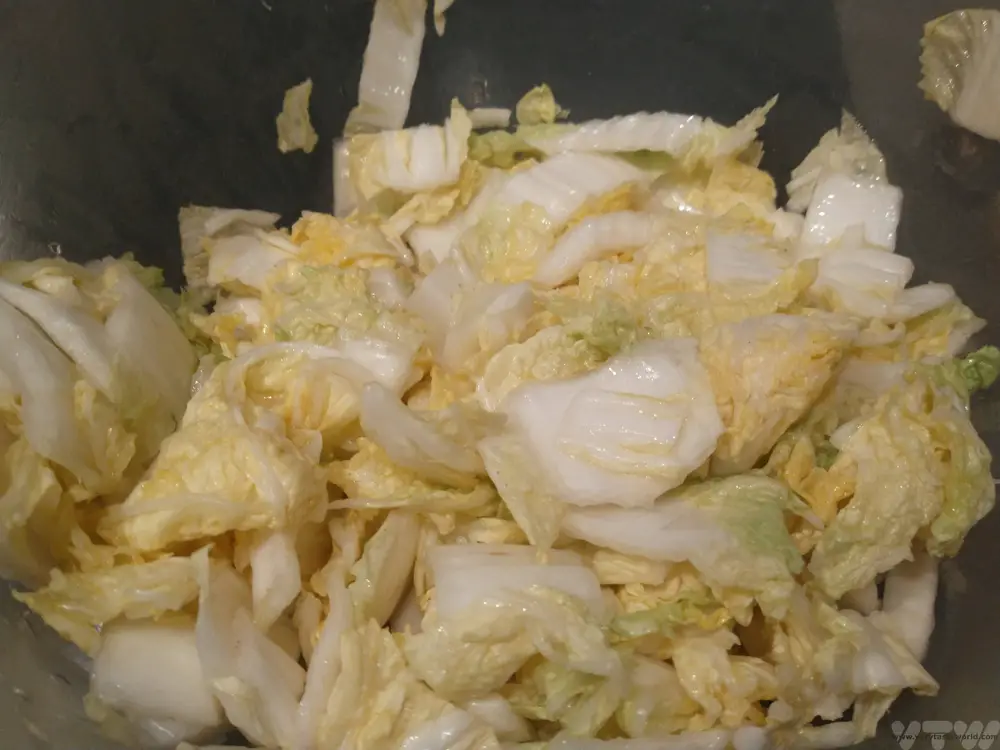
1 Chinese leaf cabbage (also known as Napa cabbage)
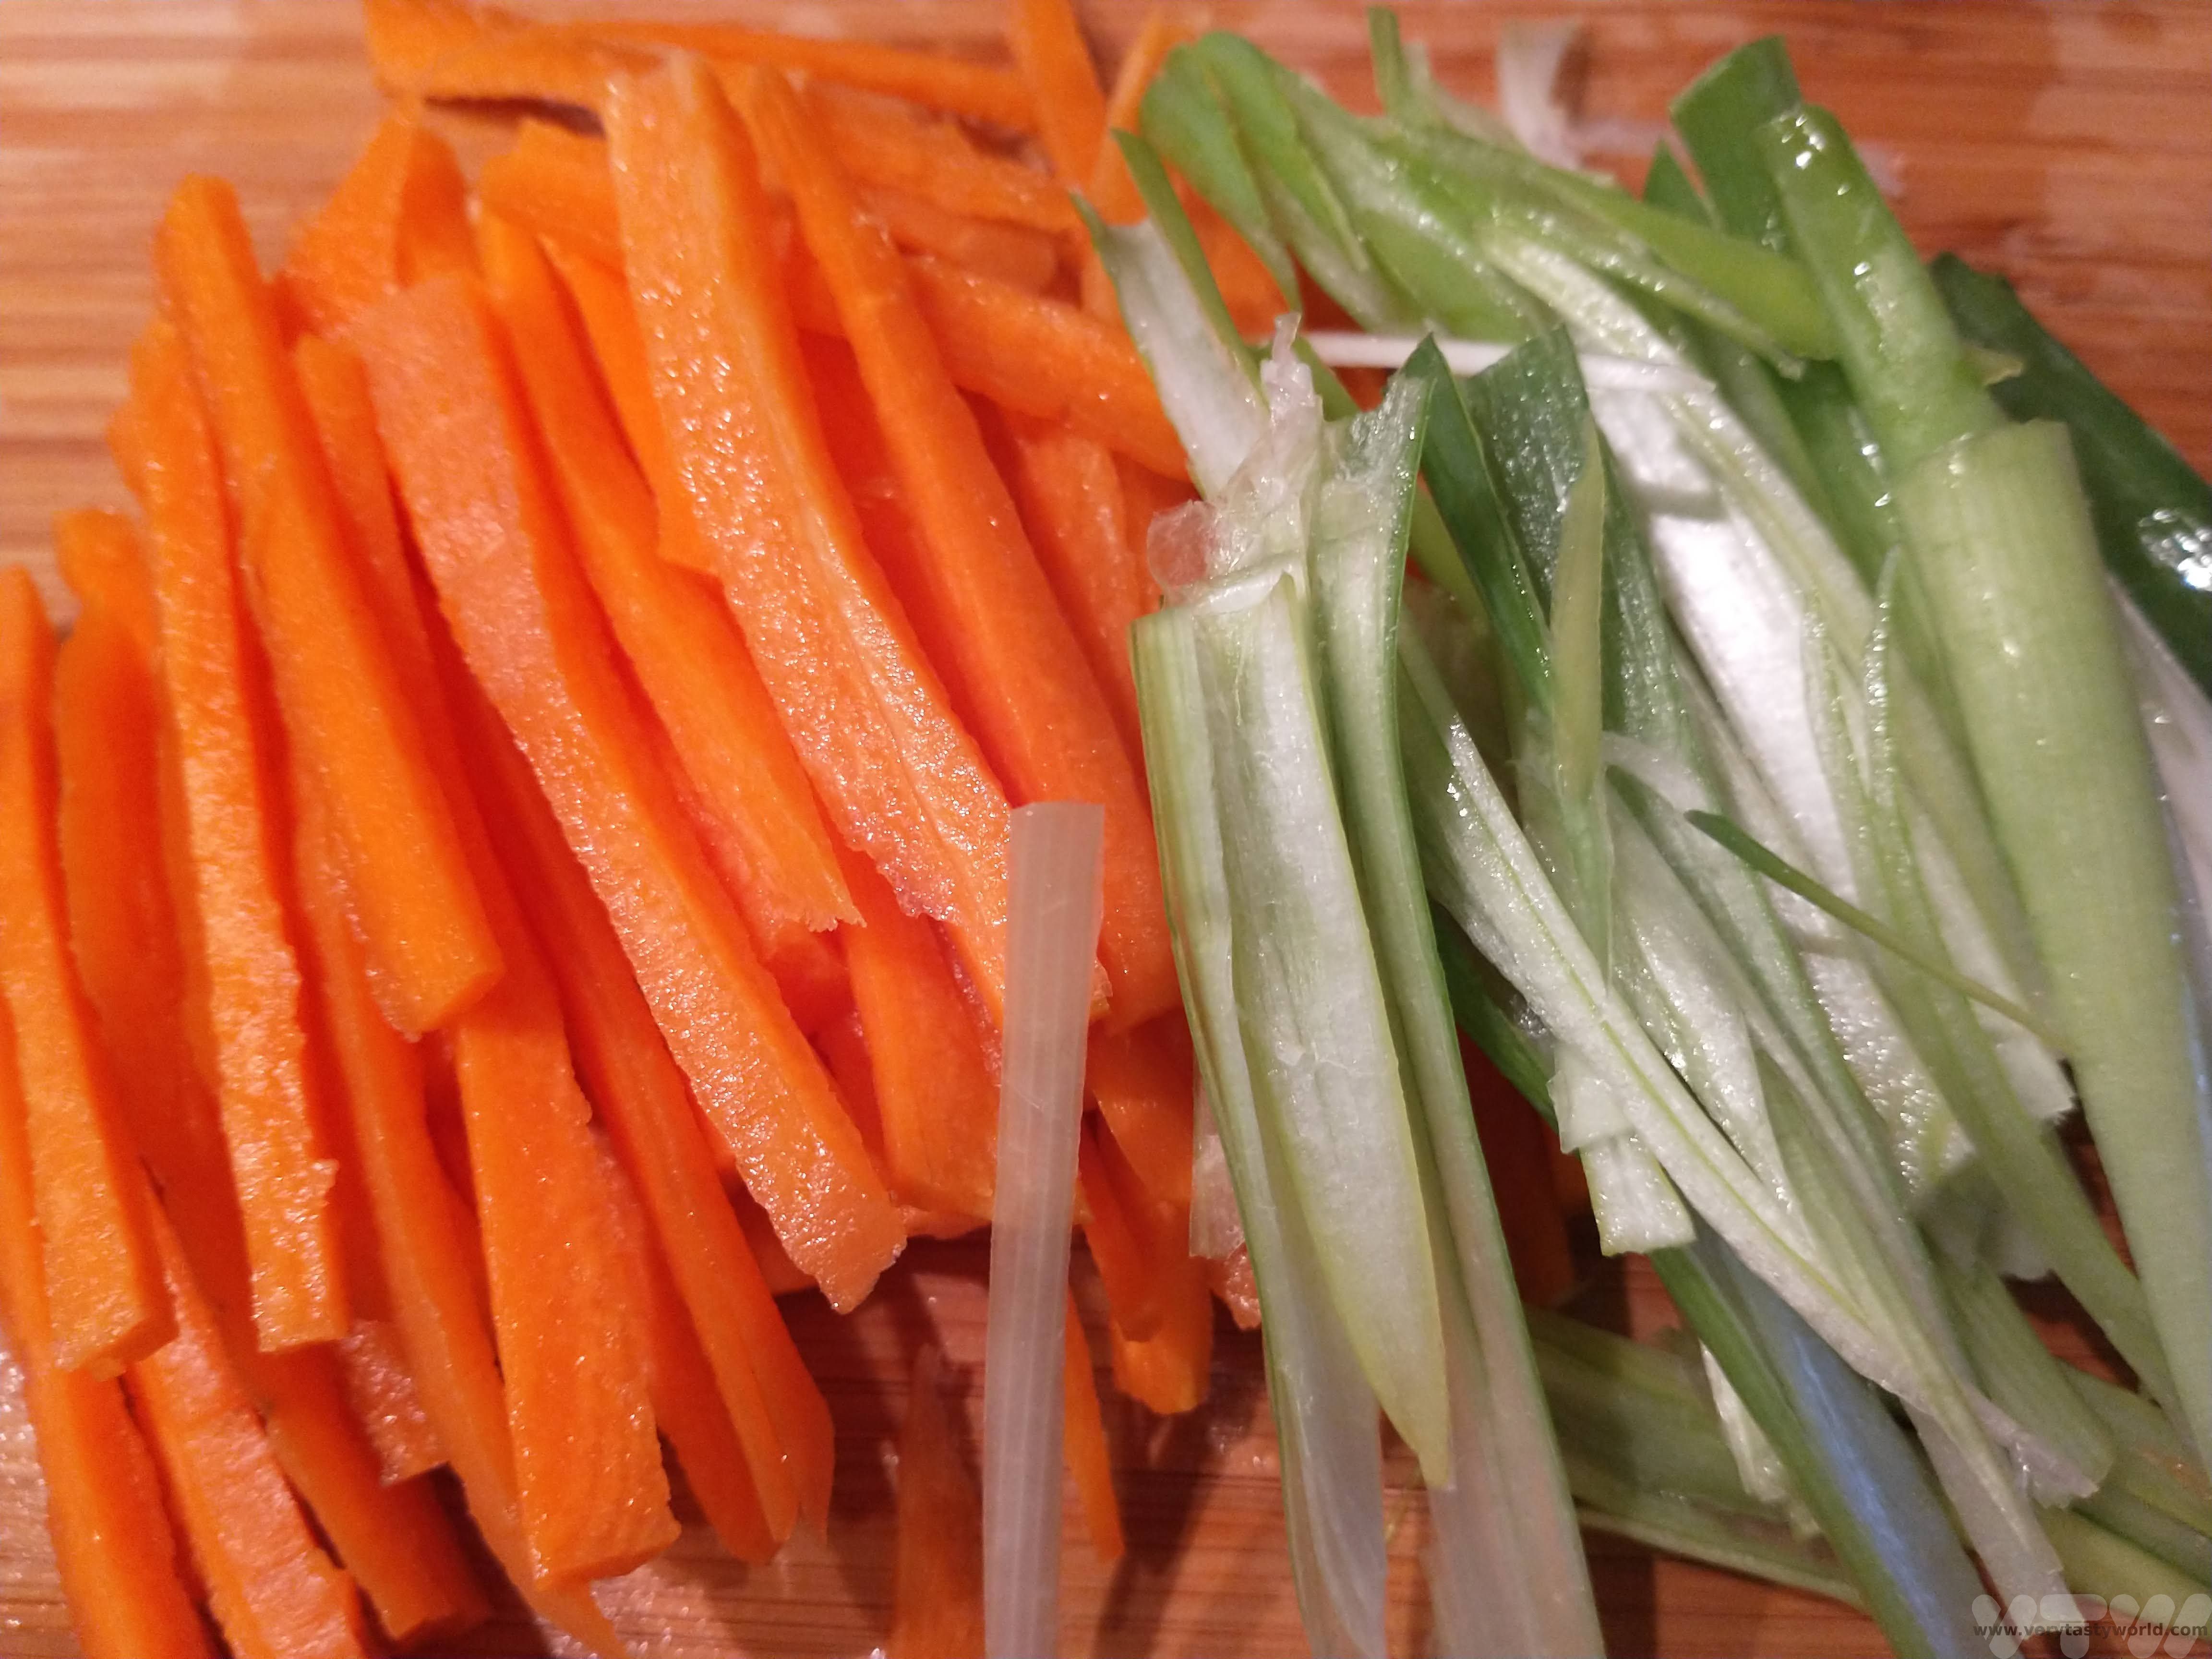
1 carrot
2 spring onions (green onions)
A carrot’s length of daikon white radish, also known as mooli (optional)
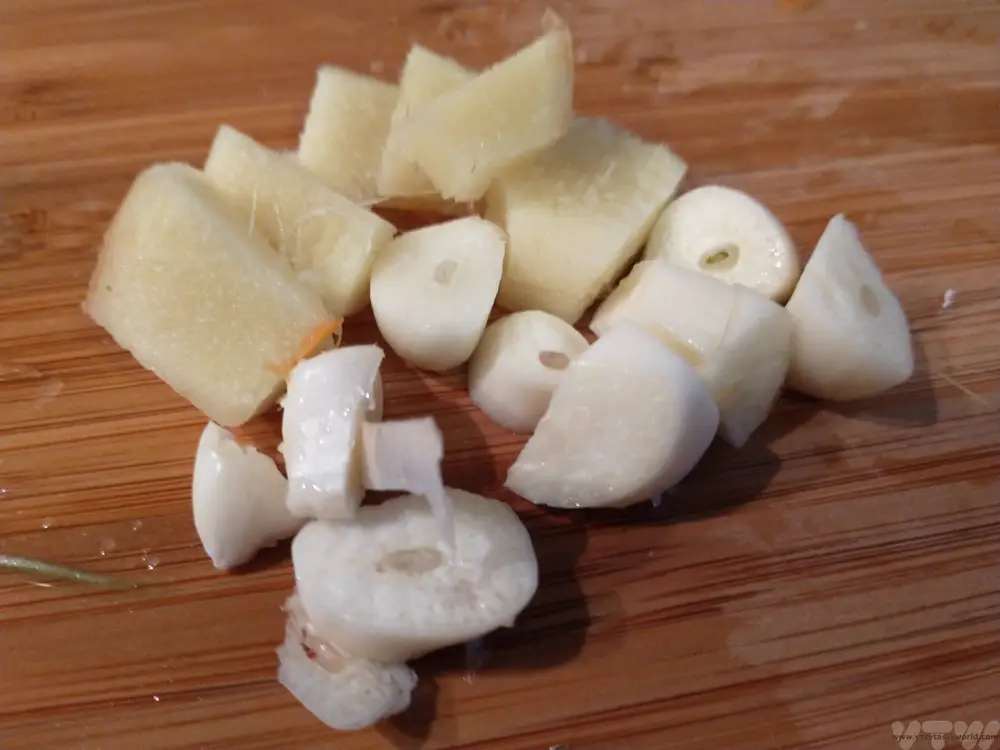
2 fat cloves of garlic (3 if your garlic isn’t portly enough)
1 tbs fish sauce (vegetarians can use soy sauce, but use less – 1/2 tbs)
1 thumb-sized piece of ginger
1 tbs Korean chilli red pepper powder known as Gochugaru (you should be able to find this in Asian stores and even supermarkets these days). A variation is to use Korean chilli paste, known as Gochujang. Gochujang is traditional but we prefer the chilli powder for this kimchi.
3 tbs salt. You want to use a salt that doesn’t have anti-caking additives. Table salt isn’t recommended. Equally you don’t really want to use really posh salt. We tend to use Himalayan pink salt.
How To Make Kimchi: Method
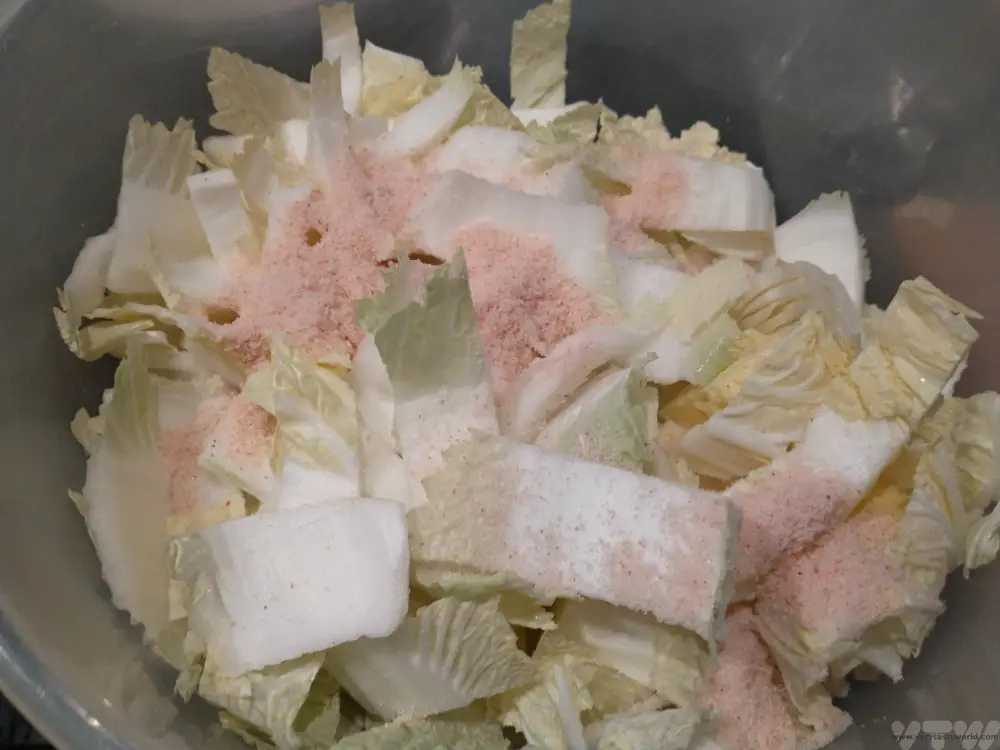
Slice the cabbage into chunks. You want to have easily pick-upable bite-sized pieces. One of the nice things about the Chinese leaf is that it has a lovely broad ribs which retain their crunch when the kimchi is finished which makes a nice contrast with the softer leaves.
Place cabbage into a bowl and sprinkle with the salt. Massage the salt into the cabbage and wait a couple of hours. It is a lot of salt but you will be washing it through later.
Prepare your fermentation jar. The size of the jar is important. You want to fill the jar up as much as possible and not have too much headspace. The jar size that suited our cabbage was 1.4 litre capacity. We recommend clip top Kilner jars as they have a good seal to keep air out but also let the liquid escape. There are some types of jar specifically designed for fermentation. We’ve had greater success with some than others.
The jar needs to be clean. We find the best way to clean the jar is to wash it in warm, soapy water and rinse. Then we boil a kettle and fill the jar (not forgetting the lid) with boiling water. After 10 minutes, drain and let the jar cool down. Some people put the jar into the oven on a low heat for 20 minutes but we haven’t found this step to be necessary for this type of fermentation.
After some time has passed, give the cabbage a quick rinse with water. Have a taste – it should taste salty but not overpoweringly salty. You don’t need to pat the cabbage dry.
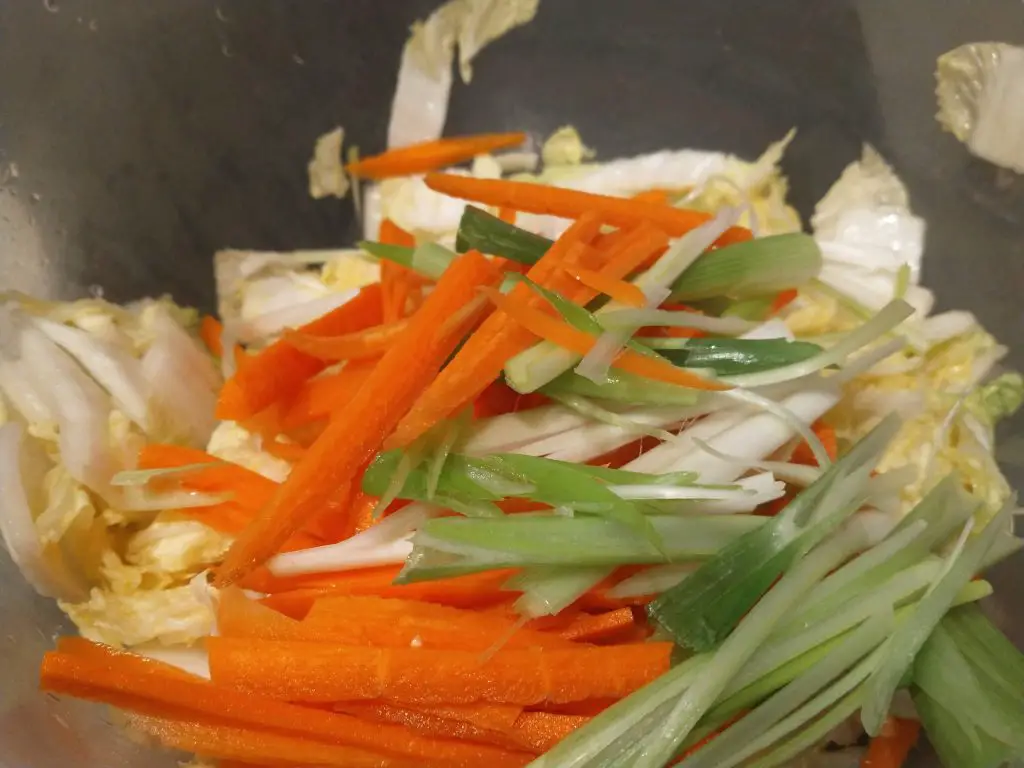
Julienne the carrot and daikon, if you are using it, slice the spring onions lengthways.
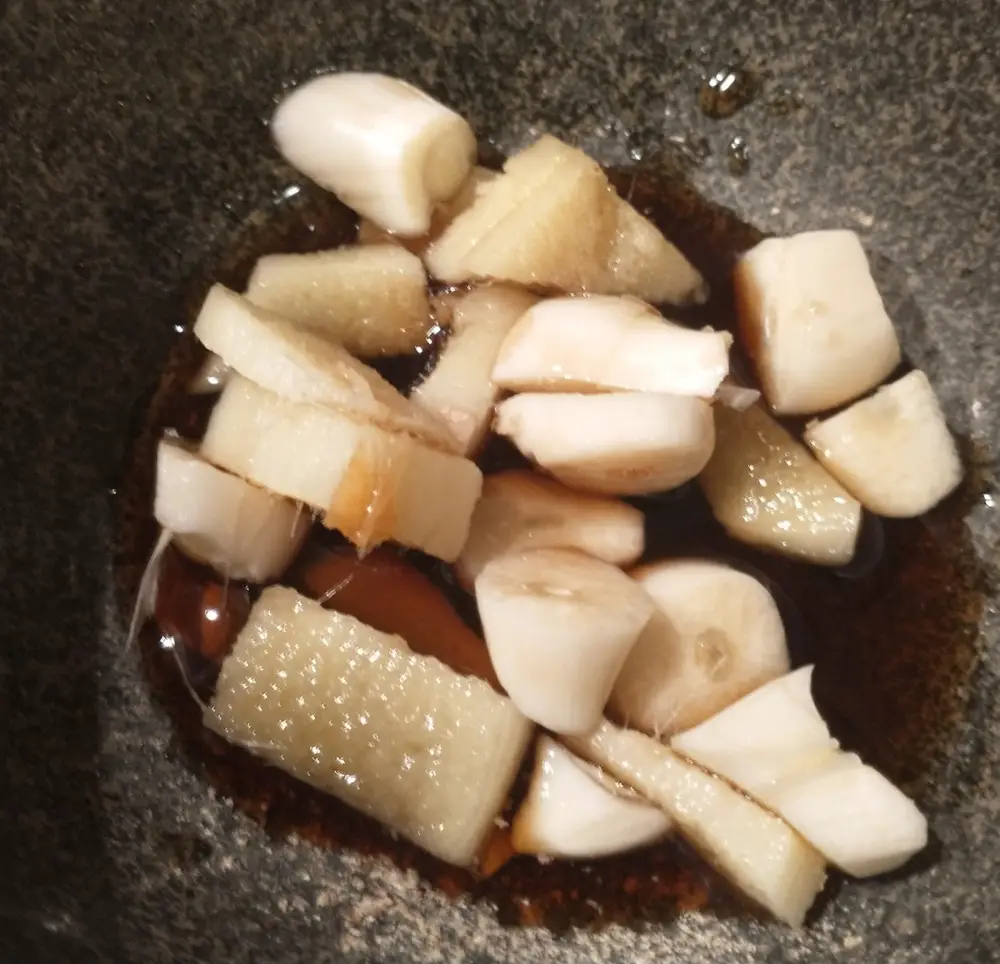
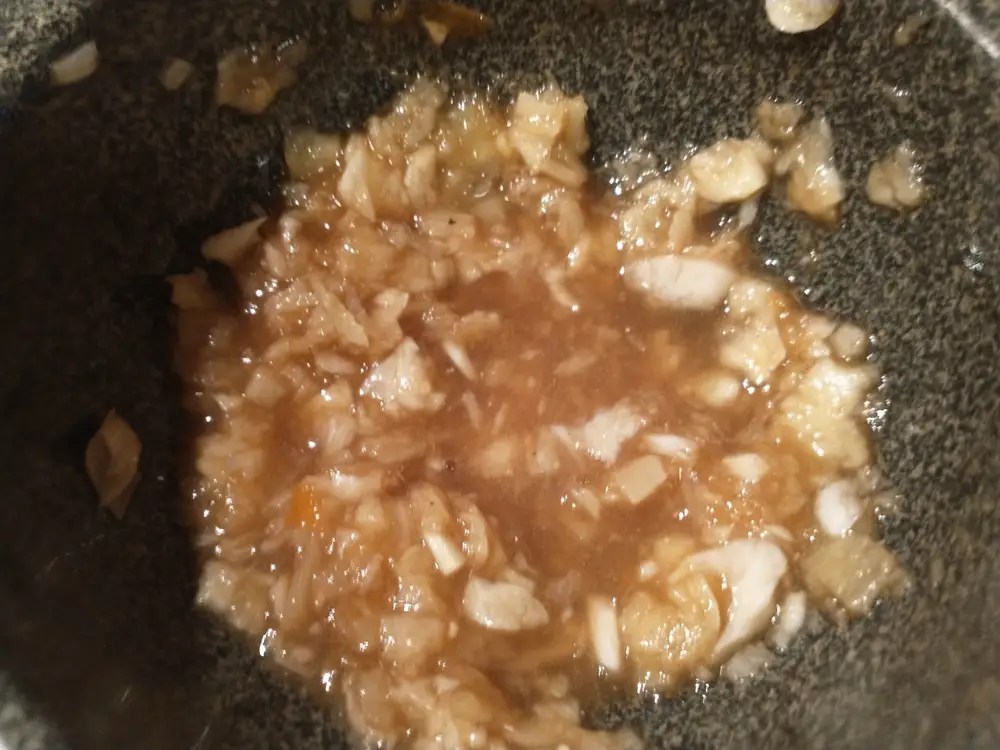
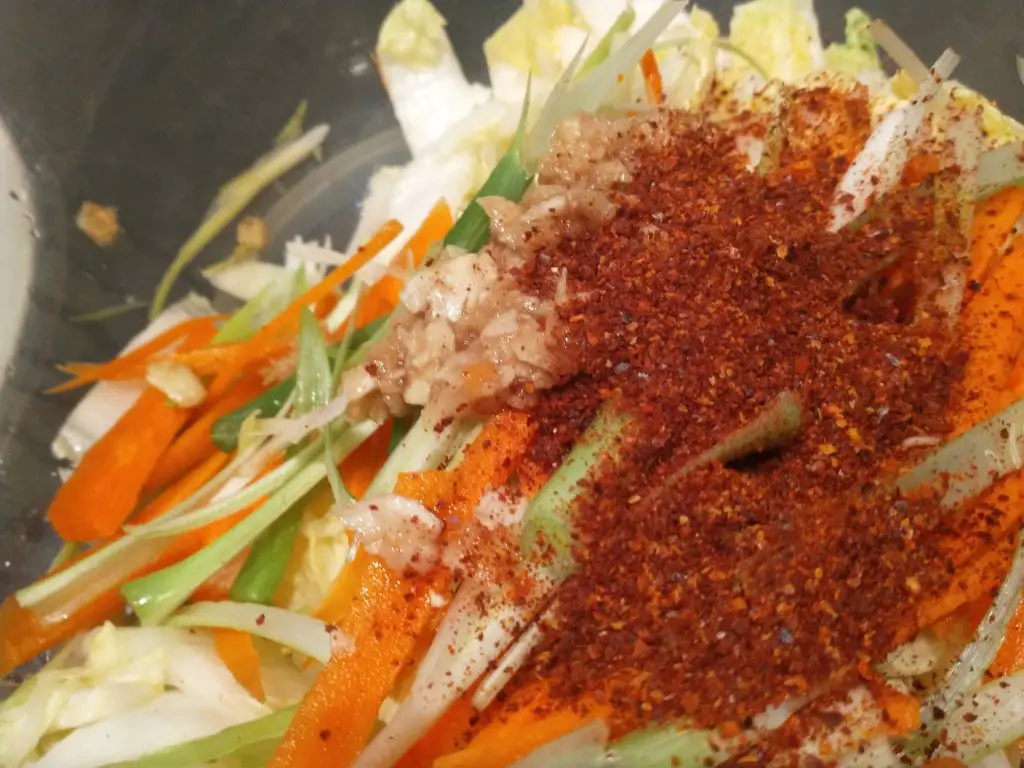
Put the garlic, ginger and fish sauce into a pestle and mortar and grind them together to create a paste. It will have quite a liquid consistency.
Add the vegetables to the cabbage.
Pour over the garlic-ginger-fish sauce paste and sprinkle the chilli powder over the cabbage and veg. Mix well. We find it’s easiest to do this with our bare (clean) hands.
Then you need to pack the jar. Pick up handfuls of the cabbage mix and place into the jar, pushing down to squish it in – really pressing hard to make sure there aren’t any air gaps.
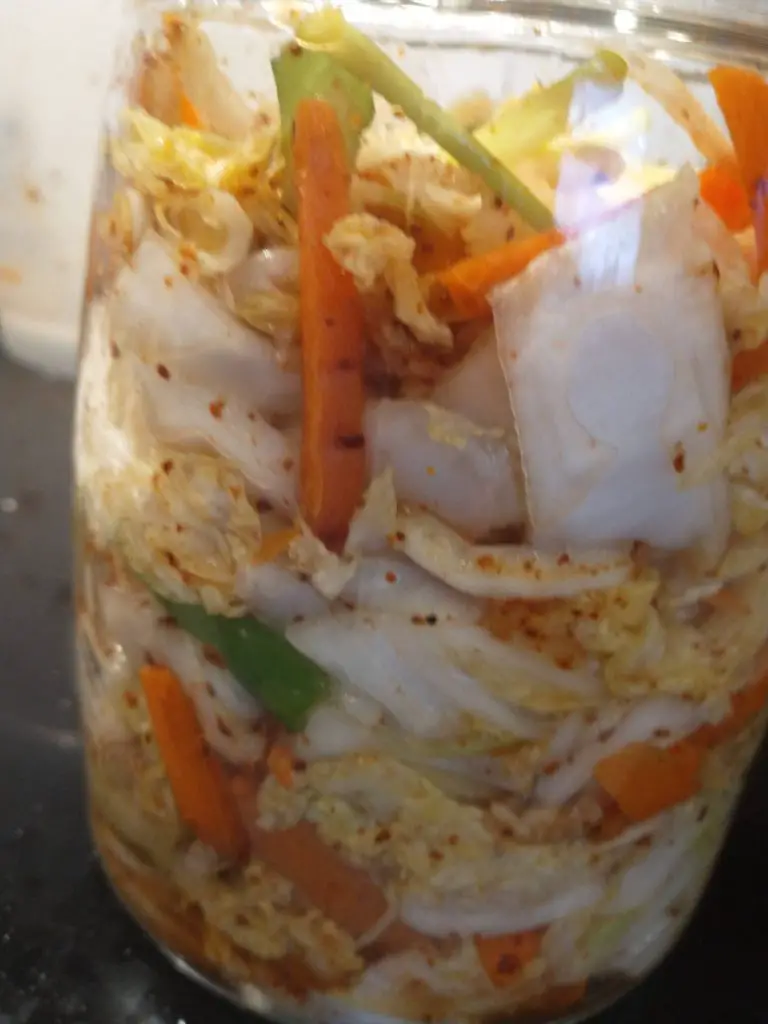
You should try and aim for minimum headroom at the top of the jar to reduce the air space. You also want to make sure the cabbage mixture remains pressed down. You can get all sorts of weights but a glass dessert ramekin type container (e.g. Gu) works well or, cheaper and less calorific than eating a chocolate dessert, fill a small plastic bag with water, tie at the end and squish into the top of the jar.
Close the jar and place the jar on a deep plate or in a bowl to catch any liquid escaping.
Check The Ferment Over Several Days
Over the next few days the cabbage will begin to ferment. The time it takes will depend on how warm the ambient temperature is. You’ll see a liquid start to form in the jar and cover the cabbage and the lactic acid bacteria will start to form lactic acid and C02. It is because of the C02 that you need to keep an eye on your ferment. If you are using a specific fermentation jar you should be fine. If you are using a conventional jar you will need to ‘burp’ your ferment, at least once a day. Open the lid – very briefly – and close immediately, just to let the C02 out. This will ensure that the pressure doesn’t build up. If you don’t burp there is a risk of the jar exploding. We’ve never had a glass jar break but there have been numerous occasions when I’ve burped the jar and ended up with a brine shower!
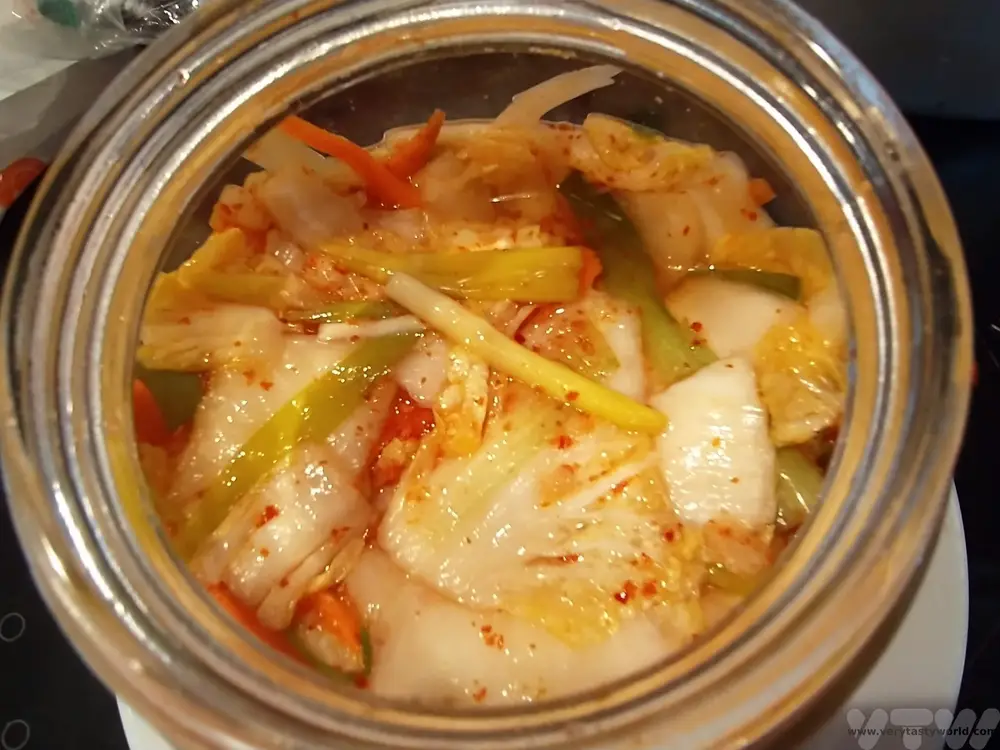
The kimchi should be ready within a week to 10 days. You can leave it longer if you wish and this will ensure further development of the flavours.
When the kimchi is ready you can store the jar in the fridge or decant it into smaller jars (just go through the process of cleaning them, then adding boiling water and letting them dry). The kimchi will store in the fridge for months as long as it is airtight.
Beware
The two greatest issues with fermenting food is risk of explosion (which can be reduced/eliminated if you use the right equipment) and mould. When the ferment is exposed to air there is the potential for mould to develop. If you open your jar and see fuzzy mould of any colour you should discard the ferment. It’s heart-breaking but the safest thing to do as the mould could make you very ill. (It’s not advisable to scrape off the mouldy bits – by the time the fuzz has appeared the spores will have permeated the whole jar.) Obviously this creates something of a dilemma – you need to open the jar to burp but don’t want to let the air in. So, the key is to open the jar very quickly to release pressure then close immediately. With some types of fermentation jar you don’t need to worry.
Some Notes On Fermentation Equipment
You don’t need too much specialist equipment to ferment food. A kilner jar with a metal clip lid ‘self-burps’ – it allows CO2 to escape whilst not letting air (which can contain mould spores) in. You can get various fermentation vessels in varying sizes.
Salt should not have anti-caking properties.
You can get chilli flakes or gochujang in Asian supermarkets.
- RECIPE Oyakodon Donburi
- Zero Waste Recipes Before Your Holiday
- RECIPE: Vegetable Biryani Tamil Nadu Style
- RECIPE: Vegan Wild Garlic Pesto
- Recipe: Venetian Pasta Sauce
- RECIPE: Biryani Raita Recipe
- RECIPE: How to Make Costa Rica’s Gallo Pinto
- Recipe: Japanese Simmered Pork Belly – Buta no Kakuni
- RECIPE: How to Make Umeboshi
Please note that this post contains affiliate links. If you click the link and decide to make a purchase we will earn a small commission, at no cost to you, which helps towards running this site.
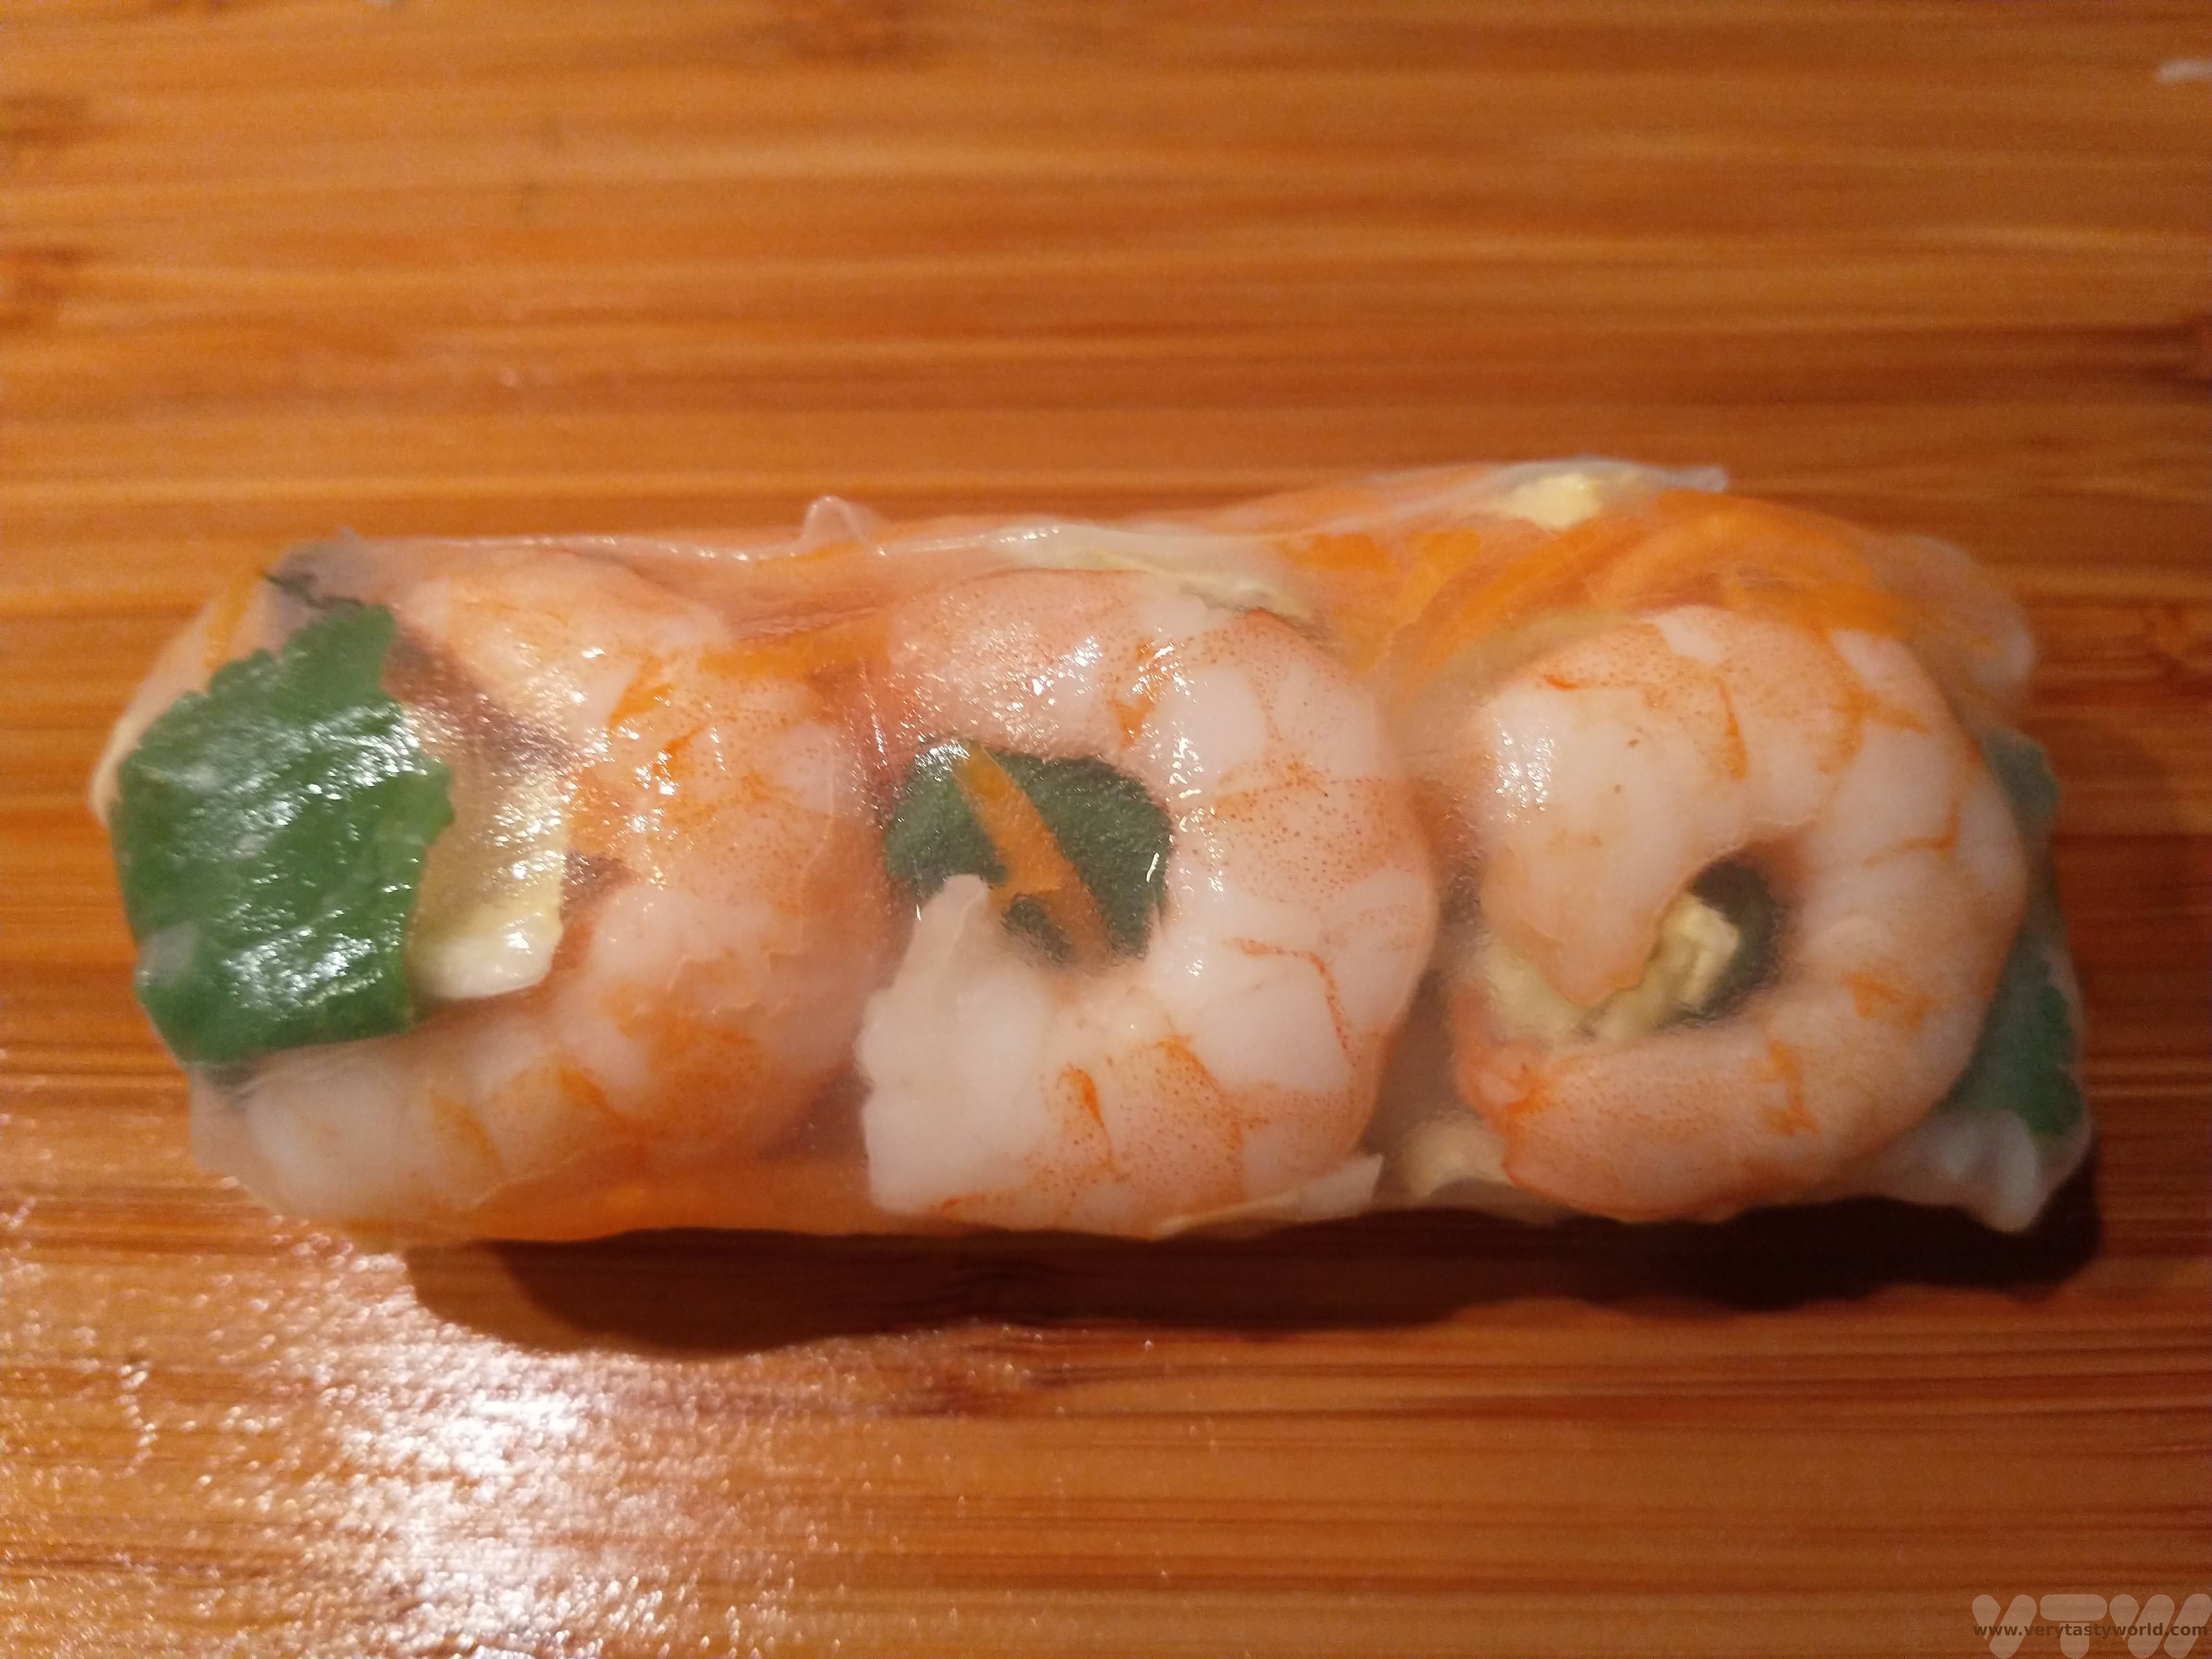
RECIPE: How to Make Vietnamese Spring Rolls
How to make Vietnamese Spring Rolls Summer Rolls
Vietnamese cuisine is amongst the most delicious in the world. It is also amongst the prettiest. We have a Vietnamese spring roll recipe. While most people think of spring rolls as being deep-fried, gỏi cuốn are actually served cold – at room temperature. In Western countries they are referred to as spring rolls, salad rolls or even summer rolls. They have slightly different names depending on the region of Vietnam: they are gỏi cuốn, meaning salad rolls in the south and nem cuốn in the north. Apparently they are called “rice paper” rolls in the central regions of the country, which is a simple description but accurate.
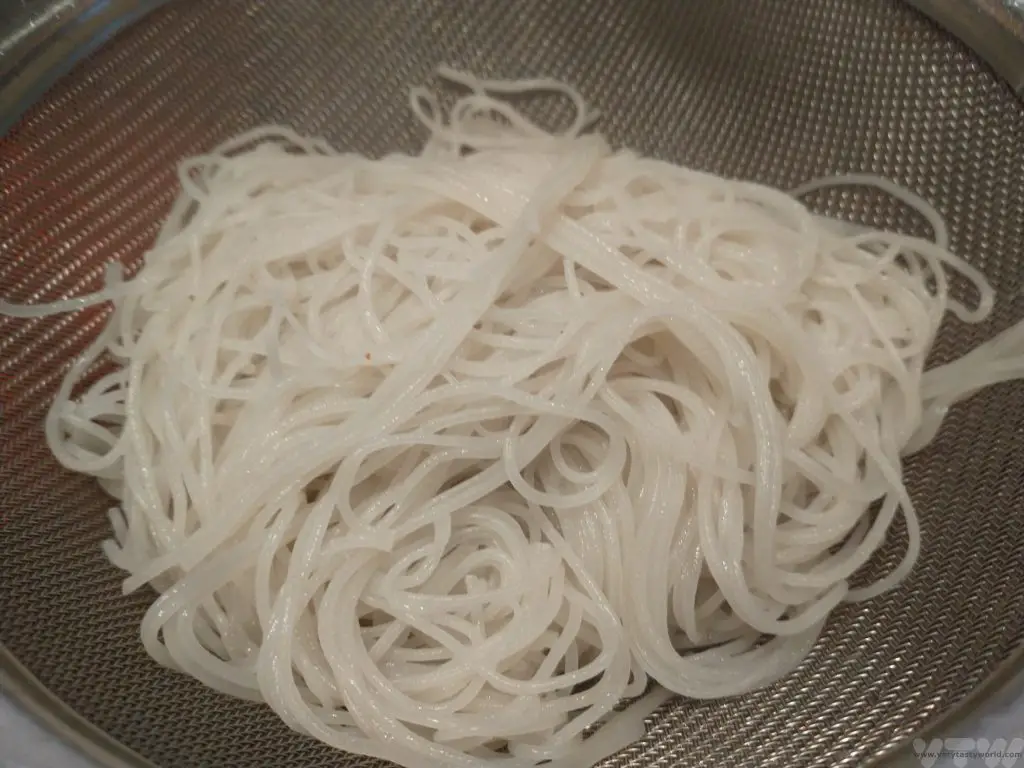
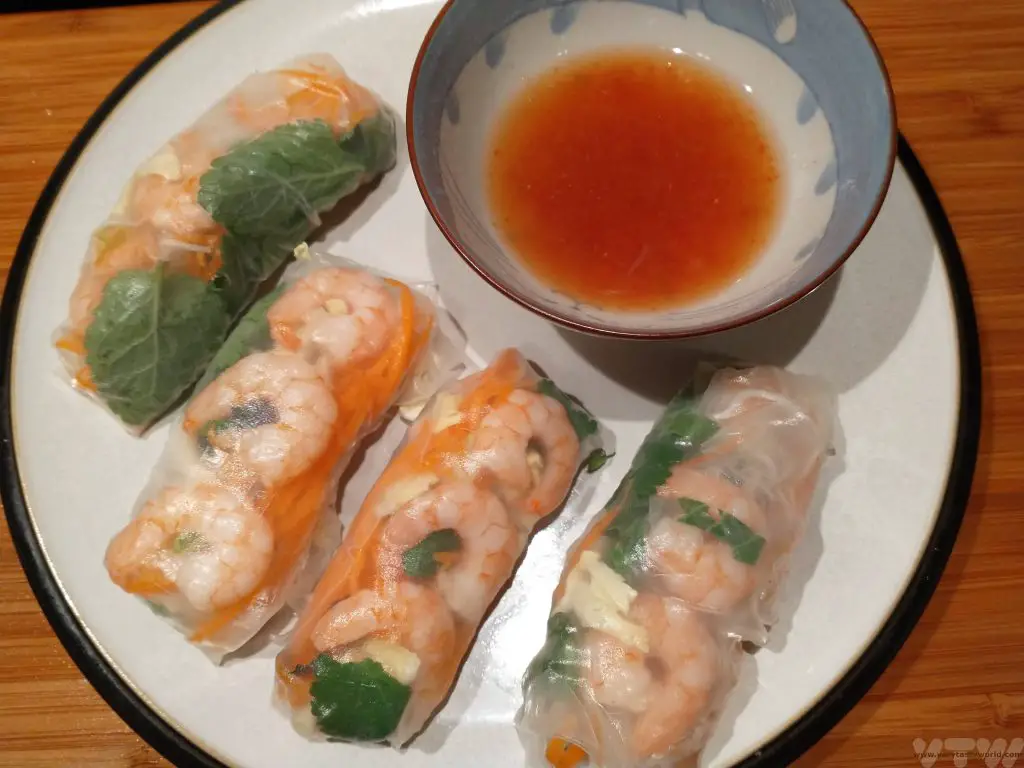
Gỏi cuốn comprise cold vermicelli noodles, salad, protein such as prawns or pork and herbs all wrapped up in rice paper, known as bánh tráng. They are usually served with a dipping sauce. Unlike fried spring rolls, these are really fresh and, like so much of Vietnamese food, full of flavour.
Vietnamese Spring Roll Recipe
- Makes 12 rolls
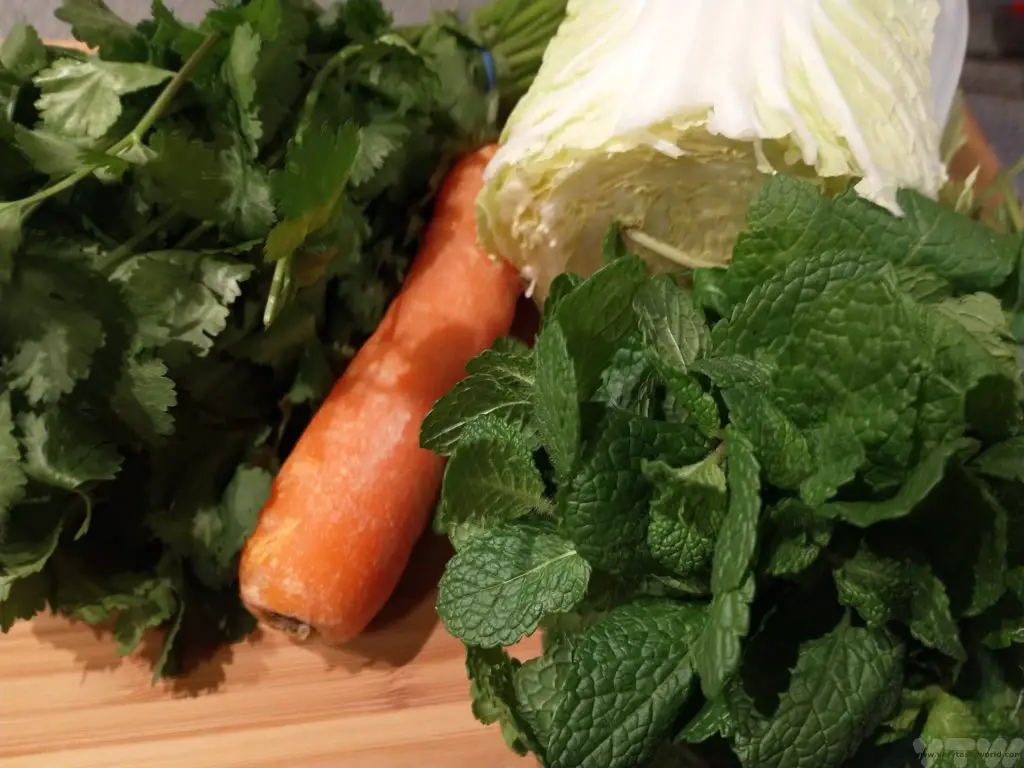
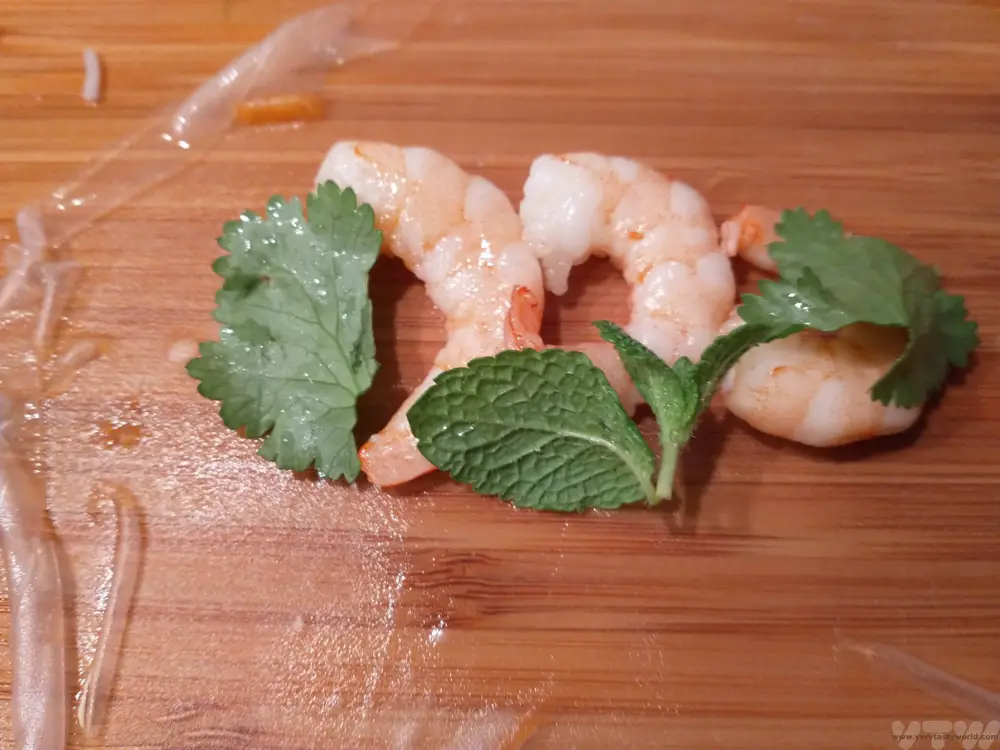
Ingredients
For the Rolls
Rice paper wrappers (you can get these from Asian supermarkets)
100g vermicelli rice noodles
36 king prawns (3 per roll, or one more each if you are feeling greedy), cooked and peeled.
2 carrots
Shredded lettuce or cabbage
Handful of fresh mint and/or coriander (or a herb of your choice)
For the Dipping Sauce
2 tbs sweet chilli sauce
Juice of ½ a lime
Splash of fish sauce (or soy sauce for vegetarians)
 |
 |
How To Make Vietnamese Spring Rolls Method
Prepare the noodles. Pour boiling water over the vermicelli and leave for 5-7 minutes until they are soft. Drain and allow to cool.
Prepare the filling. Shred the lettuce/cabbage.
Finely slice the carrot. There is a tool that you can buy easily in South East Asia which is a little like a vegetable peeler that juliennes the carrot. If you don’t have one of those you could use a mandolin. And if you don’t have a mandolin a grater will do just fine.
The packaging on the paper skins – and many other recipes – states that you only have to soak them in warm water for a couple of seconds. We found that actually some of them need quite a bit longer soaking time. (And some just didn’t go soft at all- those should be discarded, these are not crunchy rolls and will not only not taste very nice, they will have a horrid texture and be really difficult to roll.)

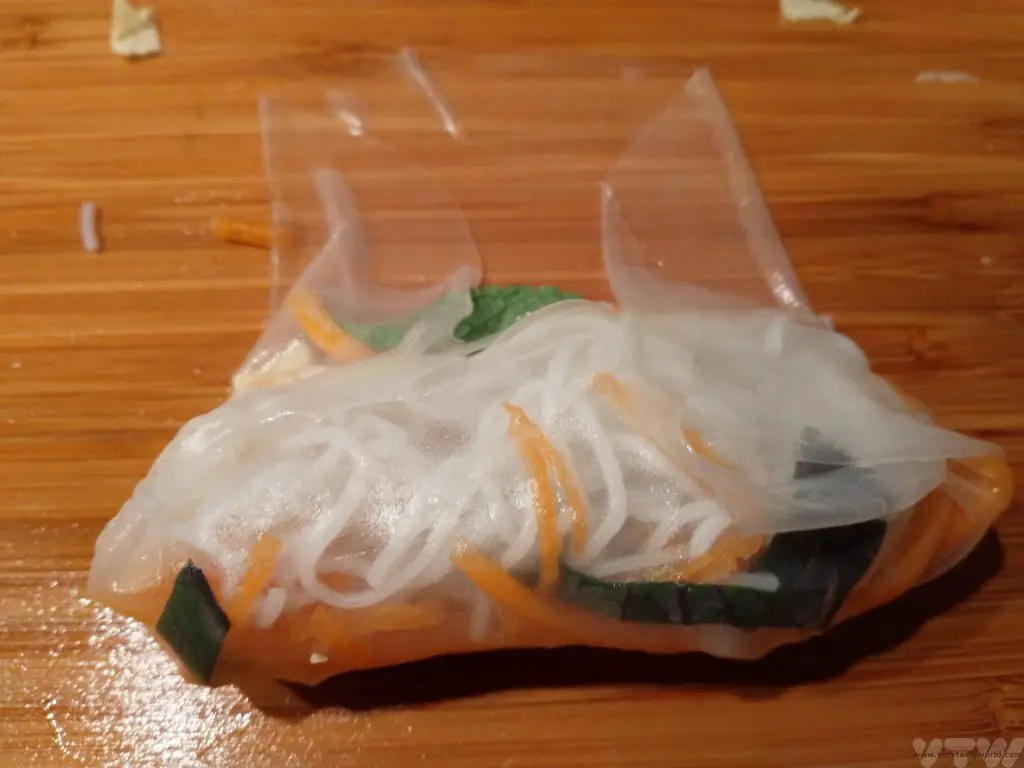
When the paper is super-soft and totally translucent take it from the water and lay it flat on a clean surface. The skins are much more robust than they appear.
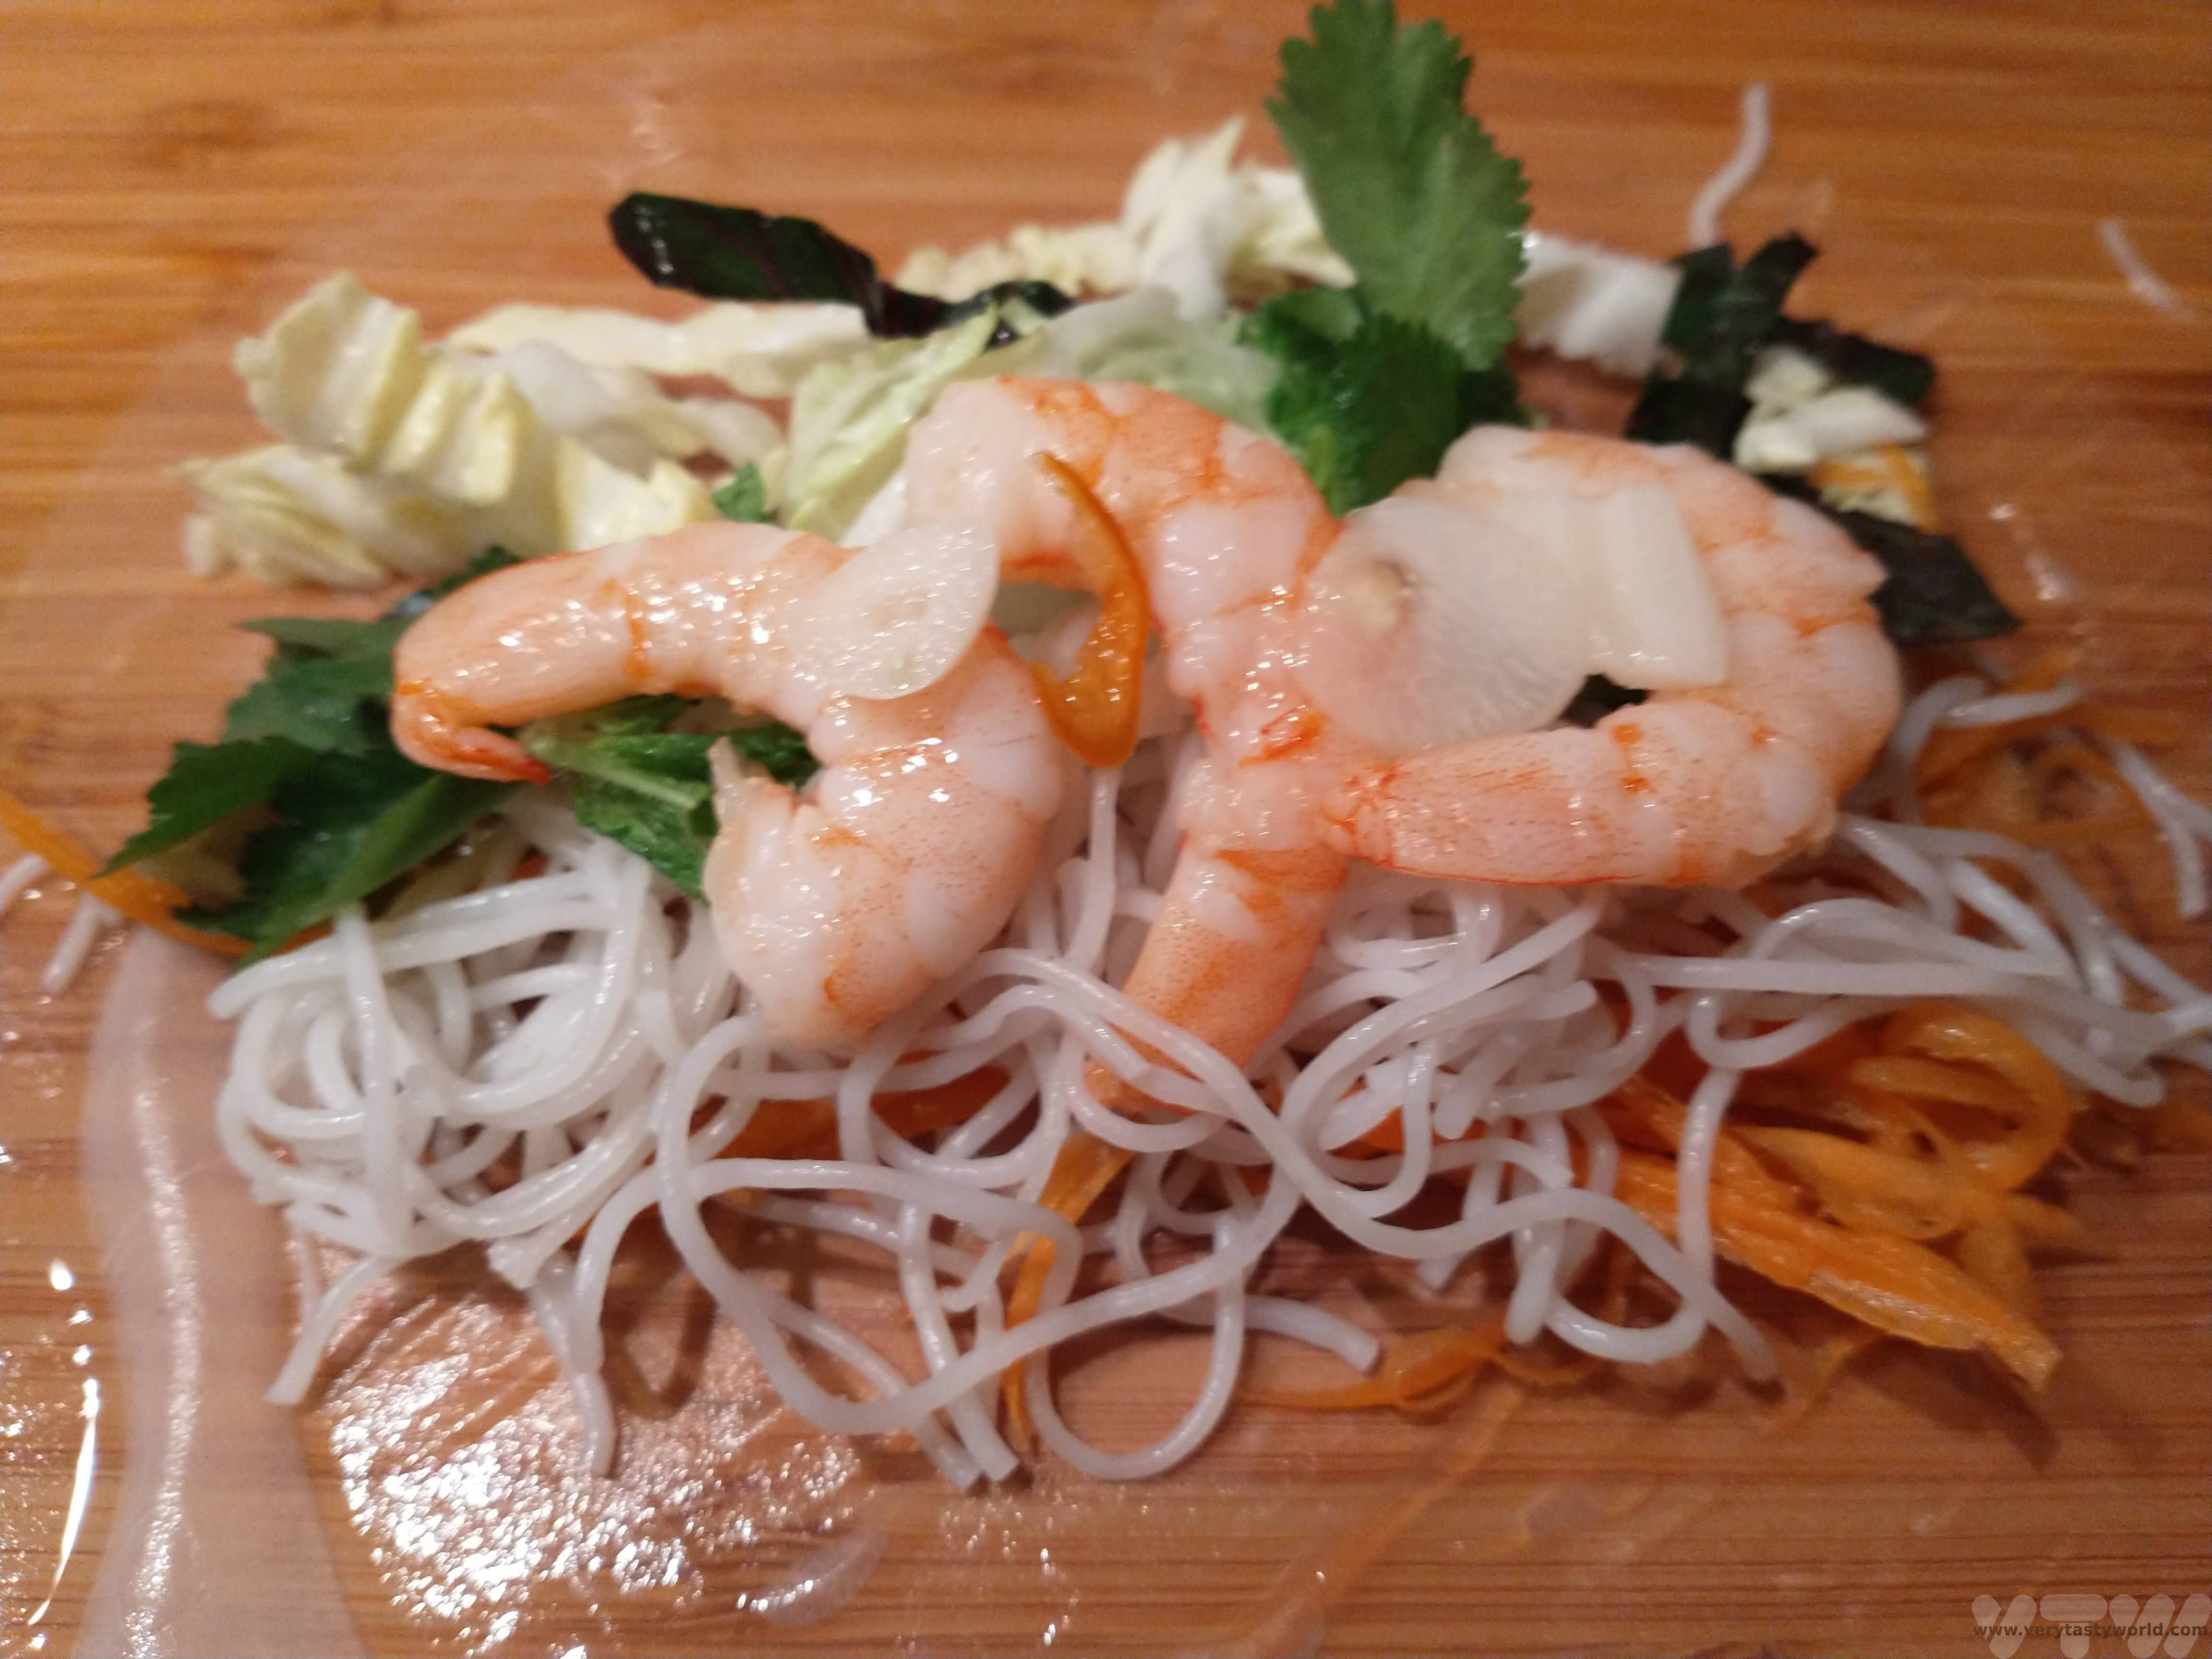
Start placing your filling onto the paper. You want to place it around 1/3 to 1/2 of the way up from the bottom of the paper and leave about 2 cm space on each side. Because the papers are partially transparent you can take your time to make the rolls look pretty. To do this make sure that the colourful items such as the prawns, herbs (try to keep the leaves whole for extra prettiness) or carrot are on the bottom of the pile, so that they can be seen through the wrapper.
Add a small handful of vermicelli, remembering that less is more – you don’t want to overstuff the rolls.
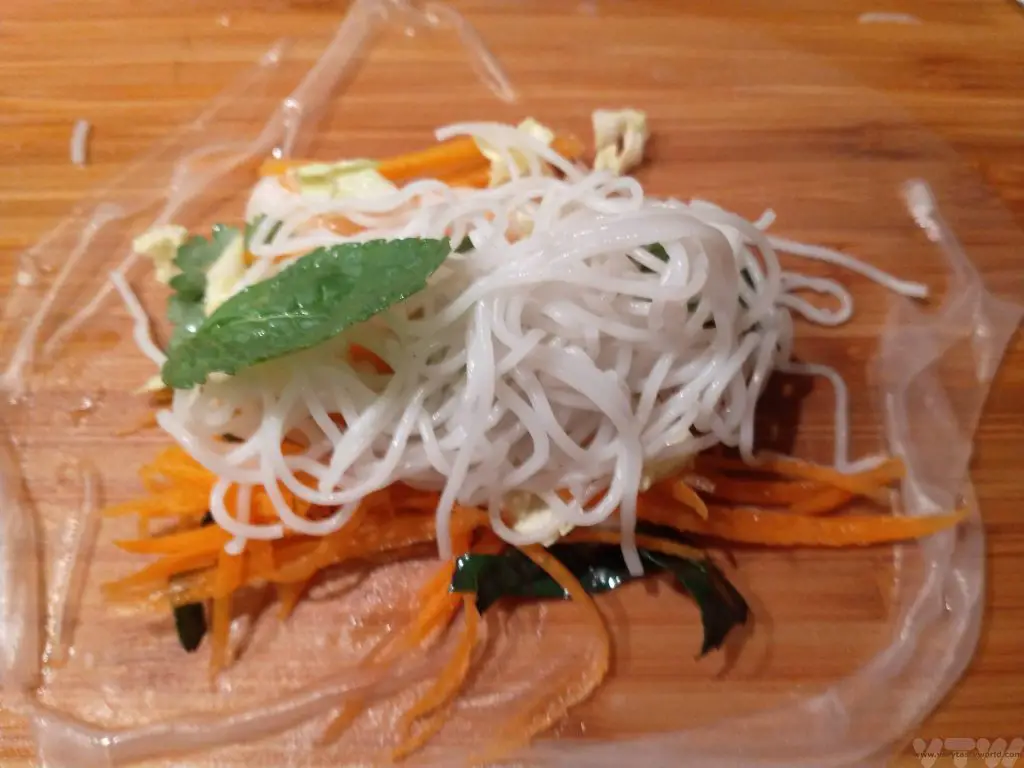
Variation: We also added some slices of home-made pickled garlic to some of the rolls to add an extra zingy flavour.
Now the tricky bit: the rolling of the rolls. It’s not as difficult as it might appear. Firstly, pull the filling together and fold the bottom of the paper over it, pressing gently into the filling so that the wrapping is tight.
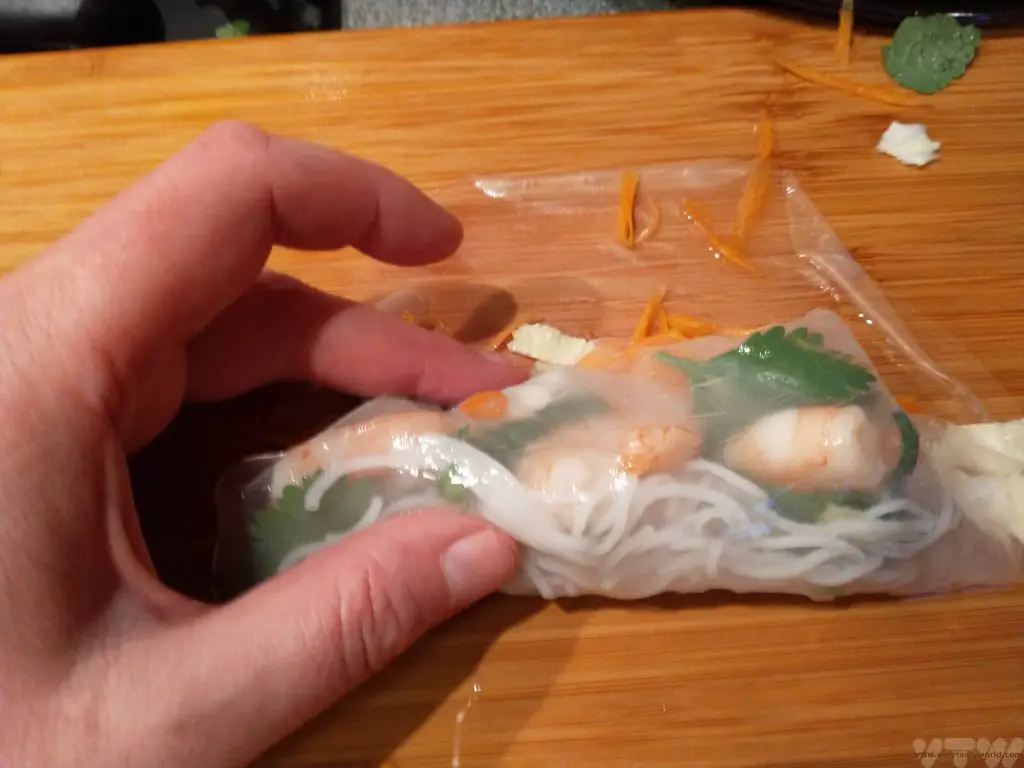
Next, fold each side in towards the centre of the wrapper to form a little parcel.
Then roll forwards to complete the spring roll, trying to keep the filling inside as tight as possible. The paper is soft so will stick at the end easily. When the rolling is completed, keep the seam on the underside which will also help it stick.
There are a variety of dipping sauces. A popular one is hoisin and crushed peanuts but we made a sweet chilli dipping sauce.
We used sweet chilli sauce, half a lime and a splash of fish sauce to give us that characteristic sweet, sour, salt and spice flavour. Just mix the ingredients together in a bowl. Then it was simply a case of serving the rolls, dipping and enjoying.
How to make Vietnamese spring rolls summer rolls
These are some of the tools and ingredients we used to make the summer rolls:
 |  |
|  |
Please note that this post contains affiliate links. If you click the link and decide to make a purchase we will earn a small commission, at no cost to you, which helps towards running this site.

- A One Day Hanoi Itinerary

- Mekong Meanderings

- A Chiang Rai Temple and A Country Retreat

- A Chiang Mai Tour in Northern Thailand

- Sunrise at Angkor Wat and Other Temples

- Mekong Delta River Cruise in Vietnam

- RECIPE Oyakodon Donburi
- Zero Waste Recipes Before Your Holiday
- RECIPE: Vegetable Biryani Tamil Nadu Style
- RECIPE: Vegan Wild Garlic Pesto
- Recipe: Venetian Pasta Sauce
- RECIPE: Biryani Raita Recipe
- RECIPE: How to Make Costa Rica’s Gallo Pinto
- Recipe: Japanese Simmered Pork Belly – Buta no Kakuni
- RECIPE: How to Make Umeboshi
RECIPE: Vietnamese Pickled Garlic
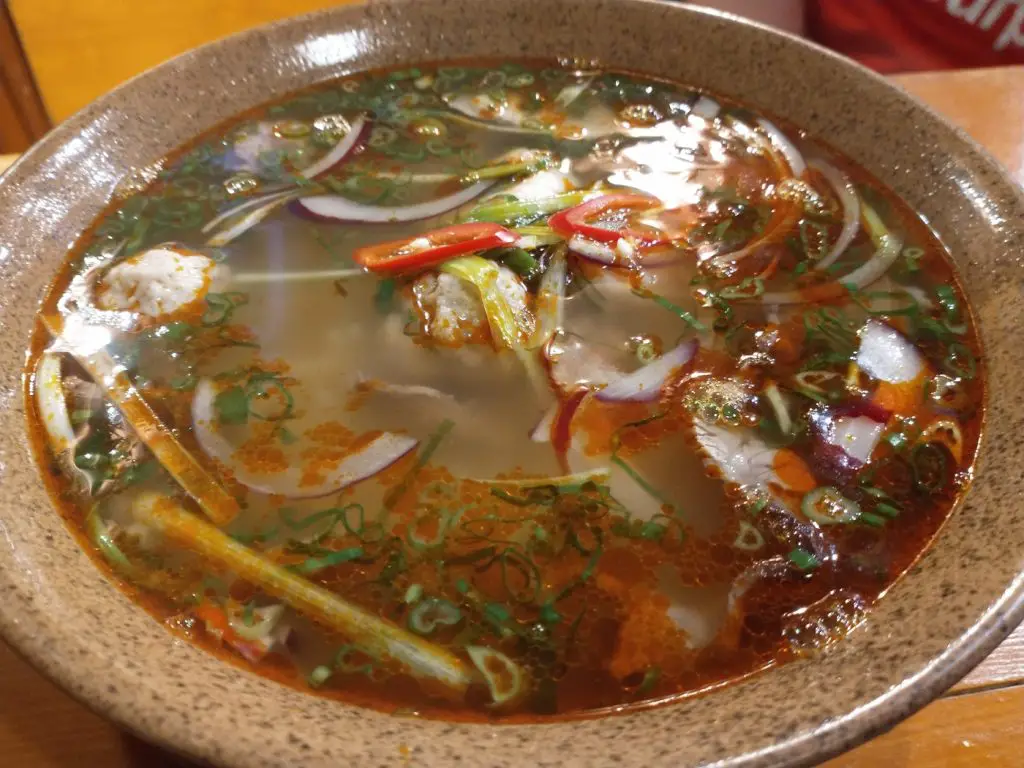
We were in our favourite local Vietnamese restaurant recently and, while eating a delicious bowl of Bún Bò Chân Giò Huế – Beef, Pork Hock, Meat Balls in a vermicelli noodle soup (Bún means vermicelli and the dish originated in Huế, a coastal city in central Vietnam that used to be its capital), the restaurant staff brought out a jar containing pickled garlic to be used as a condiment. It was delicious – it added another dimension to the dish – a zap of sour garlic with just a hint of spice from the chilli infused vinegar. It’s a really popular condiment and apparently some of the restaurant’s customers will devour the whole jar when it’s brought to the table. We figured it probably wasn’t too difficult to make ourselves so we did some experimenting and, indeed, it’s a really easy recipe.
We had grown a bunch of garlic earlier in the year – planted in the late autumn we harvested it mid-summer. We also have a habit of keeping empty jars for preserving purposes, so had most of the ingredients and equipment to hand. It’s very flexible to make and the quantities in the recipe really depend on the size of your container. You will need a clean empty jar – you can use any old jar. Just wash it out thoroughly and fill it with boiling water, which will make sure it’s clean enough to store pickles, then let it cool down. Our jar was around 300 ml capacity.
Vietnamese Pickled Garlic Recipe
Ingredients
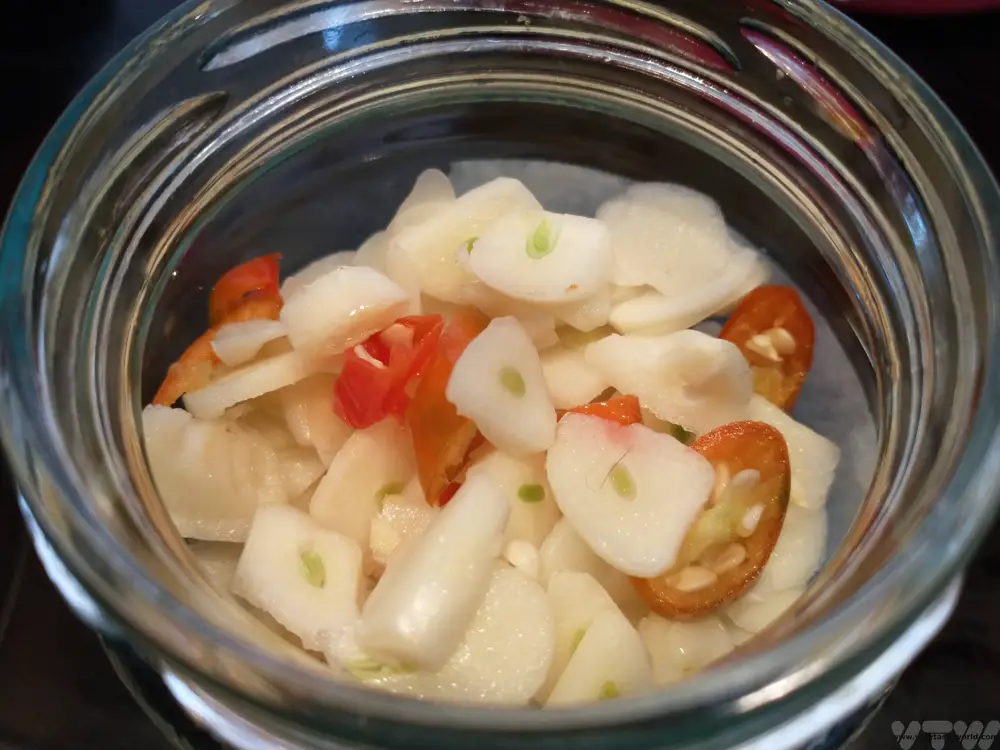
Several bulbs of garlic (the quantity will depend on how large the bulbs are and how finely you wish to slice it)
Two red chillies
White vinegar (you can use rice vinegar if you are feeling decadent but the garlic has a strong flavour and we feel it would dominate the subtle flavour of the rice vinegar)
2tsp white sugar
1/2 tsp salt.
Method
Peeling the garlic is the most time-consuming part of this job. Garlic is one of the stickiest substances known to human kind but you don’t realise this until you start peeling lots of it.
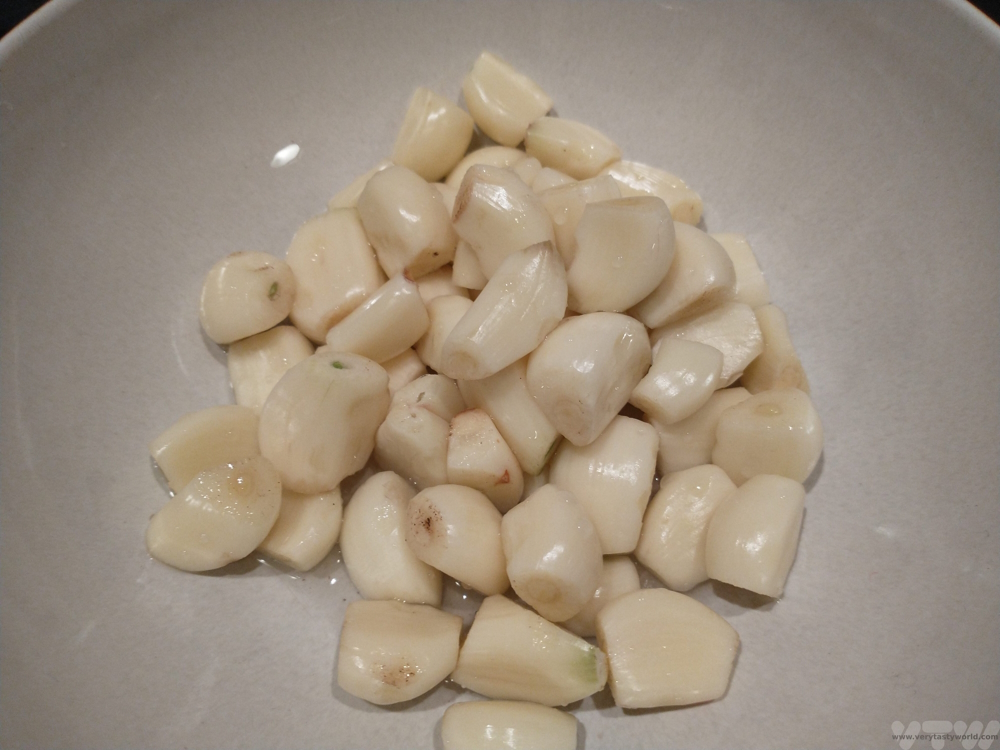
Once peeled, you have a number of choices. You can keep the garlic cloves whole, you can slice them with a knife or you can slice them wafer-thin using a mandolin. We prefer the very thinly sliced garlic because when you add it as a condiment the flavour enhances rather than dominates the food.
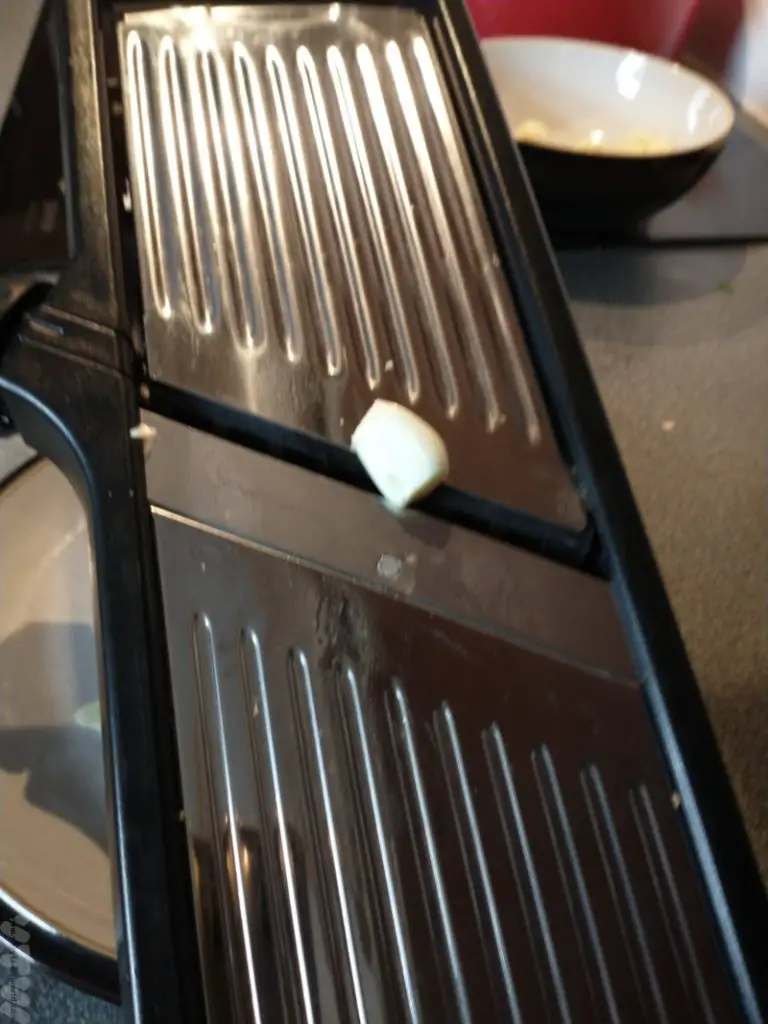
If using a mandolin, be really careful. Being clumsy cooks, we use a knife glove which means that you can slice the garlic very close to the blade without risking sliced fingers. Bloody garlic pickle is not a good idea.
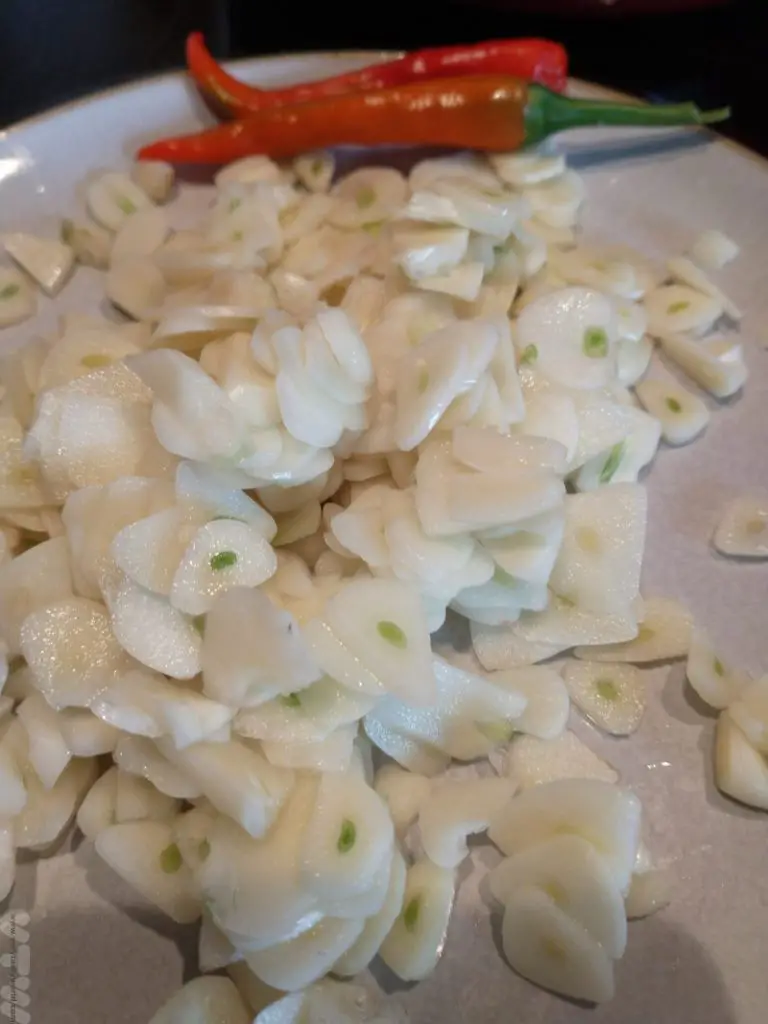
Place the sliced garlic, slice the chillies and add everything to the jar.
Top up with the vinegar. Add the sugar and salt.
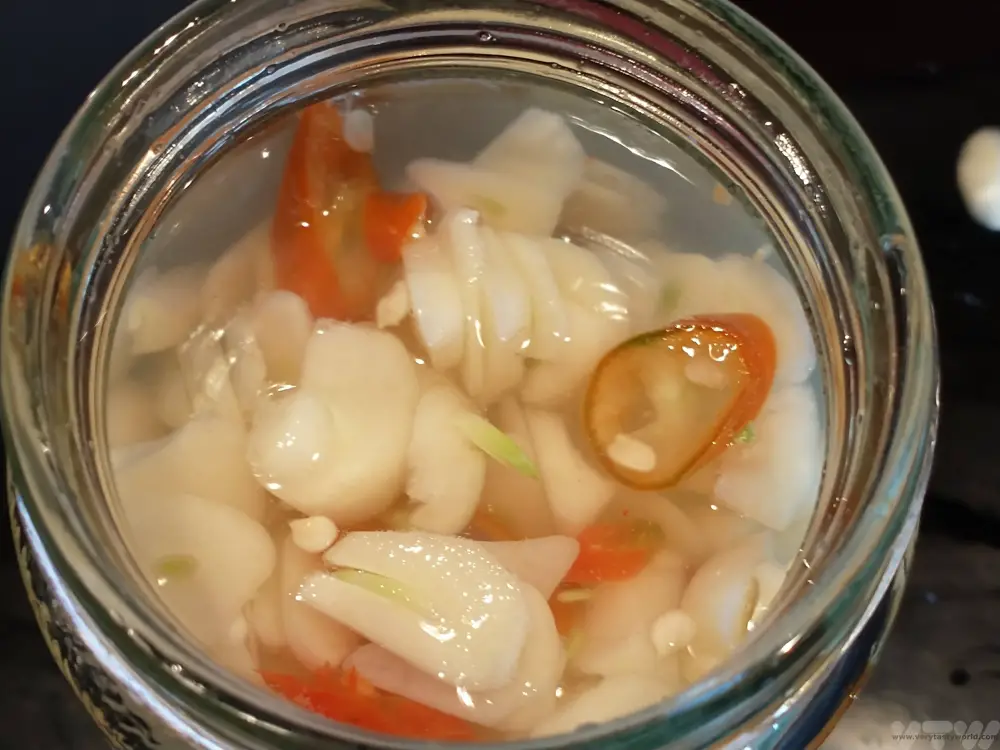
Shake the jar.
Leave to infuse for at least a week. The pickled garlic will last for months… but is likely to get scoffed much sooner. Also, because the vinegar is acidic you can add additional sliced garlic or another chilli as you use up the existing condiment.
Although this dish goes really well with Phở and Bún Huế dishes, we’ve also used it to add a bit of zing to Vietnamese summer rolls.

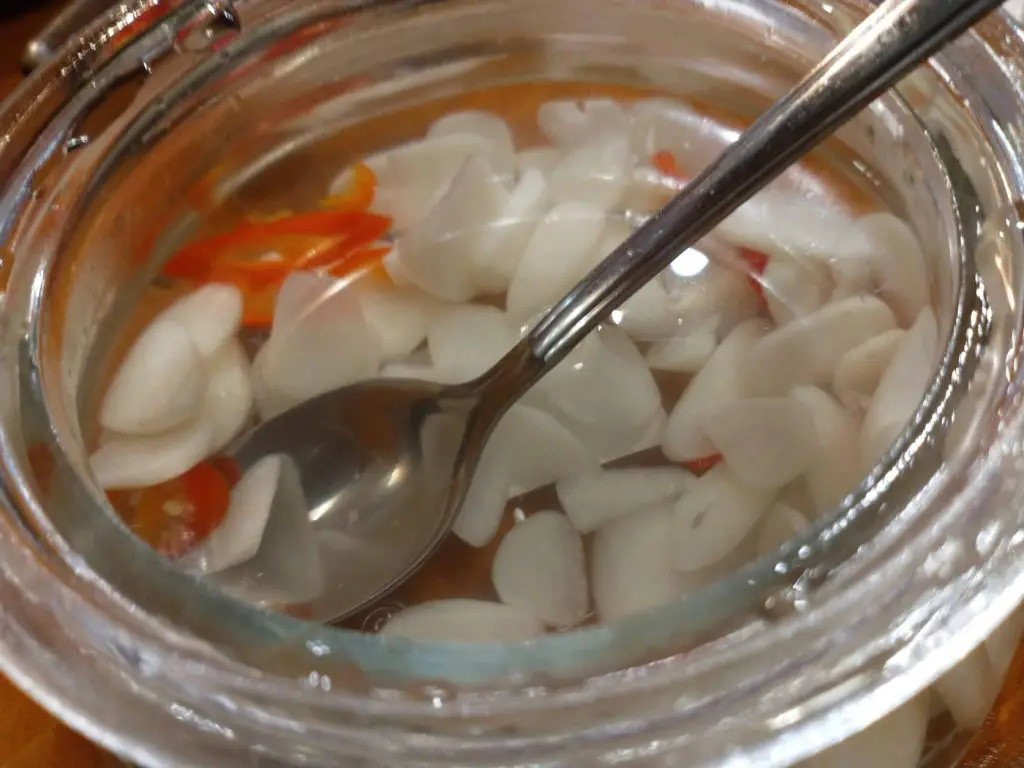
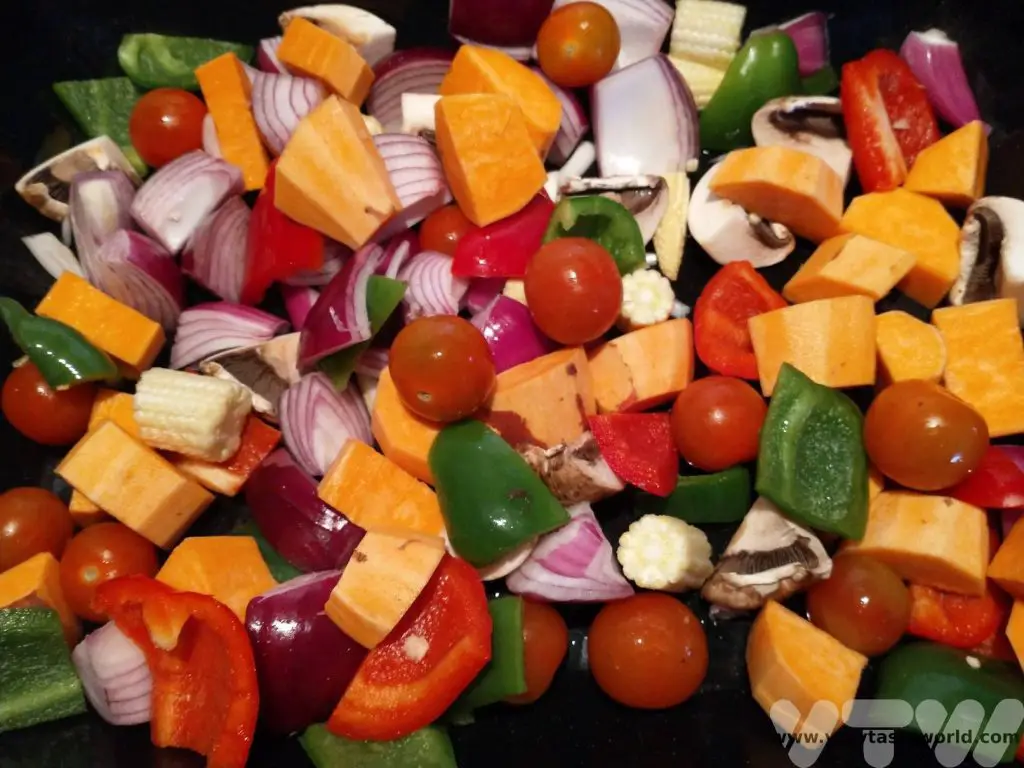
And this condiment isn’t just for Vietnamese cookery. We use this pickle to garnish soups – this is a home-made vegetable soup.

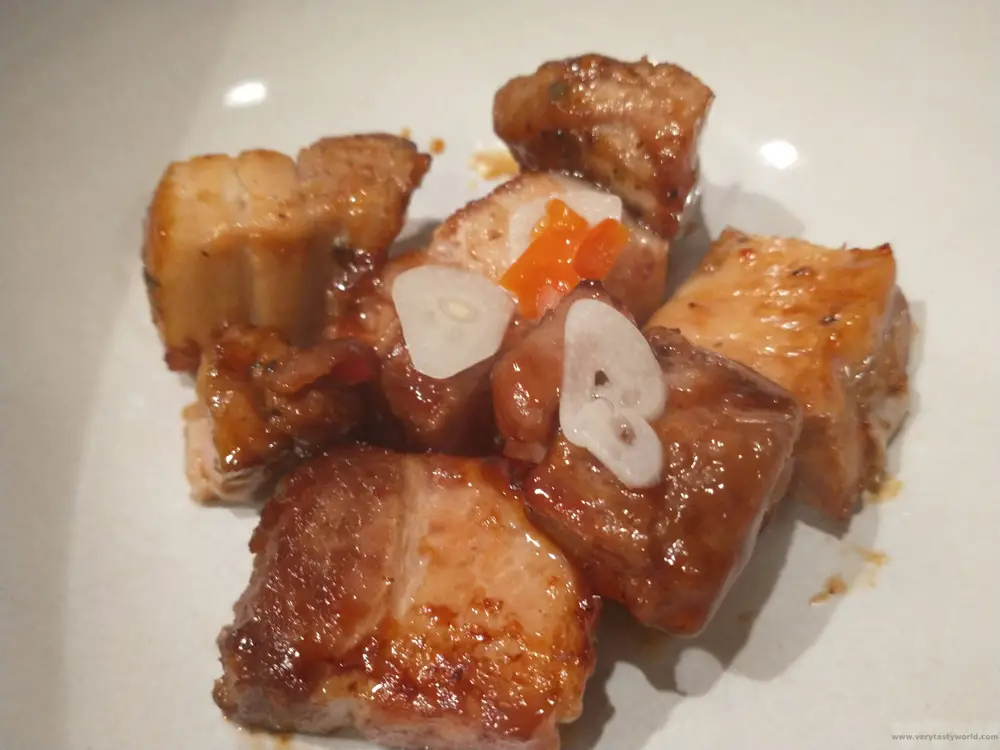
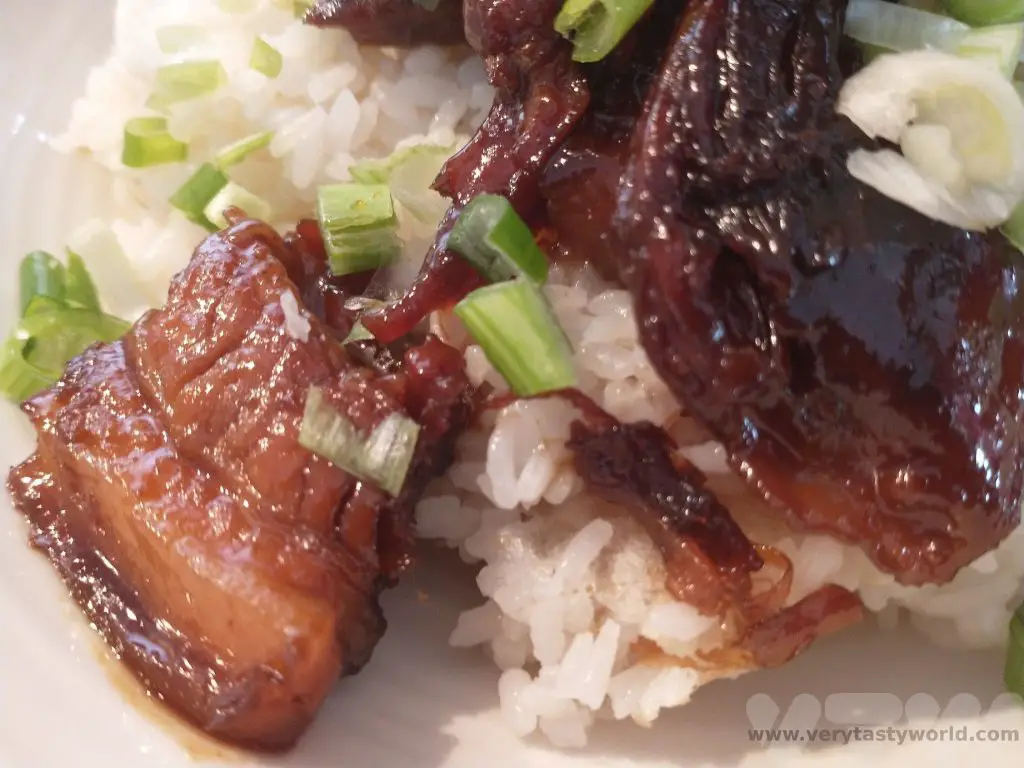
Or it can be used in a meat dish – these are glazed pork belly bites. Just a slice or two atop really cuts through the richness of the meat.


Related Posts You May Enjoy


- RECIPE Oyakodon Donburi
- Zero Waste Recipes Before Your Holiday
- RECIPE: Vegetable Biryani Tamil Nadu Style
- RECIPE: Vegan Wild Garlic Pesto
- Recipe: Venetian Pasta Sauce
- RECIPE: Biryani Raita Recipe
- RECIPE: How to Make Costa Rica’s Gallo Pinto
- Recipe: Japanese Simmered Pork Belly – Buta no Kakuni
- RECIPE: How to Make Umeboshi
Please note that this post contains some affiliate links. If you click the link and decide to make a purchase we will earn a small commission, at no cost to you, which helps towards running this site.
RECIPE – Kabocha Korroke – Pumpkin Croquettes
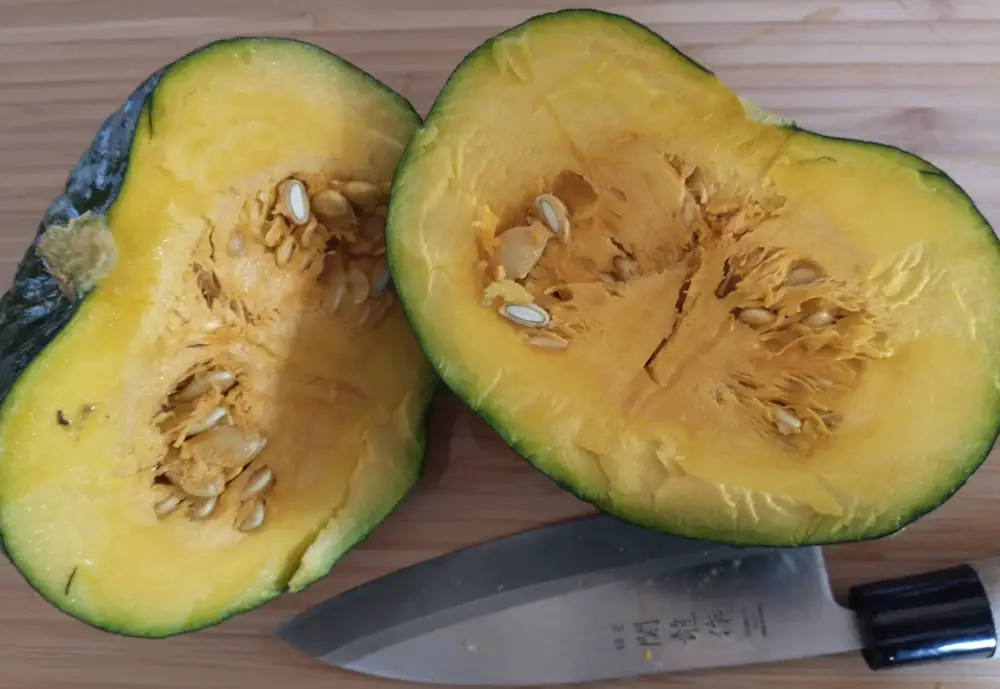
Kabocha is a type of squash, often called a Japanese pumpkin. It is small-medium in size (around 25-30cm diameter). Its flesh is bright orange which contrasts beautifully with its dark green skin. They are also pretty easy to grow. And it is a truth universally acknowledged that home-grown vegetables are always more delicious than shop bought ones.

This year we grew three of the beauties in our little garden and the very first thing we wanted to make once harvested, was ‘korroke’, a Japanese version of croquettes (the word is spelled in katakana, the phonetic alphabet used for words of international origin). It’s the sort of dish that you would find in a Japanese izakaya (a bar that sells alcohol and tasty snacks/small dishes). They are simple to make and utterly scrumptious. Here’s our recipe for Kabocha Korroke – Pumpkin Croquettes:
Ingredients For Pumpkin Croquettes
1 kabocha pumpkin. If you can’t get a kabocha, other squash can be used. Pumpkin might be a bit too squishy but something like a butternut squash would work well.
1 egg (vegans can use corn starch mixed with warm water in an approximate ratio of 1:3)
50g (approx) Plain flour
50g (approx) Panko breadcrumbs
Pinch of salt
Oil for frying/spray oil for baking
Tonkatsu sauce to eat with (Brown sauce will work well if you can’t get tonkatsu)
Method
Cut the pumpkin in half and then into slices. Remove the seeds (we kept loads of seeds and dried them so that we can sow them next year).
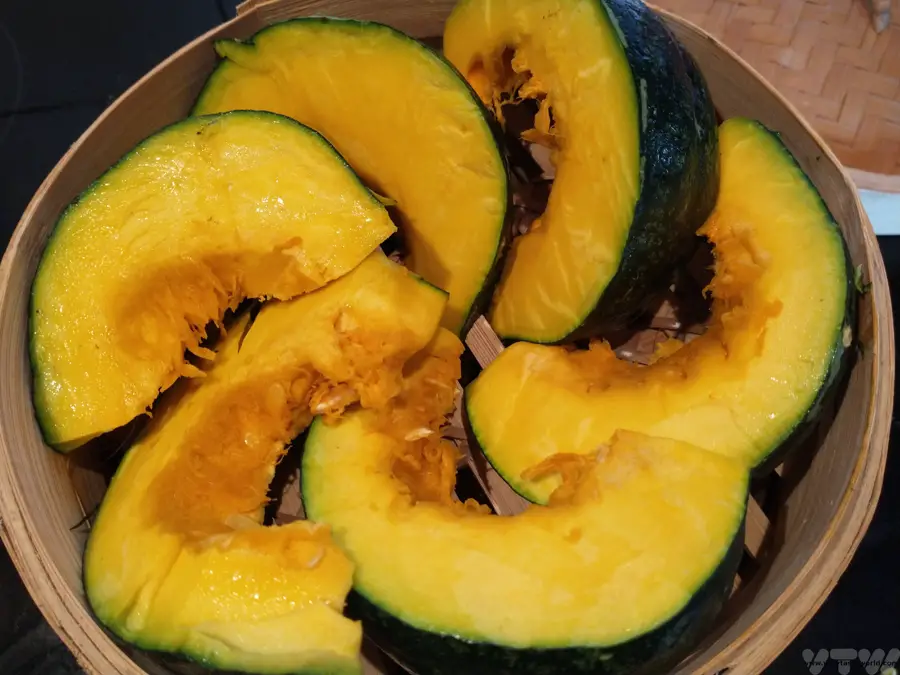
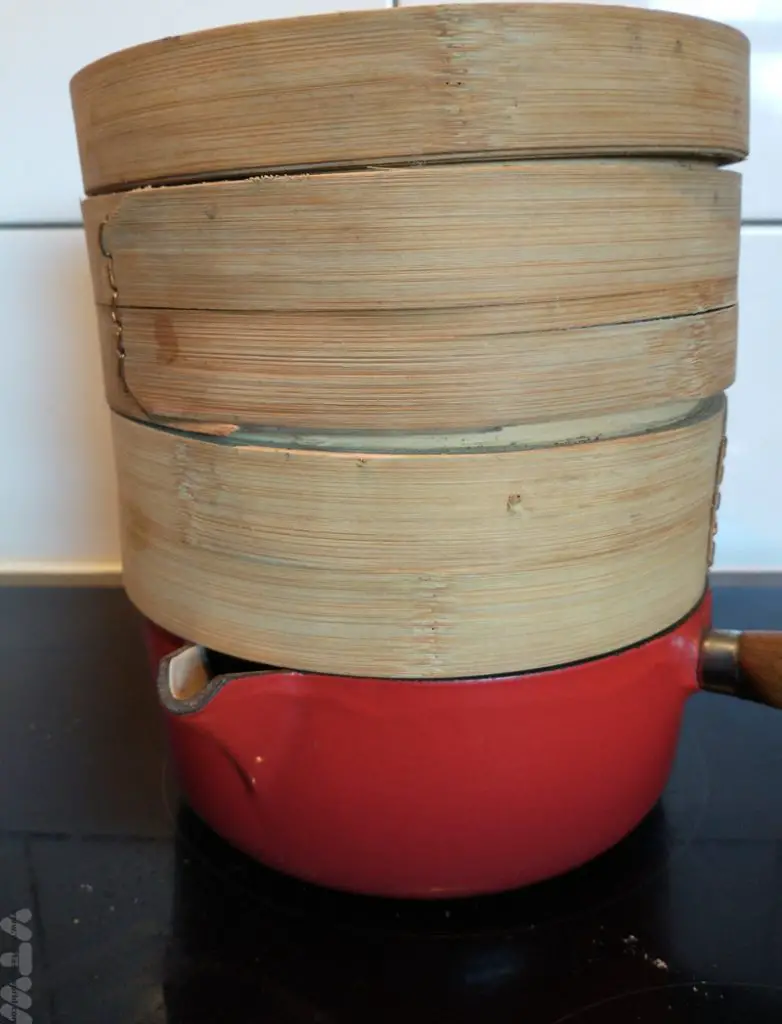
Arrange the slices into a steaming bowl. We tend to use the Asian style bamboo baskets as they stack very nicely and can just sit on top of a saucepan of boiling/simmering water.
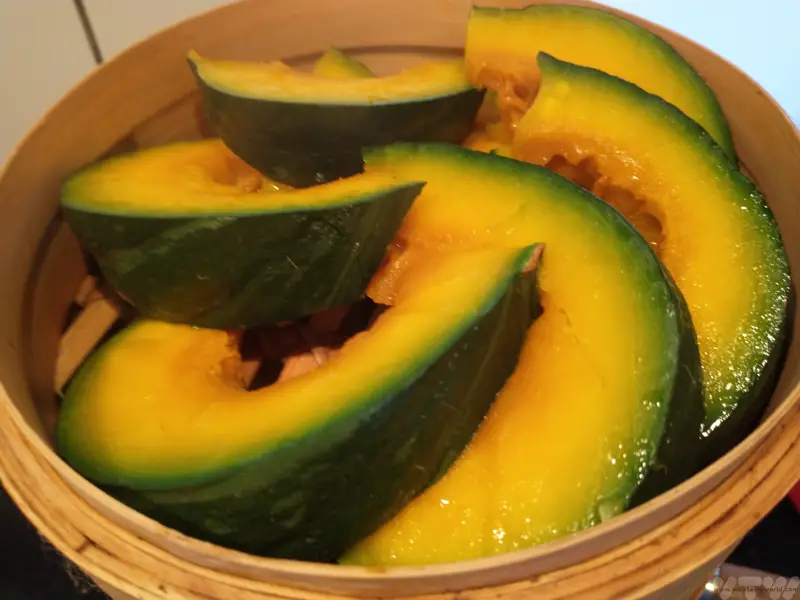
Steam for around 15 minutes or until the pumpkin is soft – a knife should easily sink into the flesh. (If you don’t have a steamer you can bake the pumpkin slices in the oven for around 40 minutes.)
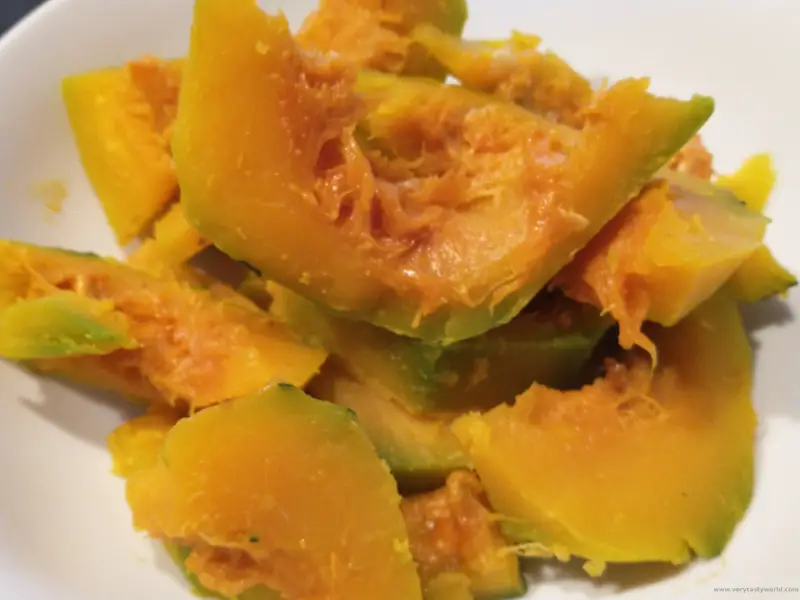
Although the skin of the kabocha is edible, for the purposes of the korroke it is best to remove it. (You can treat yourself to pumpkin skin snacks – once they have cooled down a bit – while you continue the preparation.)
Add a pinch of salt and mash the pumpkin using a potato masher. It is possible to add other flavourings at this stage if you wish. Some recipes add sautéed onions, others lashings of butter, yet others include shichimi (Japanese seven spice mix). We just seasoned with the salt, which brings out the natural flavour of the kabocha, in this instance.
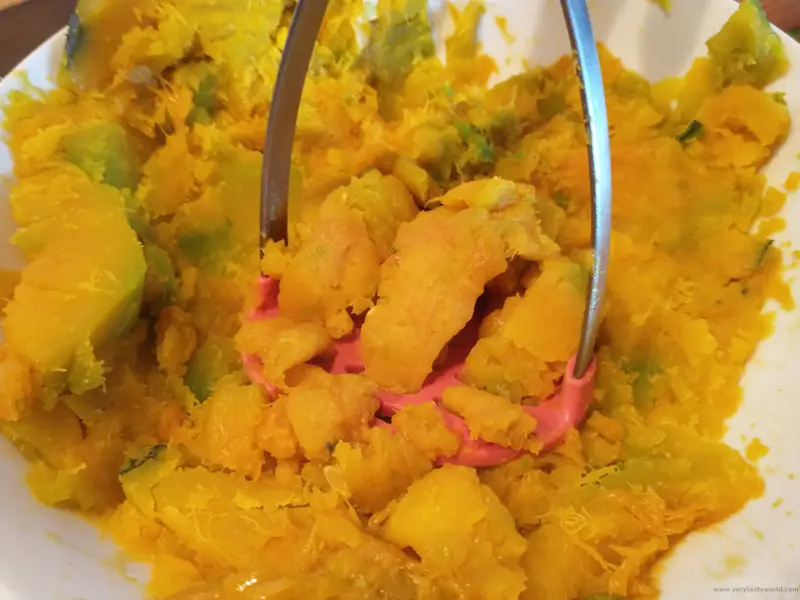
Form into patties.

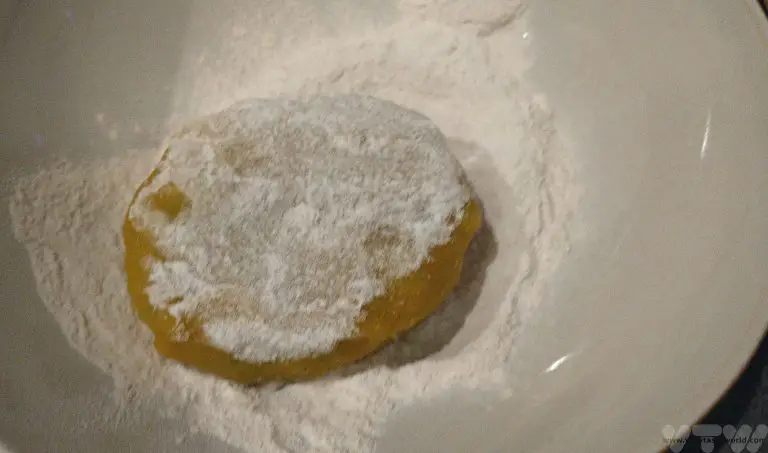
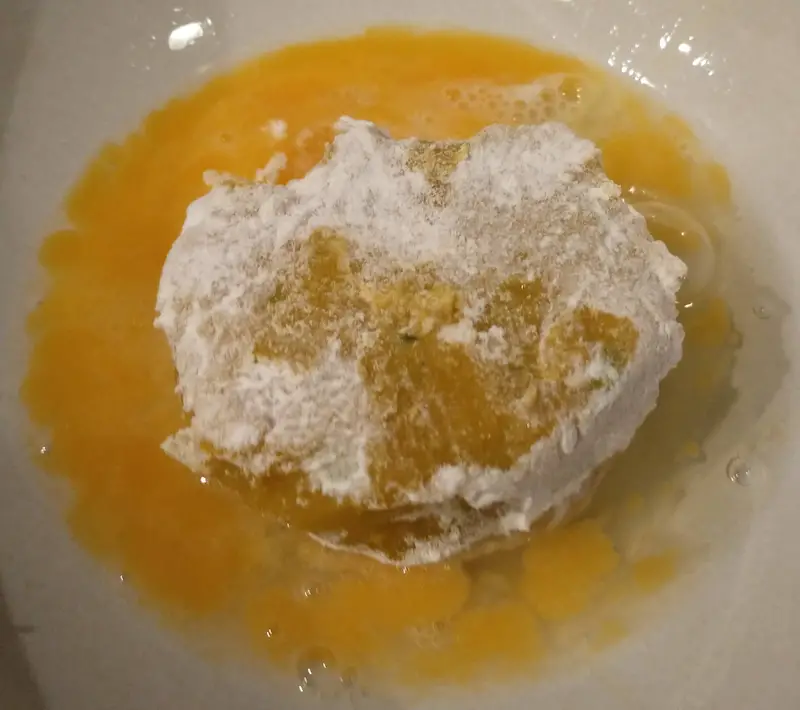
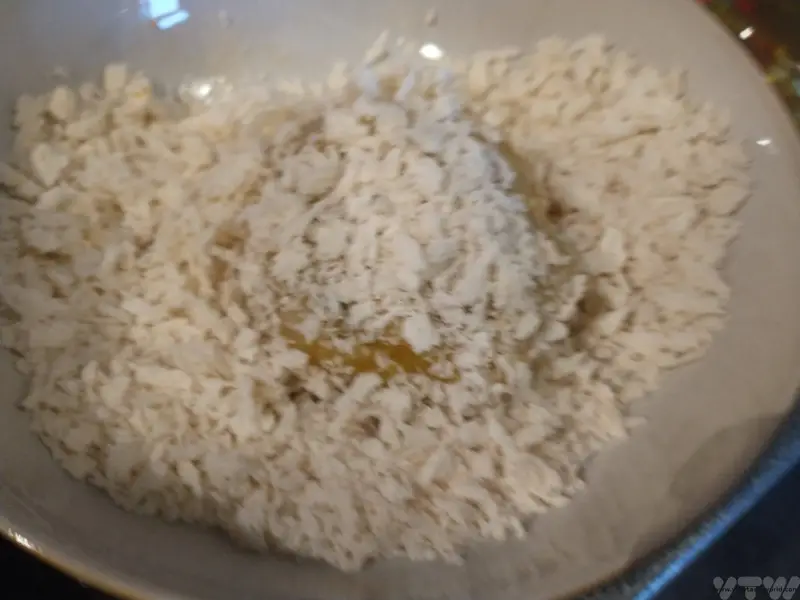
Panko are Japanese breadcrumbs. They are crispy and super dry, usually made from white bread. You can buy panko in most supermarkets these days but ordinary breadcrumbs will be fine if you can’t find them. Set out three bowls. One for flour, one for an egg, lightly beaten, and one for the panko.

Dip each patty in the flour, then the egg, then the panko. This process can get a little messy (especially if you are a clumsy cook). Do not attempt to take photos using your phone if you have sticky fingers.
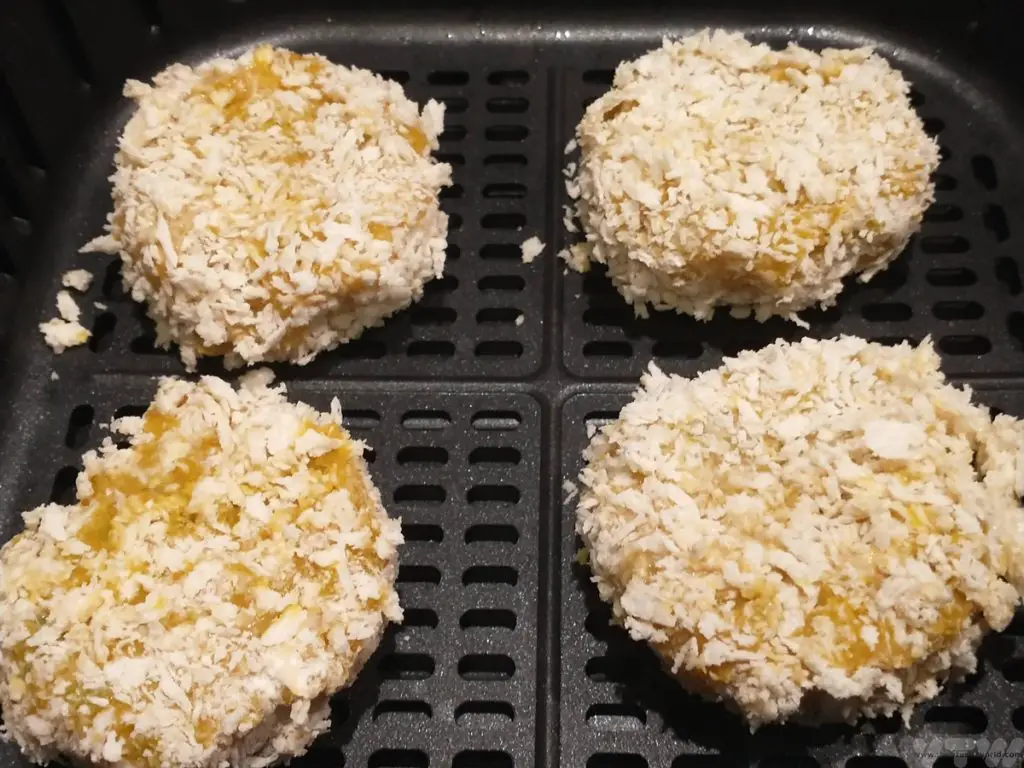
There are several options for cooking. Bear in mind that the pumpkin is already cooked so the korroke don’t need long. We’ve recently invested in an air fryer so thought we would use that. Just spray the patties with oil and cook at 190C for 4 minutes on each side. You can also bake them in the oven for about 8 minutes. Or you can fry them the old-fashioned way in vegetable oil for a couple of minutes on each side or until the panko are golden.

Then it’s time to scoff! Korroke are often served with tonkatsu sauce. This is a sweet and tangy sauce that perfectly complements the pumpkin. If you can’t find tonkatsu, brown sauce (the type you eat with a cooked breakfast) is a good substitution. Other accompaniments can include mayo or a soy based dipping sauce. Best served with a nice, cold beer. Or two.

- RECIPE Oyakodon Donburi
- Zero Waste Recipes Before Your Holiday
- RECIPE: Vegetable Biryani Tamil Nadu Style
- RECIPE: Vegan Wild Garlic Pesto
- Recipe: Venetian Pasta Sauce
- RECIPE: Biryani Raita Recipe
- RECIPE: How to Make Costa Rica’s Gallo Pinto
- Recipe: Japanese Simmered Pork Belly – Buta no Kakuni
- RECIPE: How to Make Umeboshi
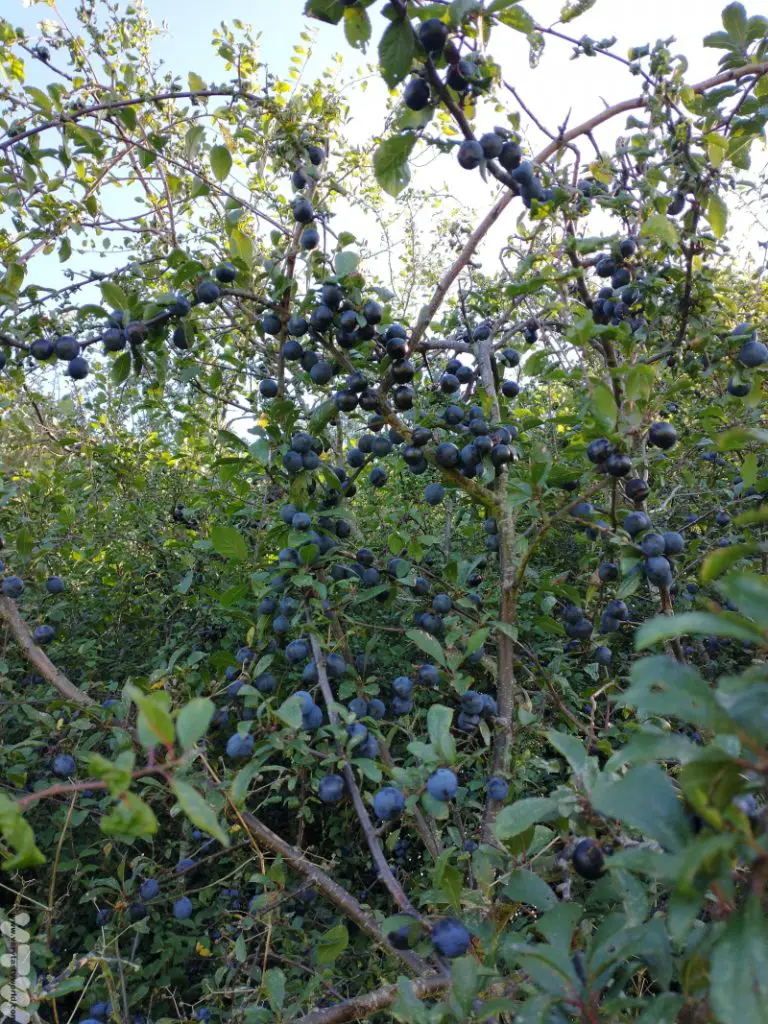
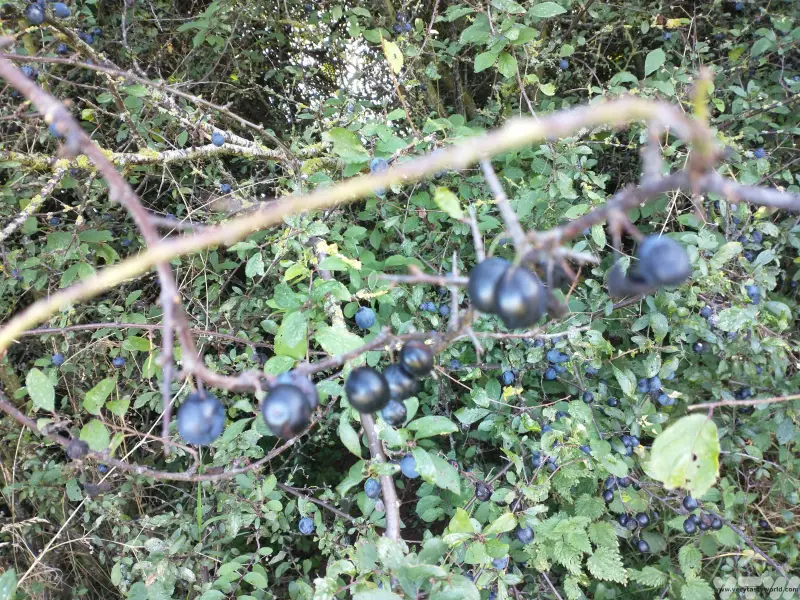
Go With The Sloe – How to Make Sloe Gin
It’s autumn in the UK, which means it’s the perfect season for foraging for fruit and mushrooms in the countryside. We are lucky to have many sloe (blackthorn) bushes in our local area and one of our favourite things to do at this time of year is to make sloe gin.
Sloe gin is a liquer made from gin and sloes, although other alcohol bases can be used. Unlike gin, which is quite perfumed, sloe gin is much sweeter, deriving its flavour from the fruit infusing into the alcohol as well as some added sugar.
Gin is a very fashionable drink these days, with a huge number of flavours and variations available, as well as it forming the base of a vast array of liquers and cocktails. Sloe gin is available commercially but if you have access to sloe bushes it is great fun to make your own.
It’s a really easy process and you can adapt it to your personal taste. It just needs a little patience.
Here’s a flow chart – or, if you will, sloe chart:


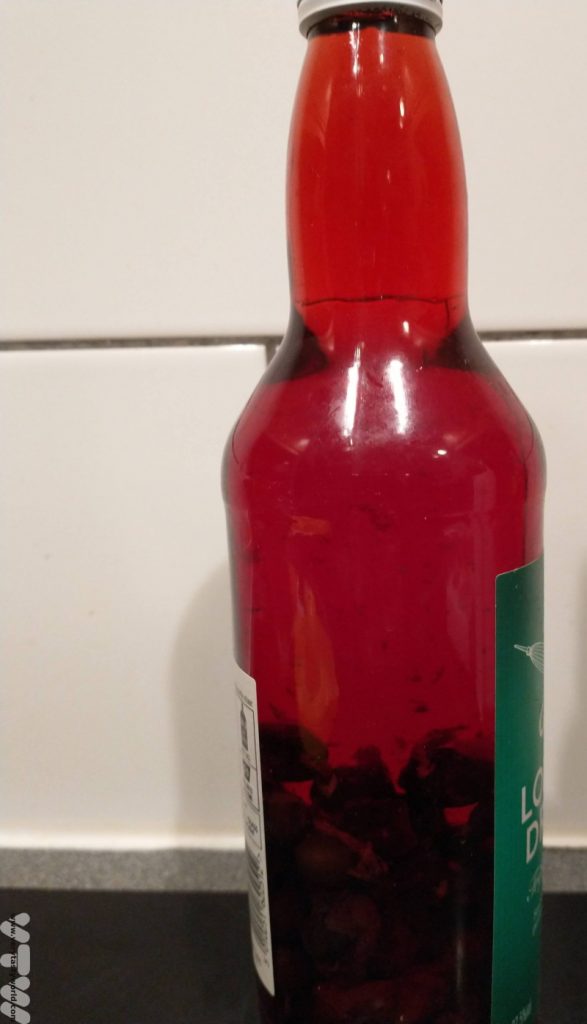
This is what the colour will look like after around three months. You can see that already the gin has acquired the colour of the berries.
Cheers!

Postscript – sloe gin is also great if you pop the bottle into the freezer for a couple of hours. The alcohol doesn’t freeze fully but becomes slightly syrupy. It’s delicious, so remember to keep some back for summertime.
As with all foraging, do make sure you are 100% certain about the fruit that you are picking. There are some great identification guides.
- RECIPE Oyakodon Donburi
- Zero Waste Recipes Before Your Holiday
- RECIPE: Vegetable Biryani Tamil Nadu Style
- RECIPE: Vegan Wild Garlic Pesto
- Recipe: Venetian Pasta Sauce
- RECIPE: Biryani Raita Recipe
- RECIPE: How to Make Costa Rica’s Gallo Pinto
- Recipe: Japanese Simmered Pork Belly – Buta no Kakuni
- RECIPE: How to Make Umeboshi
RECIPE: How to Make Thai Green Curry
Thailand’s famous curries are amongst our all-time favourites. Kaeng khiao wan is a sweet green curry, kaeng phet is a hot red curry. It’s generally the chillies that determine the colour of the curry, although the milder yellow curry, kaeng kari, uses turmeric. Other popular curries include Massaman (which has Indian and Malay influences in its spicing), Panang (another Malay influence with peanuts as a key ingredient) and sour curry, kaeng som, (which has a more soupy consistency with lime and turmeric being important flavourings). Another, less well known, dish that uses both coconut milk and coconut cream is tom kah gai – chicken and galangal in a coconut milk soup.
Thai green curry is probably the dish we cook and eat most often at home. It’s easy to make and utterly delicious. Its translation means ‘curry green sweet’ – the green chillies comprise a significant part of the paste, which forms the base of the flavour, but this curry is slightly sweeter than other types of Thai curry. Some recipes call for a small amount of sugar to be added, others rely on the natural sweetness of the coconut milk. The flavour components revolve around green chillies, galangal, lemongrass, garlic, shallots, kaffir lime zest and coriander all blended together to form a thick, fragrant paste.
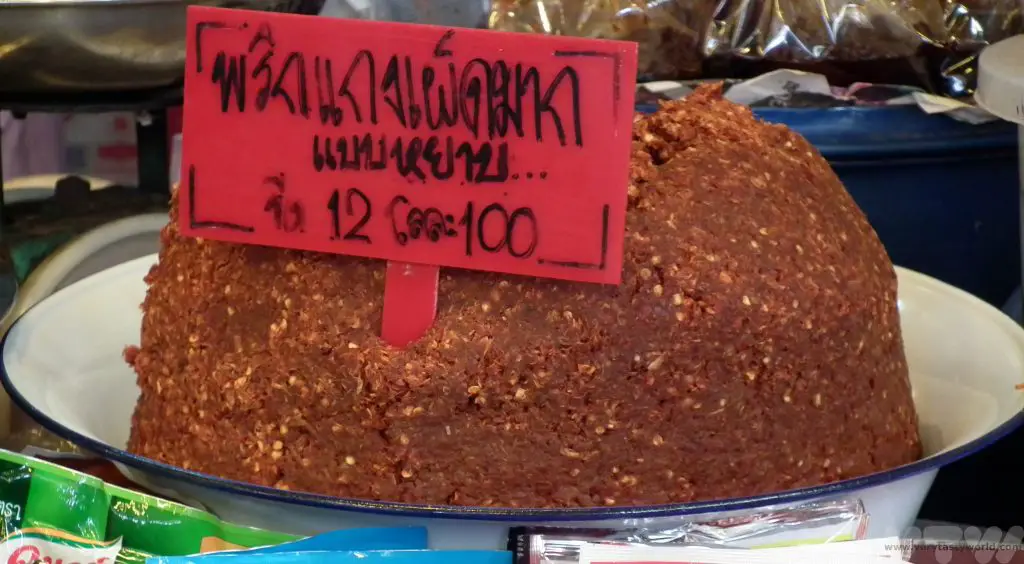
The curries are also remarkably easy to make. One thing that’s worth noting is that it is not at all shameful if you don’t make your curry paste. Even though you can get the ingredients and a blender and produce a paste that suits your particular taste, you will often see huge mounds of curry paste in Thai markets ready made for the locals to buy and use. This was an enormous pile of red paste in a market on the outskirts of Bangkok.
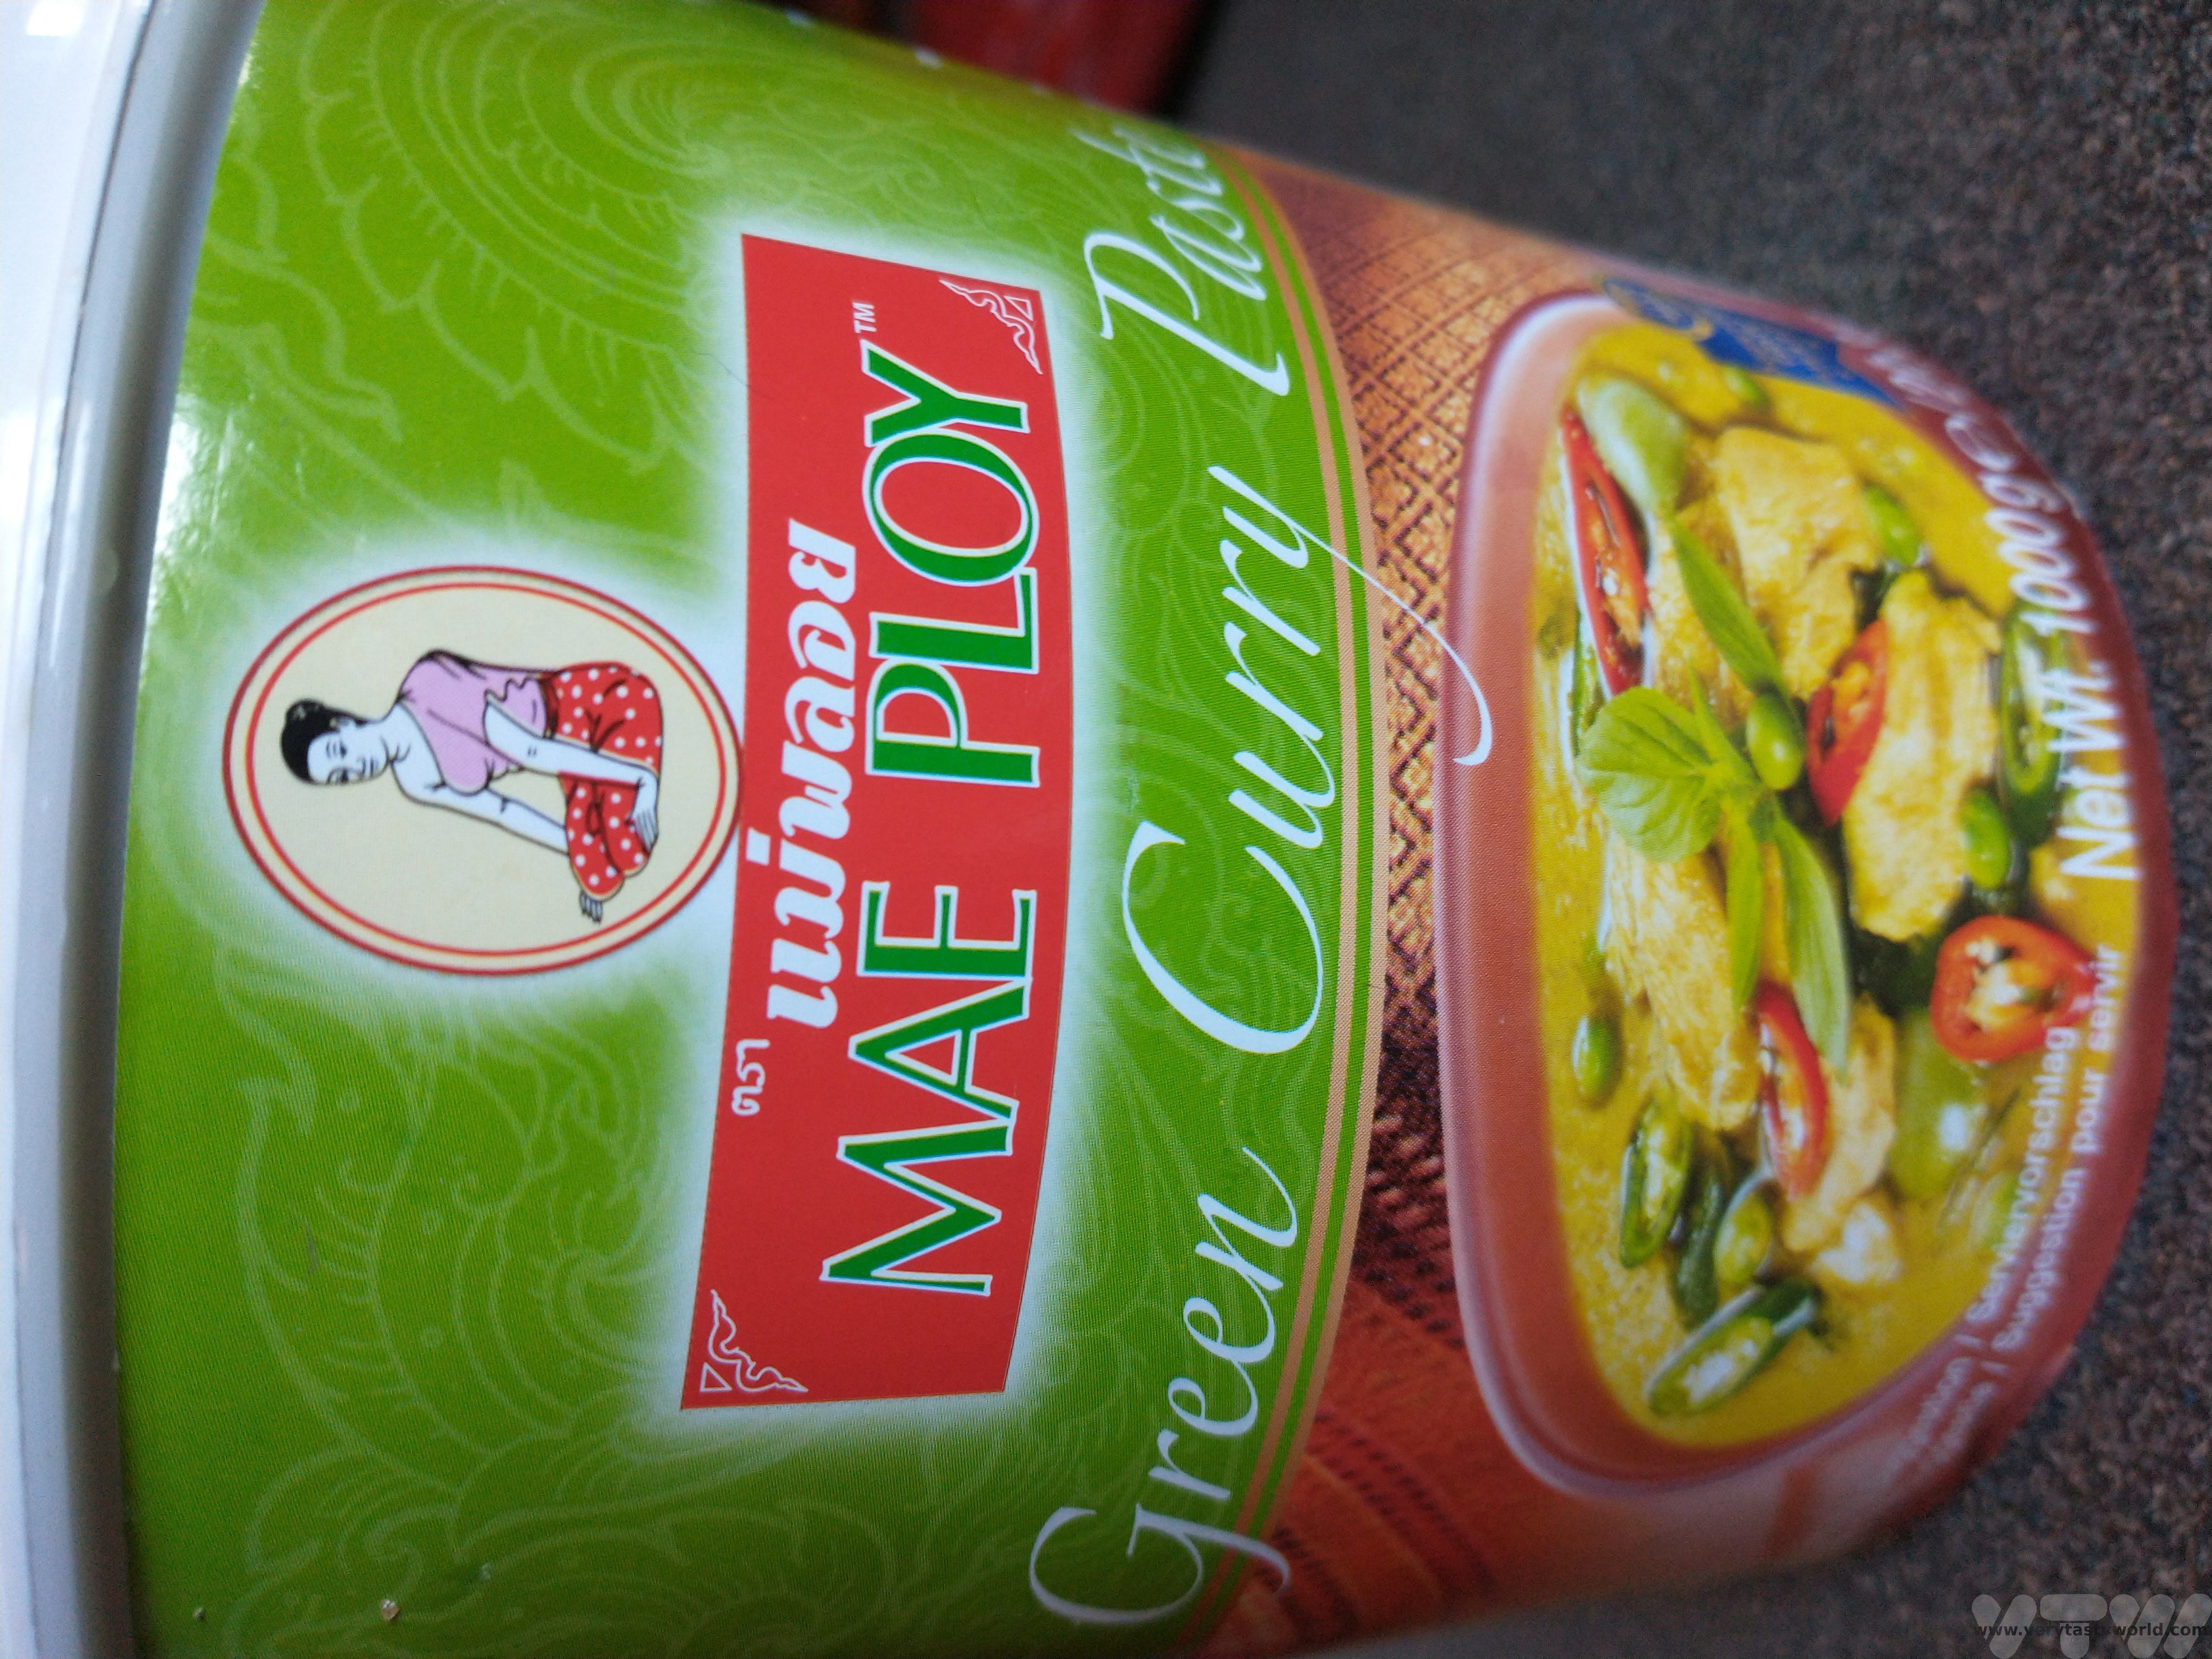
Many supermarkets stock good quality paste these days (as opposed to weaker versions aimed at western markets).
We’ve been using Mae Ploy for years as you can get it in industrial sized tubs which will give you several portions and it lasts for ages (store it in the fridge once opened). Although, to be fair, it doesn’t usually last very long in our household.
There are approximately three million recipes for Thai curry on the internet. Here’s ours:
How To Make Thai Green Curry
INGREDIENTS
500g chicken thighs, chopped into pieces (thigh meat is definitely recommended over breast meat as it has so much more flavour). Beef and pork also work well with this curry.
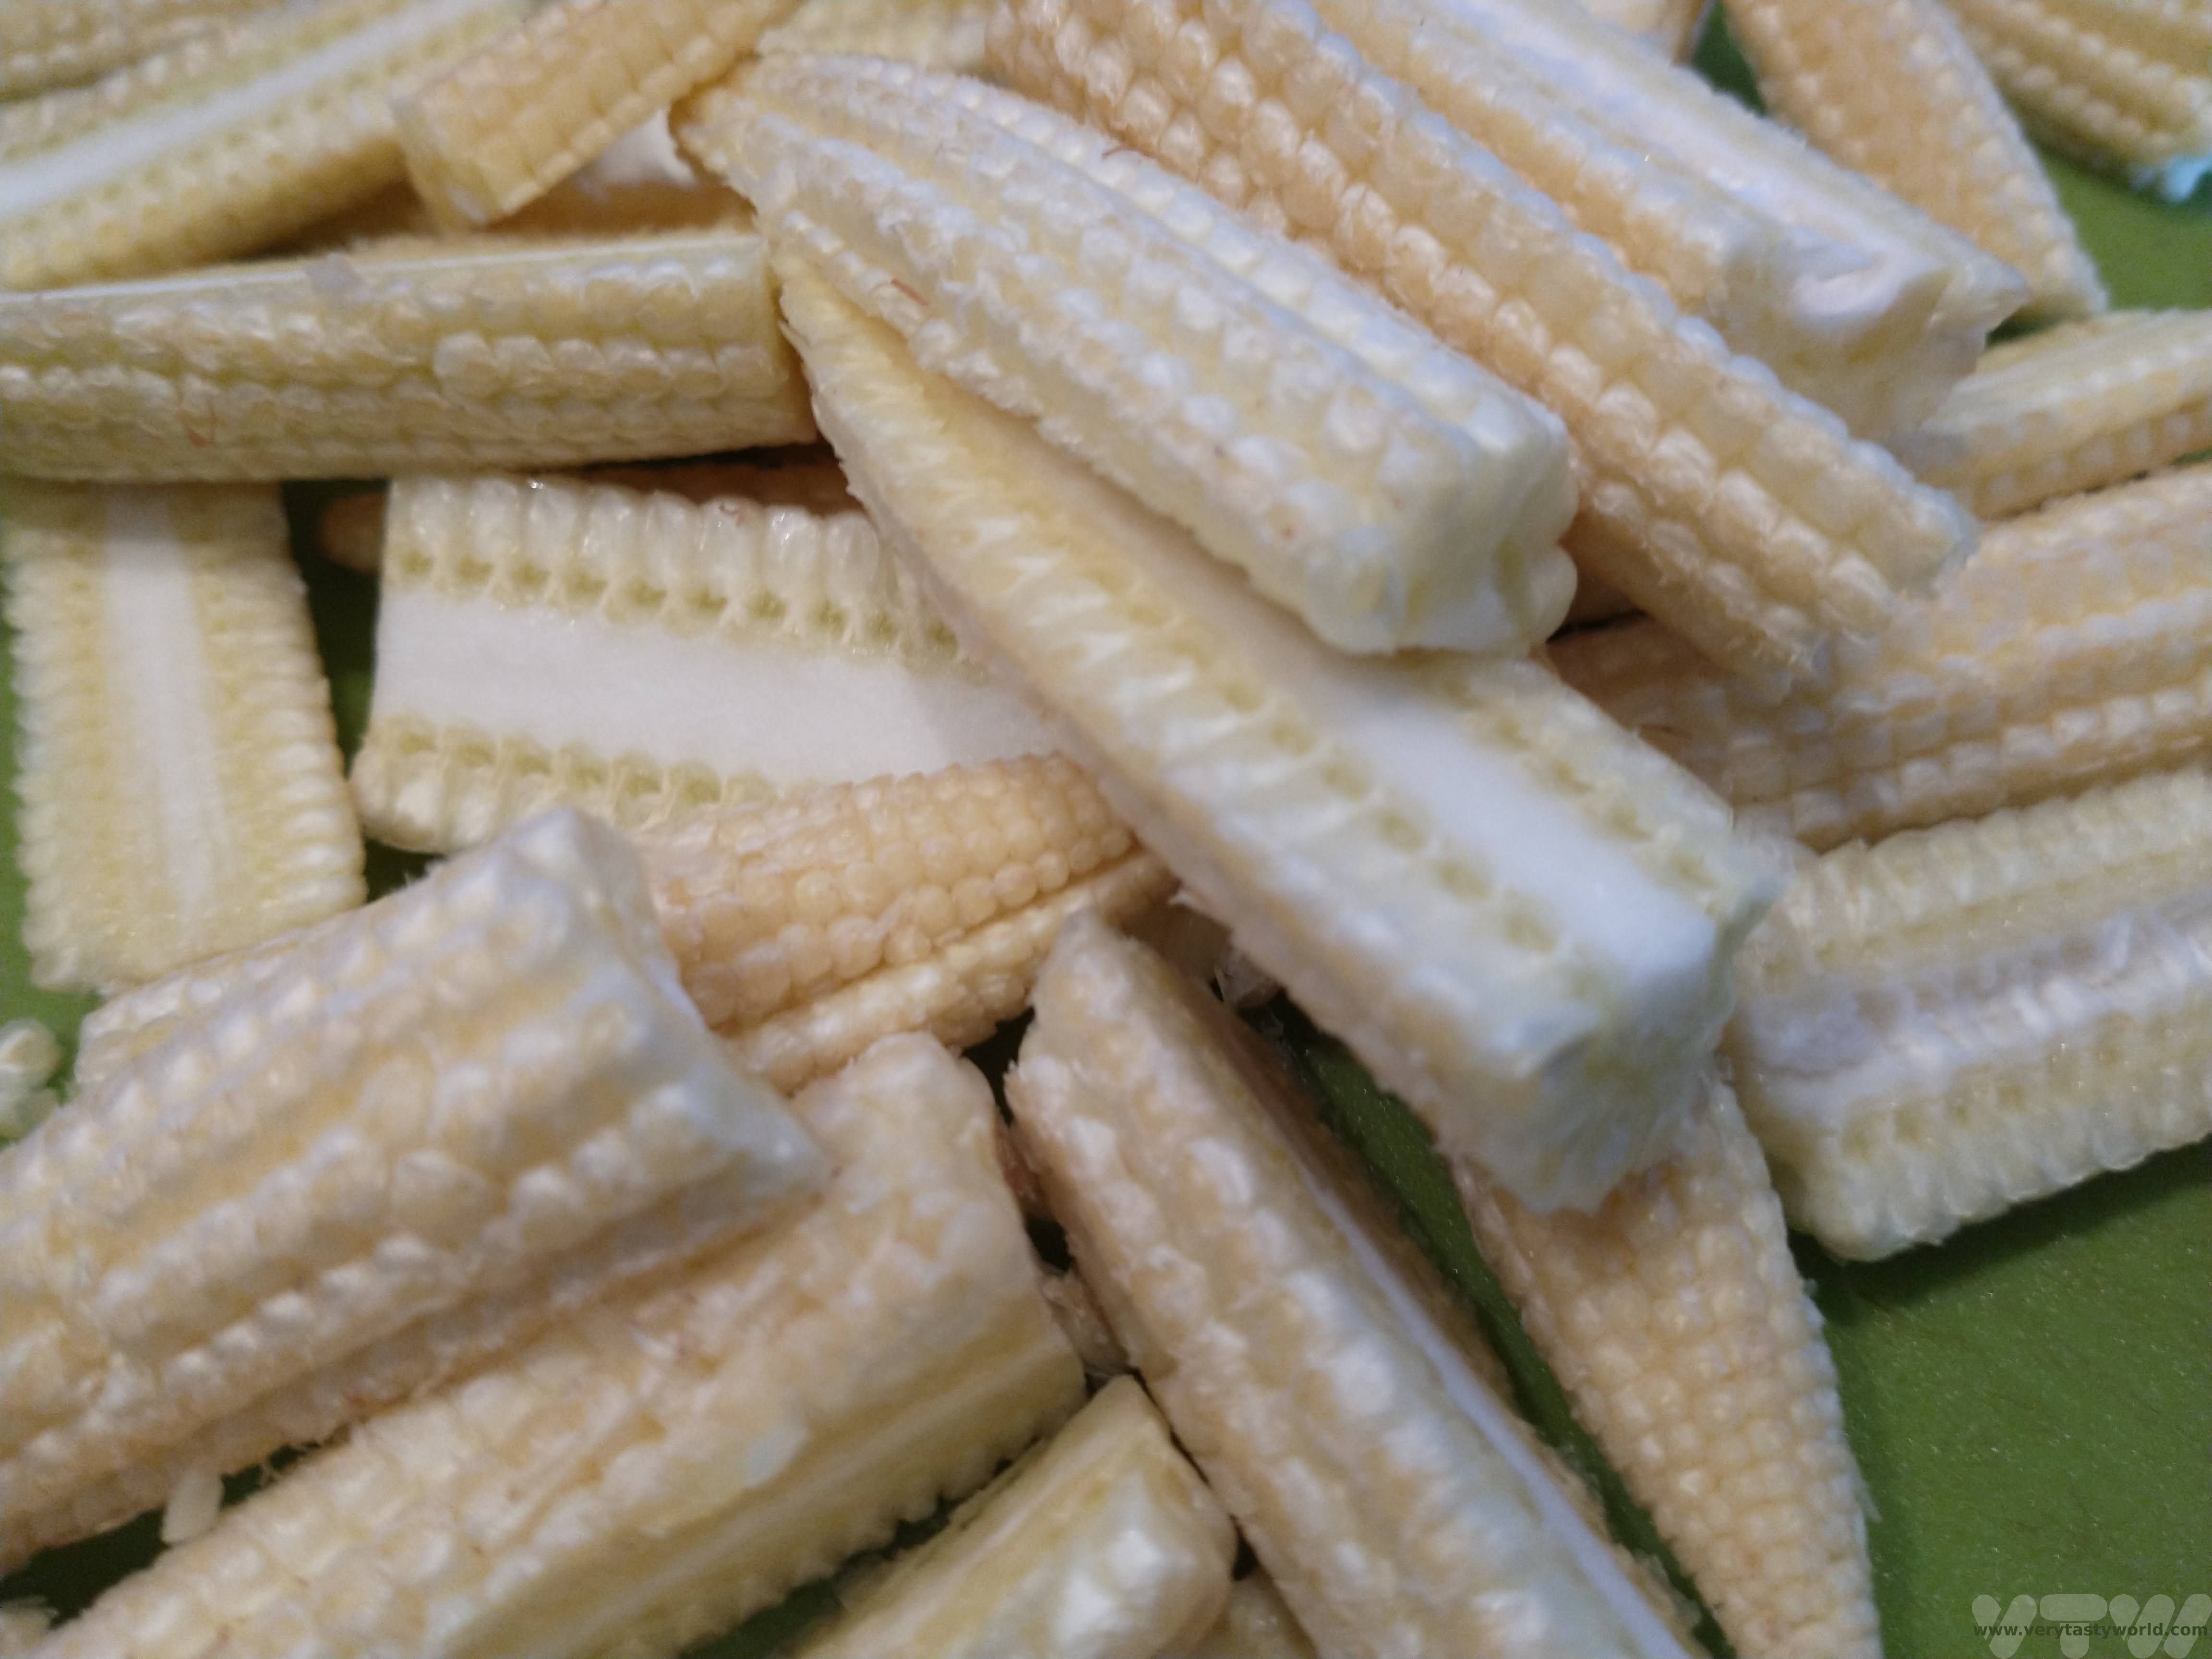
Handful of julienned vegetables – e.g. bell peppers, chillies, bamboo shoots, baby aubergine (vegetarians can use these in greater quantities instead of the meat).
A good dollop of green curry paste to suit your preferred level of spicy heat.
1 can of coconut milk.
Splash of fish sauce (probably around a tablespoon).
Bunch of Thai basil (Thai basil is very different to Mediterranean basil), chopped.
A lime.
METHOD
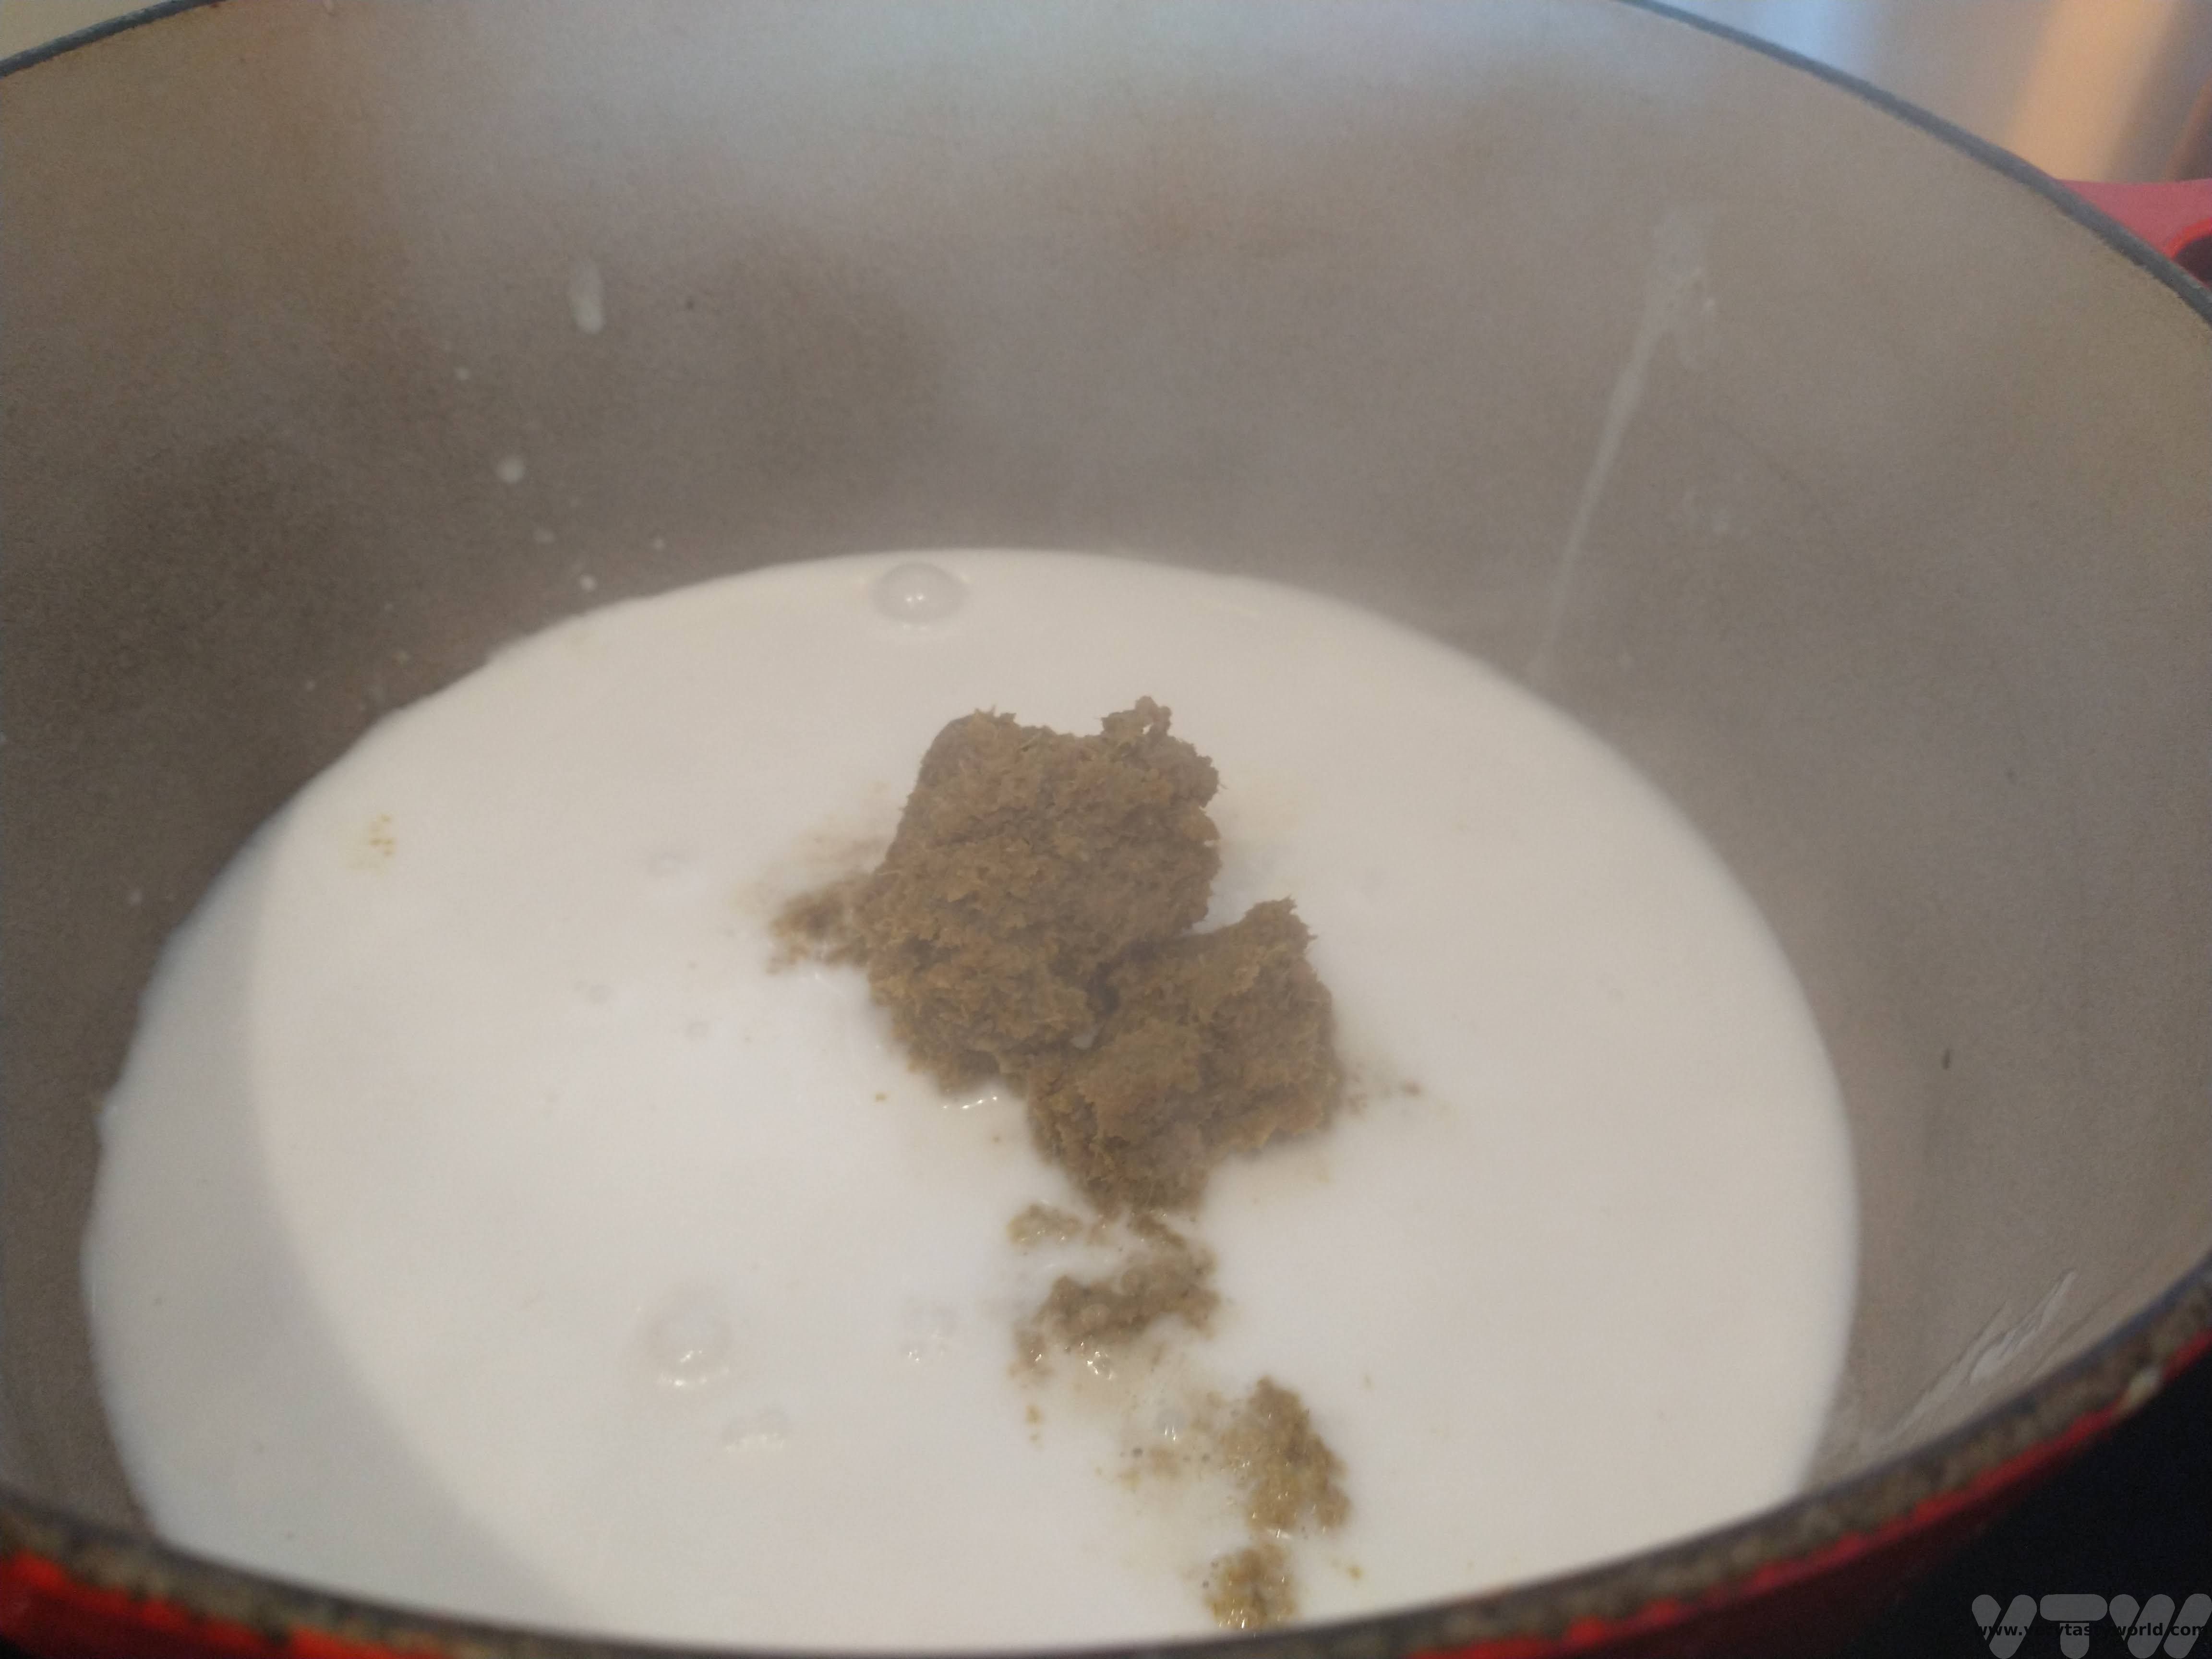
Put a small amount of oil into a pan and add the curry paste. It’s really up to you how much paste to add – if you like more spice, then add more, if you prefer a milder curry, add less. Fry it off to a couple of minutes then add the coconut milk.
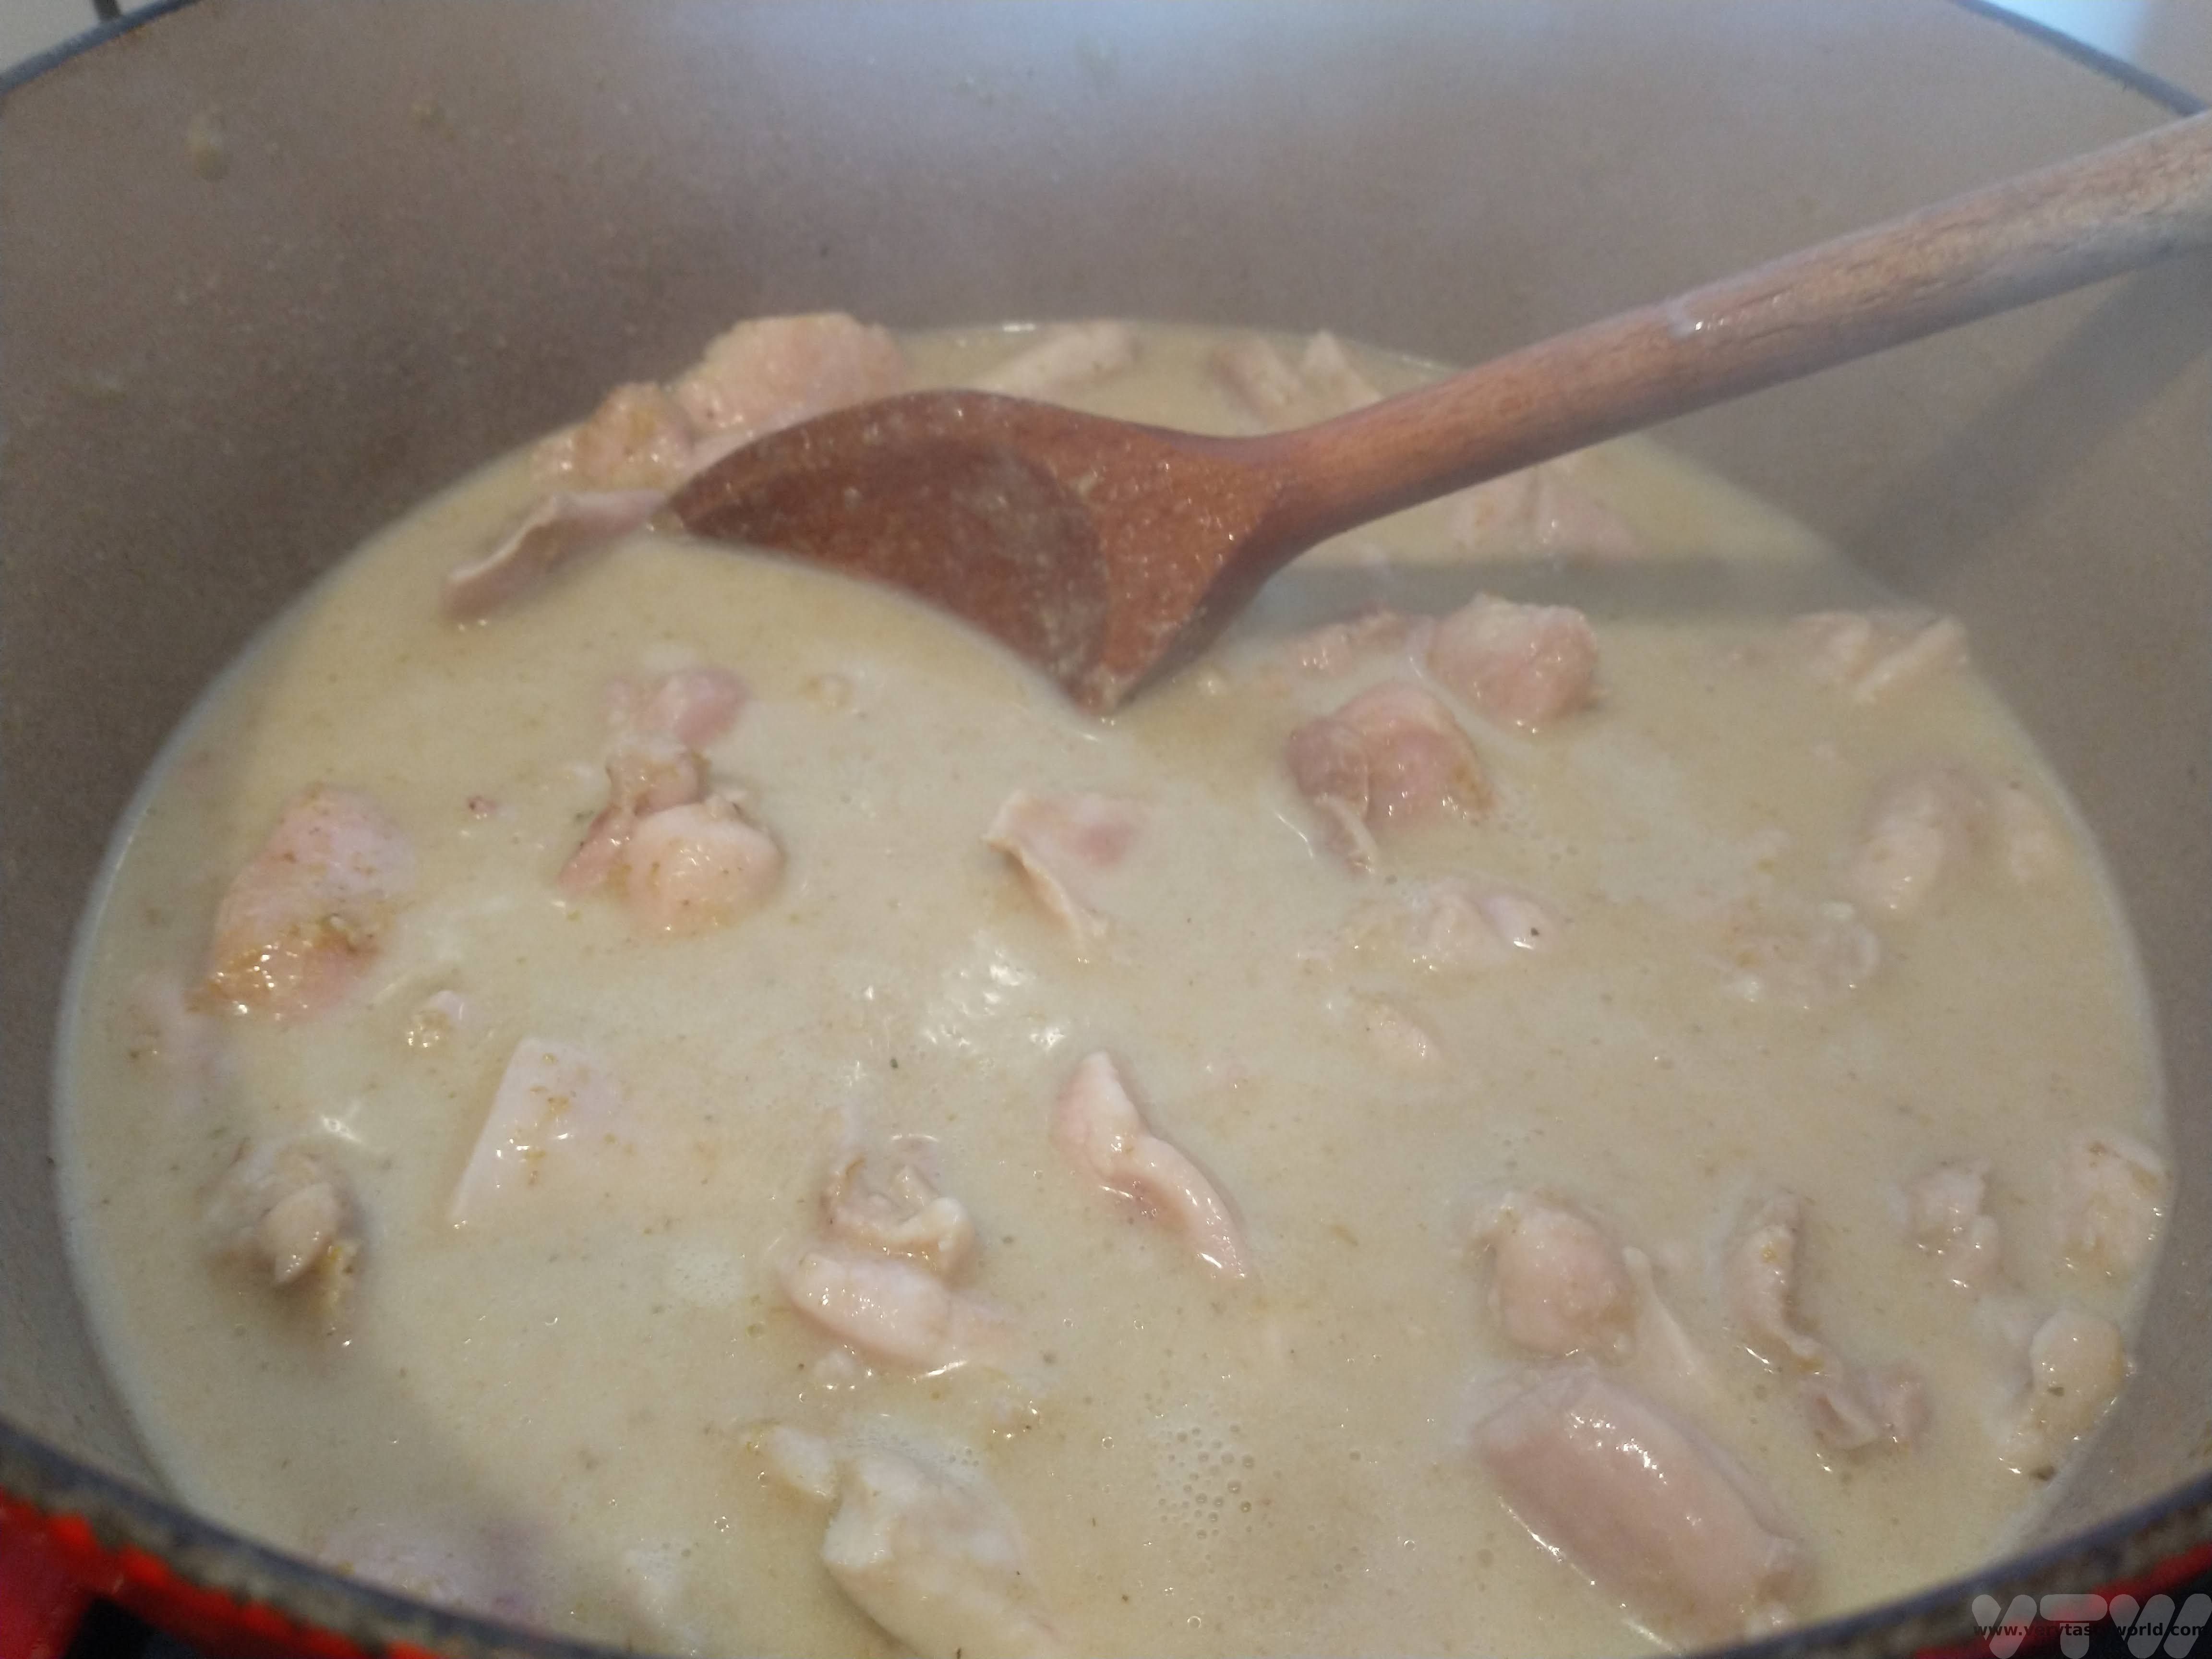
Add the raw chicken and bring to the boil.

Then turn the heat down and let the chicken simmer for around 15 minutes.
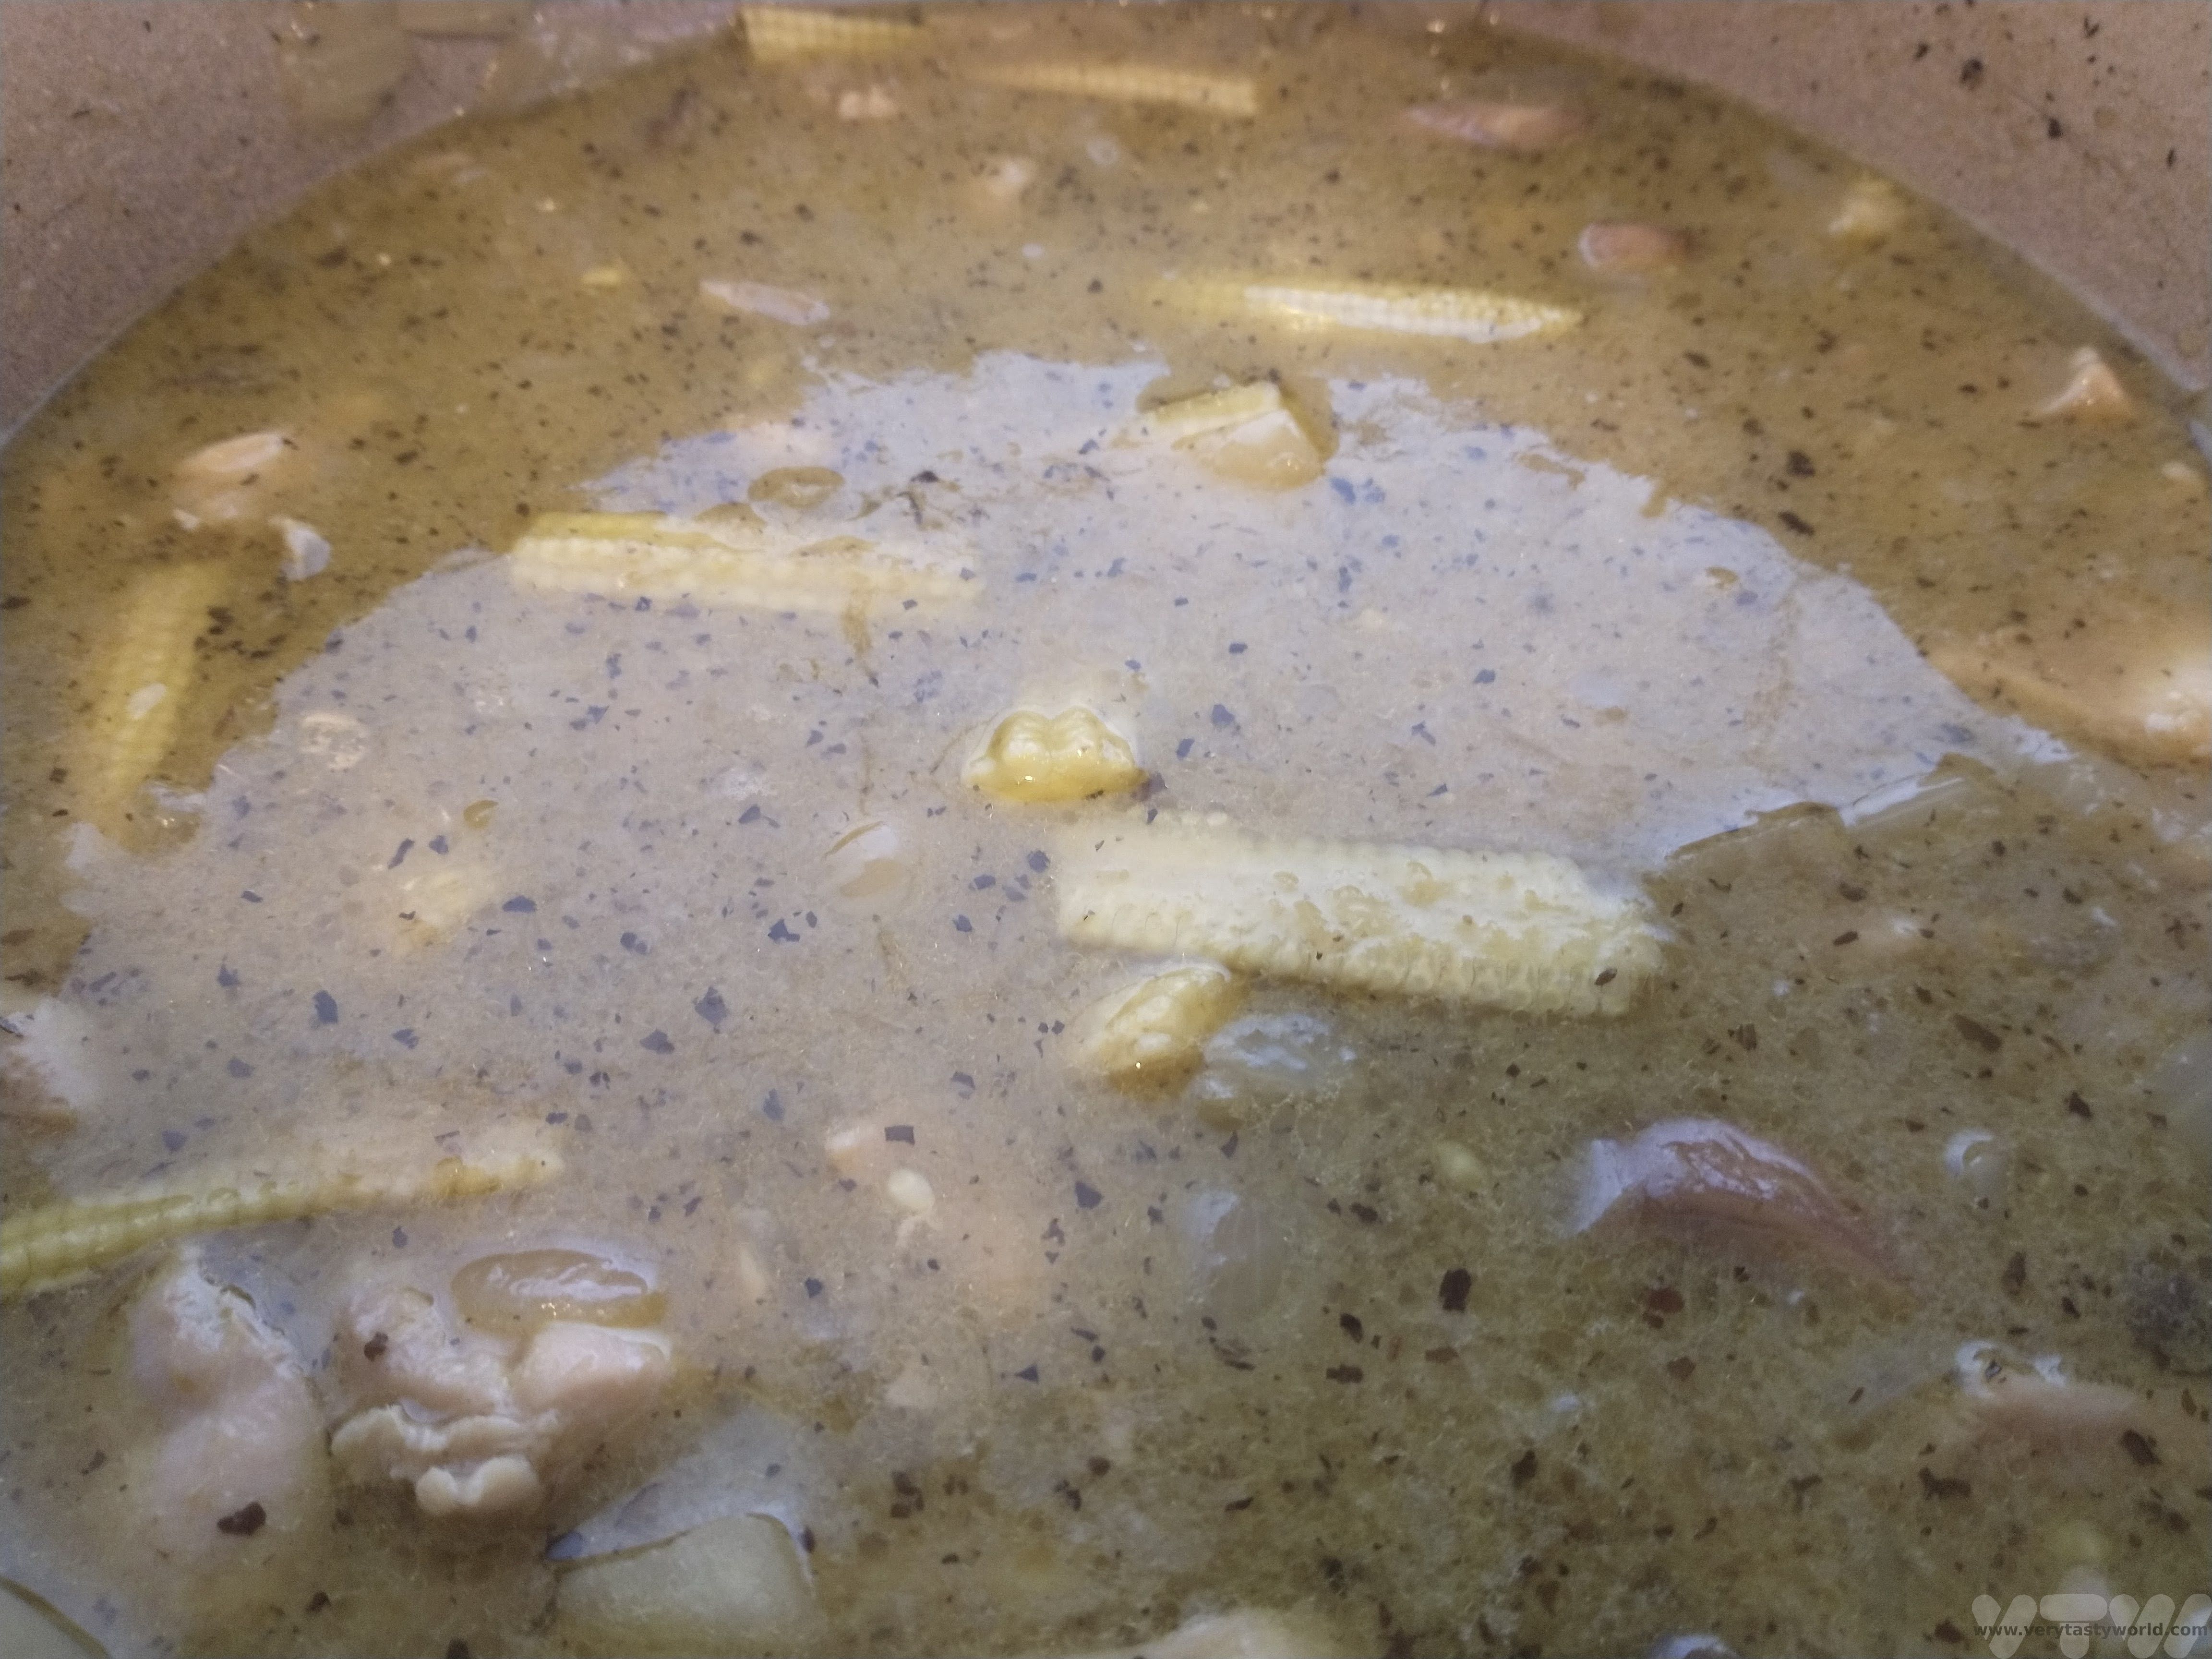
Add the vegetables and allow them to cook. Add the fish sauce and Thai basil. Allow to simmer for a few more minutes.
We often add a spritz of lime juice at the end (always at the end) to add some zing.
Serve with jasmine rice.
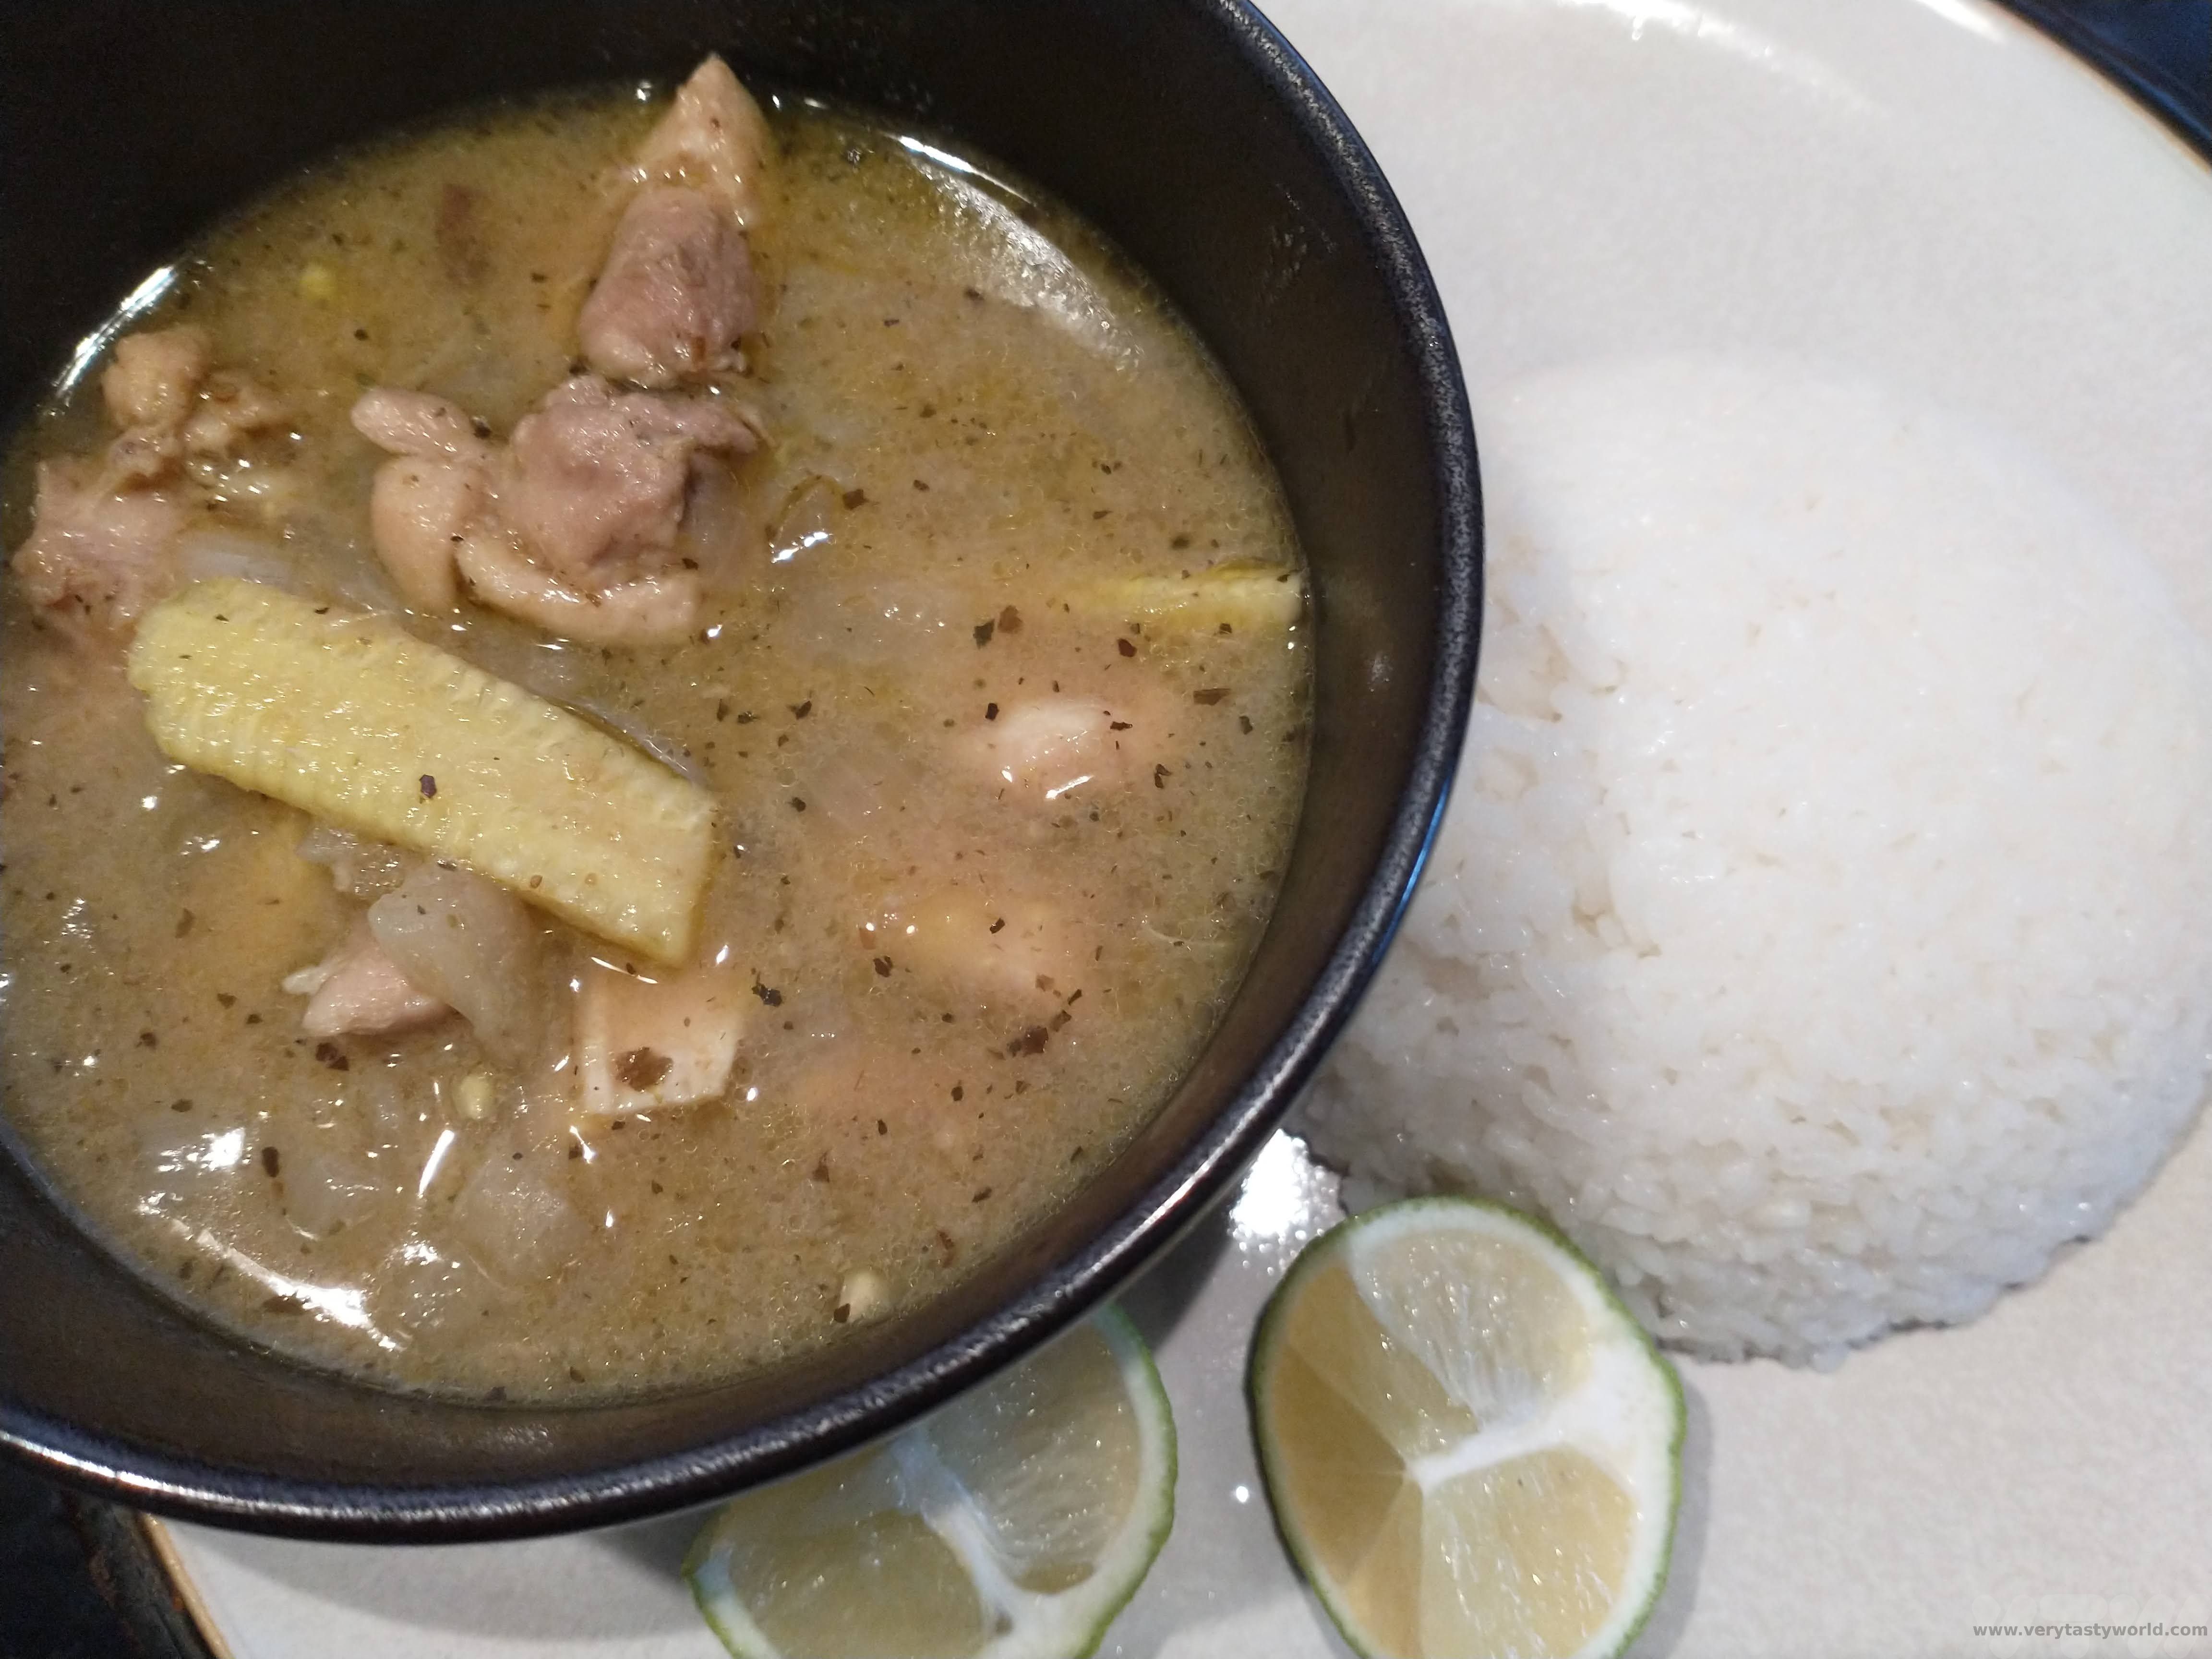
Scoff. Serves four.
Variations: One of the marvellous things about Thai cuisine is that it has a wonderful combination of sweet, sour, salt and hot flavours. Some Thai green curry recipes incorporate a couple of tablespoons of palm sugar (brown sugar can be substituted if palm sugar isn’t available) to the sauce. If you have a sweet tooth you can add it in as an option, although we don’t as we tend to prefer the sour flavours that the lime offers. This recipe is very flexible in terms of you being able to tailor it to your own palette: the coconut milk gives you sweetness (but you can add sugar if you want more), the curry paste gives heat, the fish sauce provides salt and the lime gives the sour flavours – perfect seasoning.
Related Posts You May Enjoy