A Svalbard Holiday – Land of the Midday Moon
It has long been an ambition to see the Aurora Borealis, that strange and ethereal natural phenomenon when charged particles from the sun crash into the earth’s ionosphere and the Northern Lights dance in the sky. We failed to see them on a winter trip to Iceland so thought we would try again in a new country – Norway – a place we had very much wanted to visit. Our plan was to spend some time in the lovely northern city of Tromso from where we could fly up to enjoy a Svalbard holiday.

Svalbard is also known as Spitsbergen. It’s an archipelago in the Arctic Ocean located about halfway between the top of Norway and the North Pole. It is part of the Kingdom of Norway.
The islands were discovered by a Dutchman, Willem Barentsz, in 1596 and were used as a base by whalers in the 17th and 18th centuries. A coal mining industry was established in the early 20th century and people began to settle there. Longyearbyen is the largest settlement and has a population of around 2000 people from 50 different nationalities.
We visited Svalbard in winter but many of the activities we enjoyed can also be adapted for summer visits.
Arrival at Longyearbyen
As we flew from Tromso, we could see the sun slowly setting from the window. This would be the last daylight we would see for four days.

It was already night time when our aeroplane landed at 2pm, with only the runway and terminal building lit up in the perpetual darkness. All passengers will have their passports checked before flying in, so we effectively entered Svalbard when we left Tromso. Hence there was no need to go through any form of immigration on arrival at the airport.
Transfers are easy to arrange – there are two buses which each follow a particular route, dropping visitors off at hotels or the university accommodation. Alternatively it is possible to get a taxi.
We were travelling with carry-on luggage so hopped straight off the plane and found the friendly bus drivers who indicated which bus we should get on to reach our hotel. We had to wait inside the terminal until everyone was ready to leave. Well, we didn’t but it was really cold outside! Basically as soon as all the passengers have grabbed their stuff, the staff switch off the lights at the airport and everyone goes home.

The bus fare was 200NOK (Jan 2023). It is possible to pay with plastic everywhere in Norway, we didn’t need the nominal amount of cash we brought. (The bus drivers were happy to take cash as well and even joked that they’d have our boots if that was our only means to pay!) The bus dropped us off on the road by our hotel, The Vault, which was just a two minute walk (five minutes if we were walking on ice without spikes) from the town centre.
(The transfers back to the airport basically follow the bus routes in reverse. Your hotel should be able to give you the bus pickup time for your flight. It’s worth arriving a few minutes early – wrapped up warm, of course. There isn’t a bus stop per se – we just waited on the other side of the road from where we were dropped off and flagged the bus down when it arrived.)
On arrival in our cosy room the TV screen was on. It was counting the days until the sun would appear as well as providing useful weather information and aurora forecasts.

Practicalities for Visiting Longyearbyen
Most shops and restaurants are located along the main road in Longyearbyen. There is a supermarket, booze emporium, various clothing stores, a mini mall and a tourist information centre all within close vicinity. If you have forgotten any items of kit or haven’t brought warm enough clothing there are shops where you can buy suitable outdoor clothes or expedition gear if you are feeling intrepid.
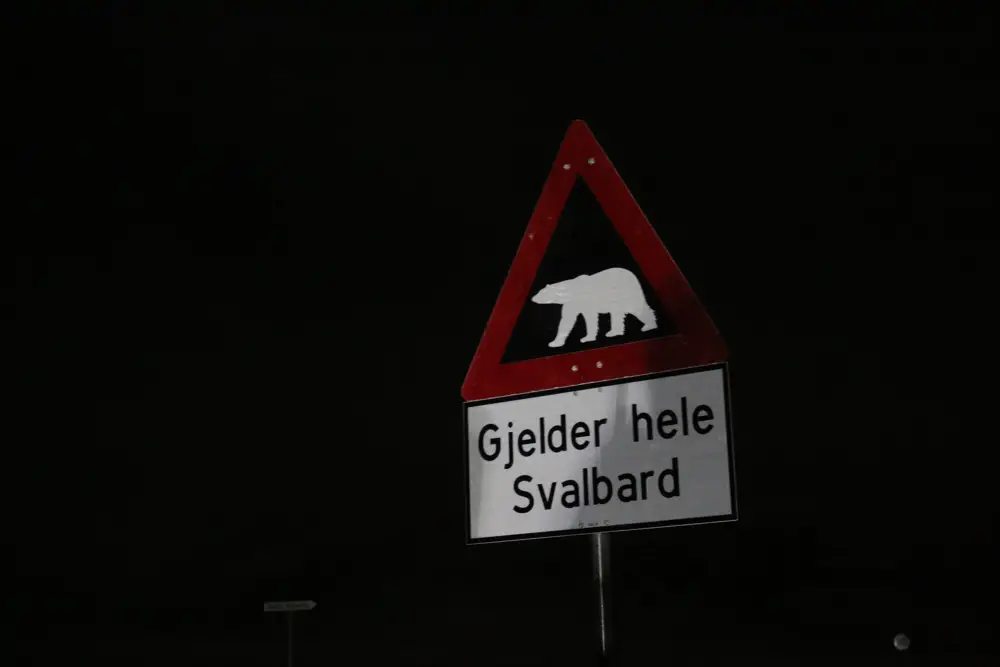
If you are walking around Longyearbyen you must stay within the safe zone. This defined area means that you are safe from polar bears! If you are outside the zone, marked by the polar bear sign, you should carry a gun (eep!) and know how to use it (double eep!). The safe zone is pretty large and covers the main town area.
Hence, as visitors, while it is fine to walk around the safe zone and visit local attractions it is essential to pre-book tours with operators who know the region and know what they are doing in terms understanding the risk.
During winter in Svalbard it is dark all the time. And cold all the time. But it’s a strangely refreshing cold because the humidity is very low. However it is absolutely essential to wrap up warmly because when the wind blows it blows right through you.
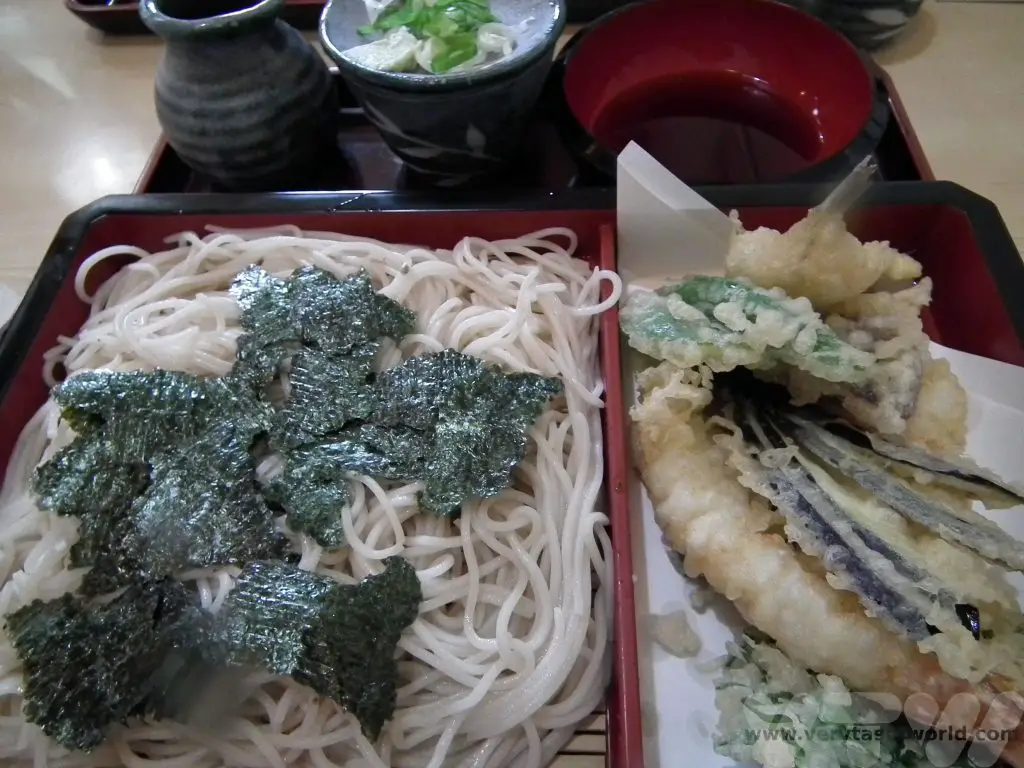
Things to do on a Svalbard Holiday
While we travelled in the hope of seeing the Northern Lights, we didn’t plan to sit around waiting for them to appear. It’s largely a matter of luck as to whether they will come out to play when you are there. Longyearbyen has a couple of interesting museums, an lovely art gallery and plenty of excursions to enjoy.
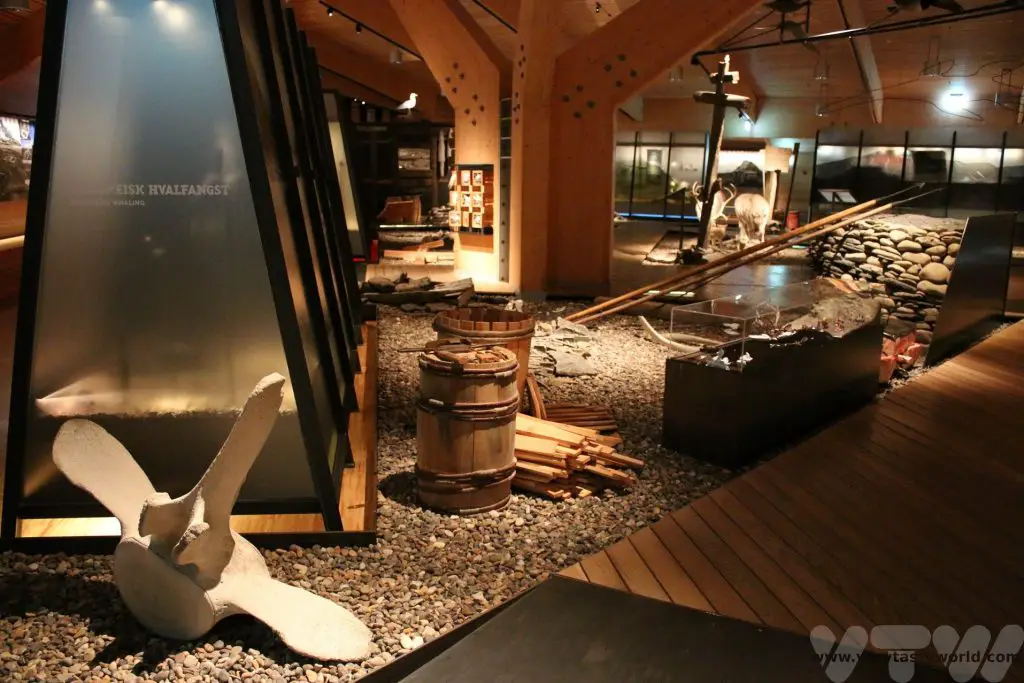
North Pole Museum
This small and friendly museum showcases expeditions to the North Pole. Unlike Antarctica, where the South Pole is located on a land mass, the North Pole is located on top of the sea, so expeditions to travel to reach it were significantly more challenging. Throughout our trip to the Arctic, we discovered the bravery and ingenuity of explorers, who attempted to reach the pole via ships drifting through the pack ice or by airship.


The museum offers a plethora of exhibits, including documents, newspapers, cine-films, letters, artifacts and even bits of airship.


The whole exhibition is fascinating. And, we learned, it wasn’t until 1969 that a British Trans-Arctic Expedition actually managed to reach the North Pole on foot, just a couple of months before humans landed on the moon!
Svalbard Museum
The Svalbard museum has a large interactive room exhibiting all aspects of the archipelago, from the geology and geography to the wildlife and industry.
They also offered a small temporary exhibition about the people of Longyearbyen.
Art Gallery
Located on the main road in town a new art gallery has opened recently. It’s a cool space to view art and also has a café.
We discovered the remarkable works of Kåre Tveter, an artist whose minimalist approach to painting perfectly captures Svalbard’s landscapes.

With just a few colours his art conveys the stark beauty of the region.

Husky Sled and Ice Cave Visit
One of the best trips we took was a full day husky sled drive excursion to an ice cave. Nikolas from Green Dog picked us up from our hotel and took us to their base a few kilometres out of town.
Green Dog provided all the equipment we needed so we changed into our exposure suits, mittens, hard hats with torches and boots, and went straight out to the dog yard. Karl was the first dog we met and he was super-keen to have a hug. In fact, all the dogs wanted cuddles.


Huskies have evolved and been bred to enjoy the cold weather. They have two coats – a thick undercoat for warmth and a guard coat with coarse hairs that are water, wind and snow-proof. Each dog has its own kennel in the yard but it had to be really cold for them to actually sleep inside them.
We received a briefing on how to use the sled, how to direct the dogs, how to get them to stop and how to get the sled to stop in an emergency.
Then we fastened the dogs to the harness. They were itching to go, barking excitedly and jumping. As soon as we set off the dogs were absolutely silent, fully focussed on pulling the sled.

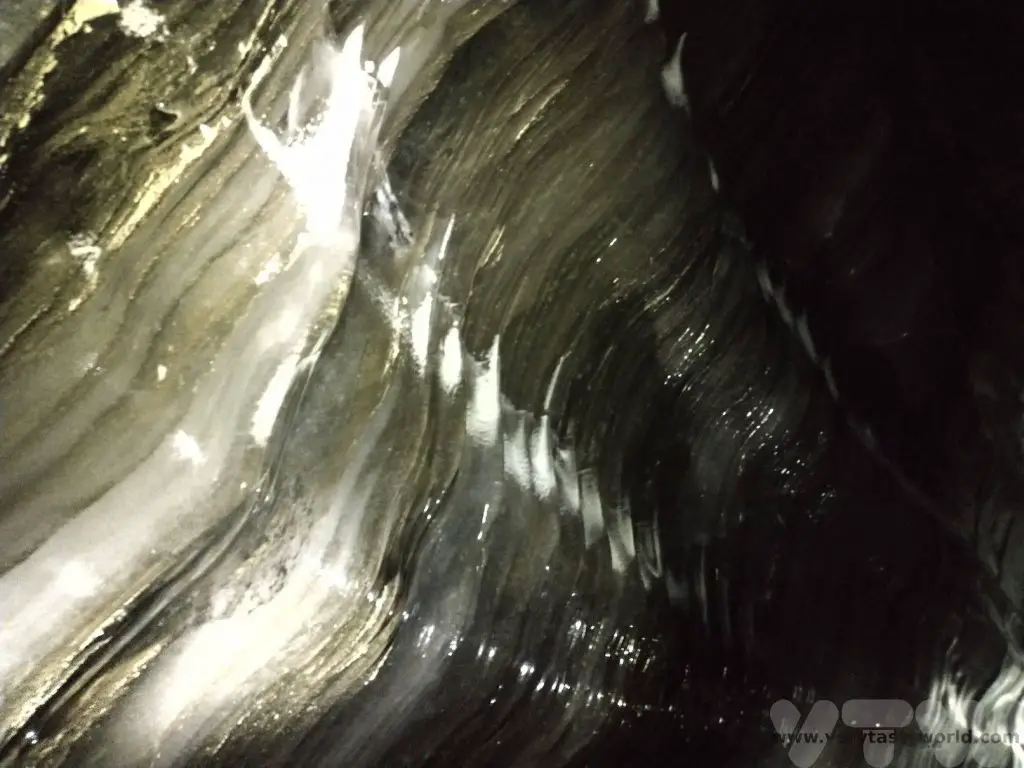
We travelled through stark and beautiful landscapes in the dark. As we reached the ice cave we let the dogs off their harnesses and rewarded them with some hunks of meat.
Then it was time to visit the ice cave. The cave is part of a glacier – around 60% of the archipelago is covered with glaciers. The ice cave changes each year as the glacier melts during the summer months and re-freezes. There are some wide bits and wiggly bits to traverse through. It’s not an extensive route but it’s great fun to slip and slide inside the cave and marvel at the ice formations – you can see rocks sticking out of the sides of the wall and crystal-like icicles.


After a quick lunch of rehydrated food – which was surprisingly tasty – we hitched up the dogs and started the return journey. We flew across the glacial moraine fields back to the dog yard.
We are always cautious about doing activities which involve animals as we want to be sure that they are treated well but we can honestly say that the huskies were the happiest dogs we had ever met.
If you visit in summer it is possible to go sledding on wheeled sleds. The ice cave isn’t available for exploration but the route will take you through some interesting scenery.
It is also possible to visit the ice cave via snowmobiles during the winter. You need a valid driving licence and a good command of Norweigian or English to be able to drive one.
Gruve 3 Coal Mine Visit
We also enjoyed an excursion to Mine Number 3. Longyearbyen was established as a settlement after excellent quality coal was discovered. It might seem surprising that an Arctic landscape with no trees should have coal. But around 65 million years ago Svalbard was located near the equator and the movement of tectonic plates over the millennia has now placed it in its icy position in the world. The seam is very thin – twelve metres of forest turned into just one metre of coal.
We were able to visit the mine and learn about its history, construction, its people and how they mined. There is around 200 metres of mountain above the mine so safety was really important, especially in terms of shoring up the tunnels. Apparently you can hear the mountain creak.

This was also the first mine to employ female workers. They were largely involved with engineering jobs but some women worked at the coal face and were very much respected by their male counterparts.
The miners would crawl along the seam, in a tunnel that was between 38cm and 50cm high, and mine using heavy drills for 8 hours a day. Pay was exceptionally good.
You can borrow an overall (choose one that’s size larger than your usual size as you just wear it over your clothes) and crawl into the seam. It is incredibly claustrophobic. Not sure either of us would last even an hour in there, no matter how much pay we received.

The mine also holds a seed bank and archive for a number of countries.
The trip is easy to book via Get Your Guide.
The world international seed bank is also located near the mine. It stores millions of seeds from all around the world, the idea being to help provide a degree of food security for the world.

Snow Cat Northern Lights Tour
The aurora forecast indicated that our best chance of seeing the lights was on our last day so we booked a snow cat tour to take us out to the countryside, away from the city lights, to see if we could spot them.

The trip is probably more exciting if the Northern Lights are in the sky. You get in a big vehicle with a load of other people, drive to a hut, have a warm drink, wait for the lights, come back.
Sadly, we didn’t get to see the Aurora. With this sort of thing it is pure luck; we had booked the trip several weeks beforehand so there was no real way of knowing how active the sun and how cloudy the weather would be. Ever the optimists, we plan to try again!
Svalbard for Foodies
The great thing about Longyearbyen is that it’s located at 78 degrees north so you can say that you’ve eaten the world’s northernmost food, drunk the world’s northernmost beer and so on. The fish in Svalbard – and indeed the rest of Norway – is excellent quality and highly recommended. Our breakfast at the Vault was a buffet comprising smoked and pickled fish, rye bread, brown cheese and pickles. Perfect!

Svalbard Brewery
Svalbard Brewery is located a couple of kilometres out of town (but still within the polar bear safety zone). They are open for brewery tours and some evenings the taphouse is open for drinking but you do need to book in advance.

We enjoyed a tasting flight and then some more of their fine beers. They have a broad variety of styles on offer.

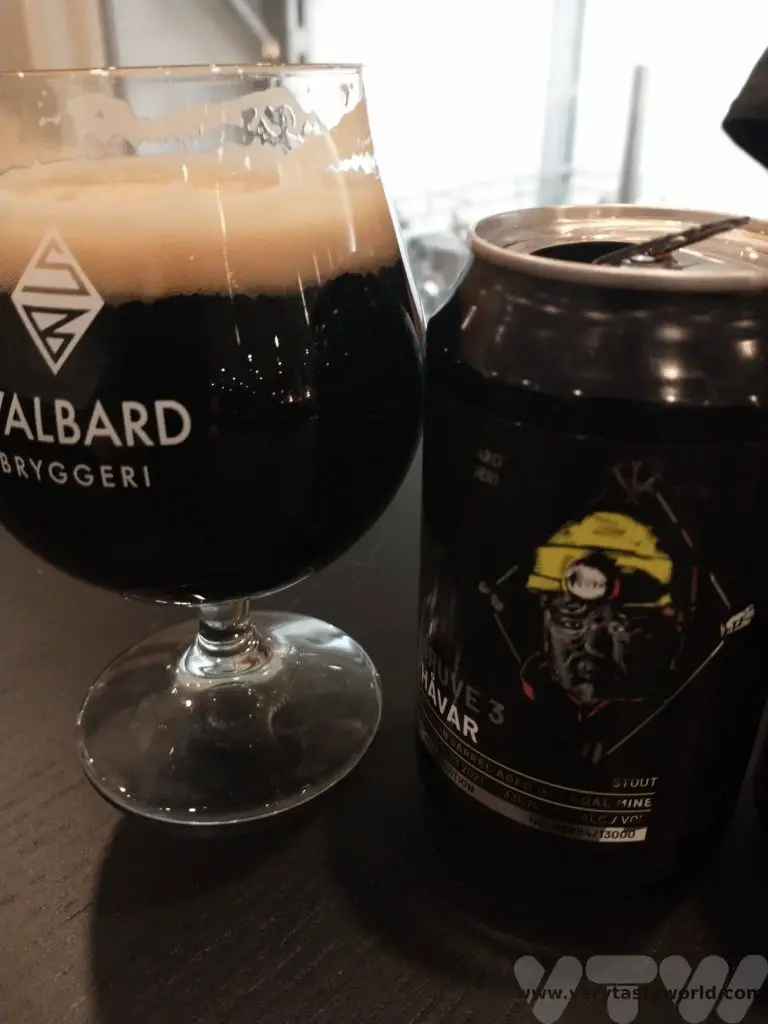
The best was the Gruve 3 stout, inspired by a local miner – bourbon and caramel flavours combine in this delicious 9% beer. Yeah, we caught a taxi back to the hotel. (The brewery kindly phoned for one for us.)
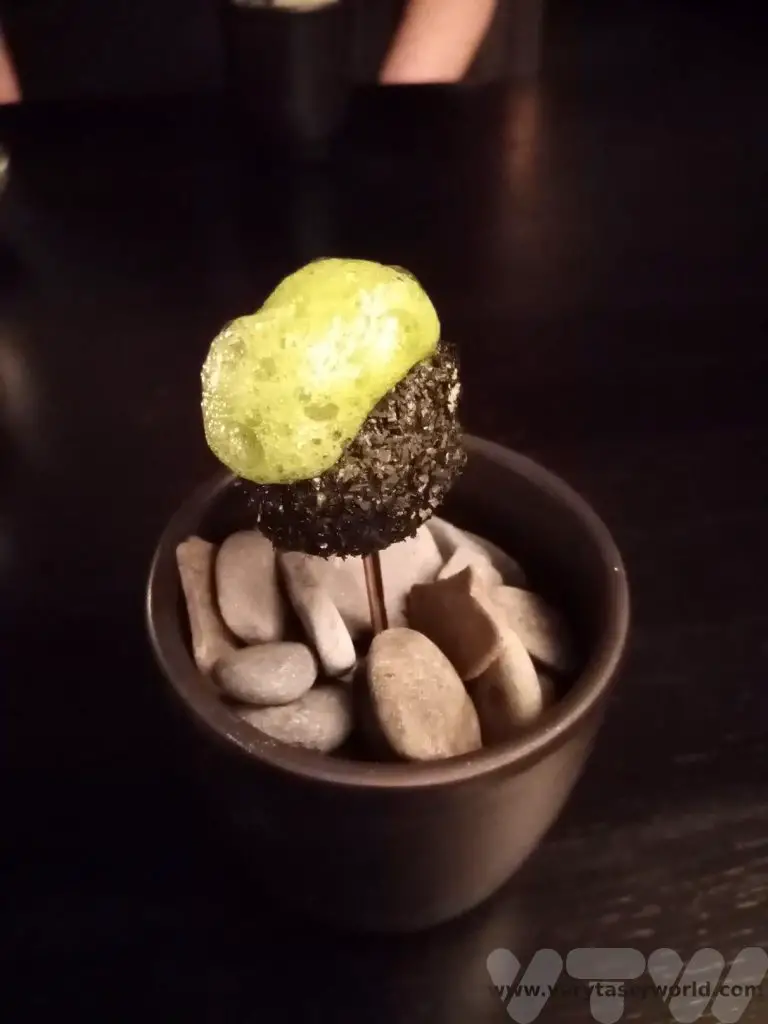
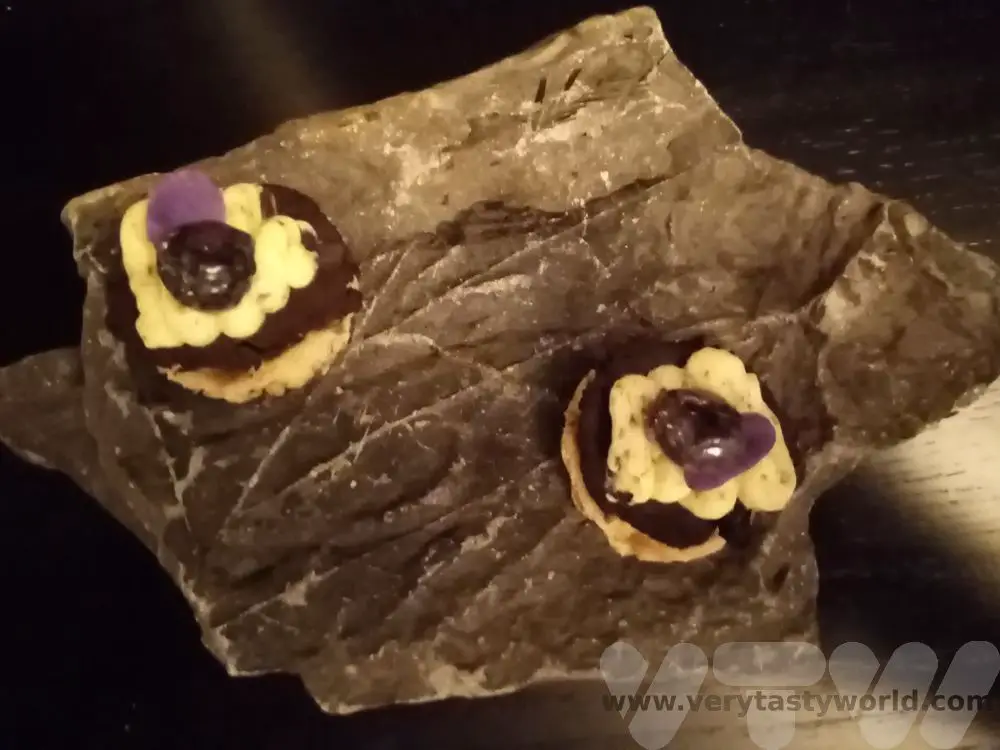
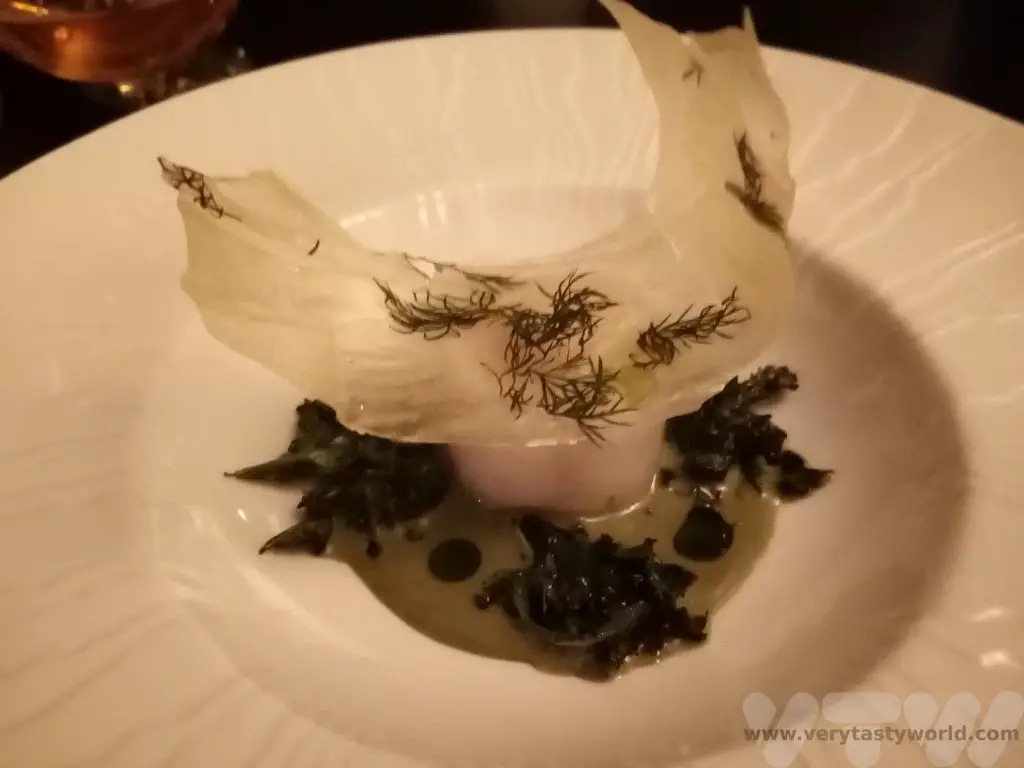
Fine Dining at Huset
We decided to treat ourselves to a dinner at acclaimed restaurant Huset. Set in a former community centre built in the 1950s, it’s located a few kilometres out of town, so we needed to take a taxi to get there. Taxis are plentiful but not very cheap. Still, this was a treat. The ethos of this restaurant is to present food from the region in the form of a Nordic tasting menu.

Our welcome was warm and friendly, each dish was presented beautifully and came not only with an explanation of what we were eating but information about its provenance, sometimes even including the name of the hunter. It was also lovely to see the chef himself serve some of the courses – it’s always nice to be able to compliment the cook directly.
Prices for the tasting menu were similar to tasting menus in the UK.

The lovely staff at Huset also offered us a chance to tour the building and see their astonishingly well-stocked wine cellar. It’s one of the best in Europe and has around 15,000 bottles. We tentatively tiptoed around the cellar, a little bit scared of turning too quickly and knocking over several thousand pounds worth of exceptionally good wine.

The tasting menu can be accompanied by a wine pairing and it is also possible to request a beer pairing to accompany each dish. All the beers are local and supplied by Svalbard Brewery.
The food was exquisite and beautifully presented. It made for a truly memorable evening.
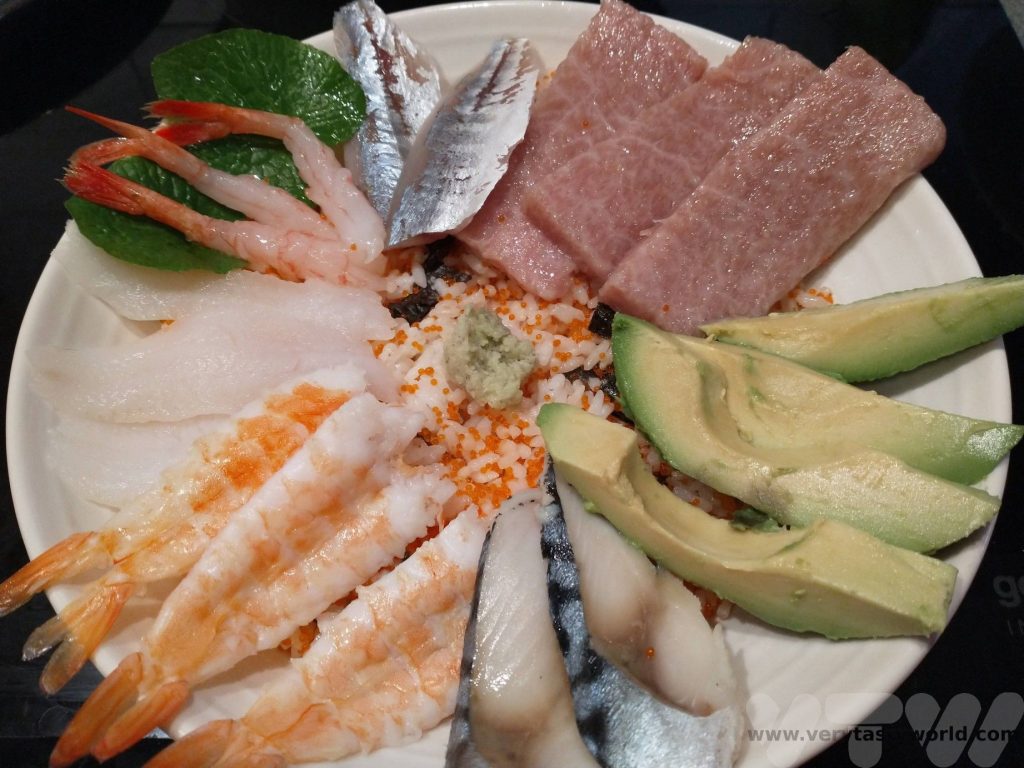
Sushi
Our hotel restaurant just happened to transform into the Nuga Sushi Bar in the evenings so we felt it would be rude not to partake, especially as sushi is our favourite food in the world. It’s always interesting to see how other cultures present sushi and Norway is one of the largest seafood exporters in the world, so local fish is guaranteed to be very fresh and top quality. We enjoyed a sushi platter. The tuna was – unsurprisingly – not the greatest we have ever tried (tuna not being a fish indigenous to Norway’s waters) but the salmon was fresh and delicious and the scallops were probably the largest and juiciest we have ever eaten.
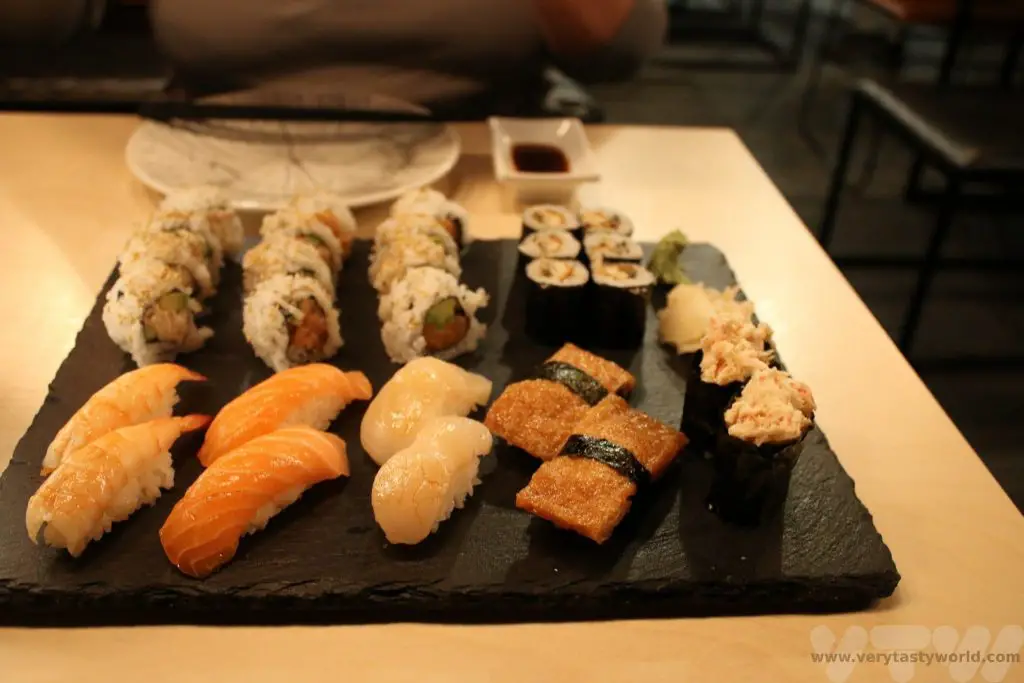
There are plenty of restaurants along the main street and in the mall. Stationen offered what we would call pub grub. Straightforward honest food and some seriously good fish and chips!

DIY Food
The supermarket in town has a wide variety of products if you don’t fancy eating out. There are all sorts of fresh products and convenience food. You can even buy dried expedition food which you can rehydrate if you have a kettle in your hotel room.
DIY Booze
If you enjoy a tipple, alcohol in Norway is expensive. Svalbard is actually less expensive than the mainland due to a different tax regime but it’s still pretty pricey. You can only buy booze in the alcohol store, next door to the supermarket. Keep an eye out for opening times.
There are alcohol restrictions for local people. They can buy as much wine as they like but are restricted on how much beer or spirits they can buy in a month. Residents have an alcohol card to record their purchases. This convention dates back to Longyearbyen’s mining heritage – apparently miners aren’t fond of drinking wine but enjoy beer and spirits!
Tourists can buy as much booze as they can drink but will need to show their airline boarding pass or ticket at the checkout to prove that they are not living in the area. And there will be restrictions on how much alcohol you can take off the island.
What to Bring to Svalbard in Winter
Warm clothes. When we say warm clothes we mean proper warm clothes. We recommend layers and clothing to cover your whole body. We took a base layer (tops and bottoms), several long sleeved tops, thick trousers, double pairs of socks plus hats, gloves, scarves and balaclavas.
Solid outdoor shoes – in winter you will be walking on ice and in snow. You need to have decent walking boots and they need to be waterproof.
Spikes – these nifty little rubber fittings have small metal spikes underneath and can be attached to most types of shoe and boot. They give a massive amount of grip when walking on ice and make the world of difference between slipping and sliding all over the place and walking normally.

Reflective jacket or strips. It’s dark all the time so it’s good to be visible to oncoming cars if you need to cross the road. The tourist information bureau has some that you can borrow if you wish.
Indoor Shoes – Longyearbyen was established as a mining settlement and the miners spent long days at the coal face. When they returned to their accommodation their boots would be covered in coal dust – so there is a convention that people remove their shoes indoors. Our hotel had multiple lockers to put boots in. We did take some indoor shoes to wear but changing them was a bit of a faff so we ended up walking around indoors in our socks, which worked fine for us. But bring some indoor shoes or slippers if you wish.
A camera that works well in low light. In retrospect, our phones and camera struggled with the darkness. Many of the shots we took were wobbly due to the light conditions.
Although some of the shots turned out to be quite arty and cool – quite by accident.

Even though we didn’t see the Northern Lights, we had an amazing time in Svalbard. Everyone was very friendly and welcoming and it was strange but curiously wonderful to experience darkness all day.
Related Posts You May Enjoy


RECIPE: Vegan Wild Garlic Pesto
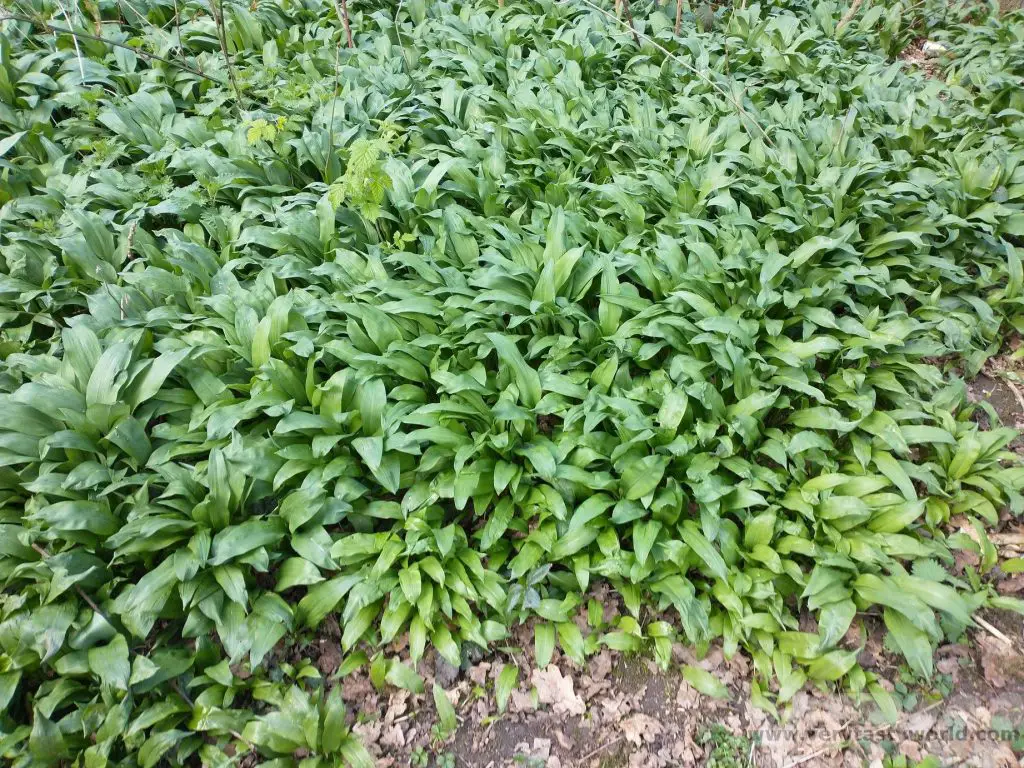
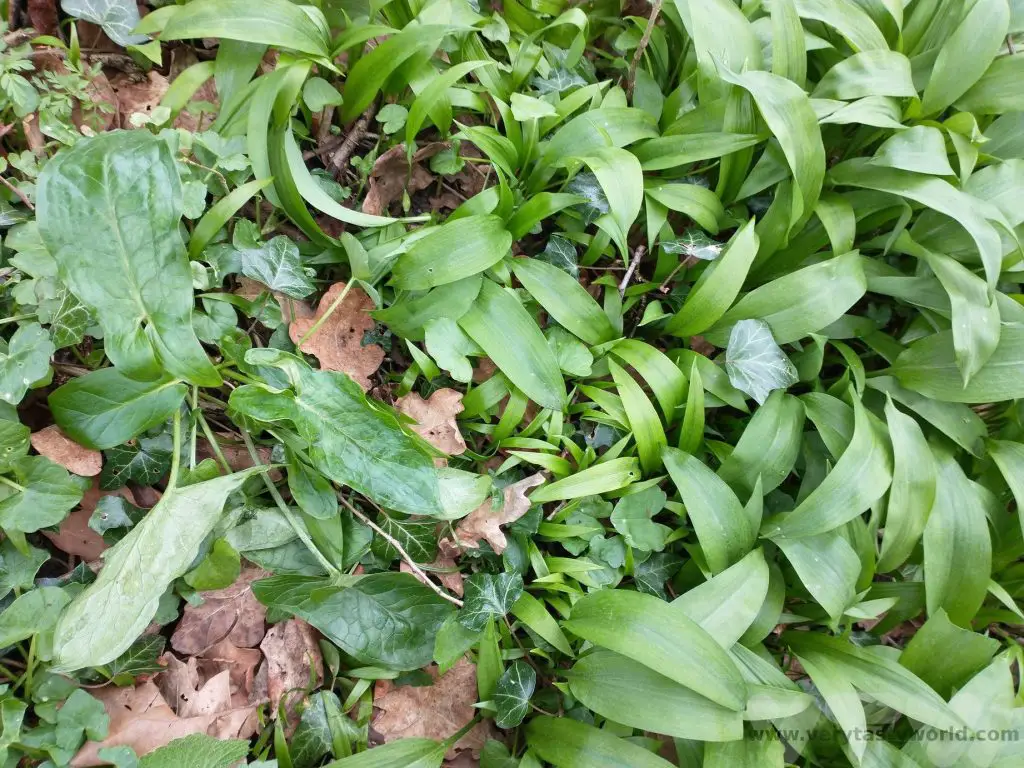
Every spring we make the most of foraging for greens in the English countryside. Wild garlic is our absolute favourite and we have a fabulous recipe for wild garlic pesto. But pesto uses cheese! So we also have a recipe for vegan wild garlic pesto.
In the UK you can forage wild garlic for free as long as you just take the leaves, stems and flowers. All these parts are edible. We make it a rule never to take more food than we need as it’s nice to leave some for other people and also ensure that the plant will appear next year. We try to pick one leaf from each stem so as not to disturb the plant too much.
Foraging for Wild Garlic
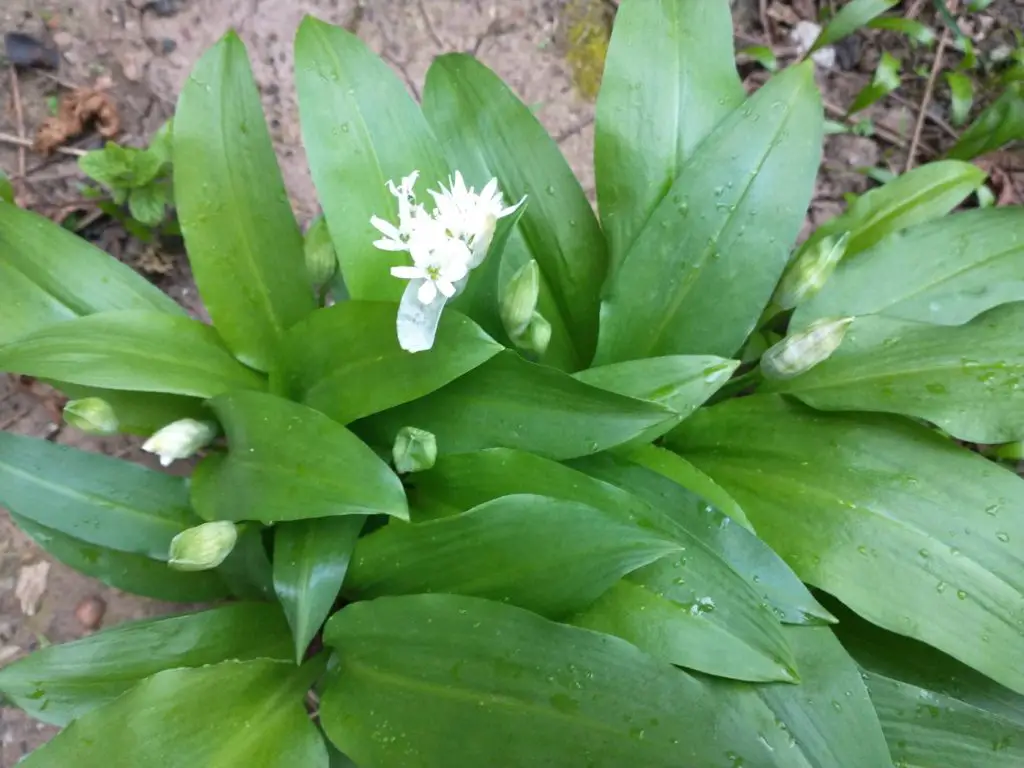
Wild garlic is pretty easy to recognise and has a very definite garlicky smell. Pick a leaf and crush it in your hand – it has a wonderful scent.
A little later into the season lovely white flowers appear. These have a very mild garlic flavour – we use them to garnish dishes.
As with any foraging, you have to be 100% certain of what you are picking. Poisonous plants can grow near wild garlic. Arum maculatum, also known as Lords and Ladies, is very toxic. Apparently even putting the leaves into your mouth will result in an immediate burning sensation. It can grows worryingly close to the wild garlic. When it’s more mature it develops shiny arrow-head shaped leaves but when young, looks very similar to wild garlic.
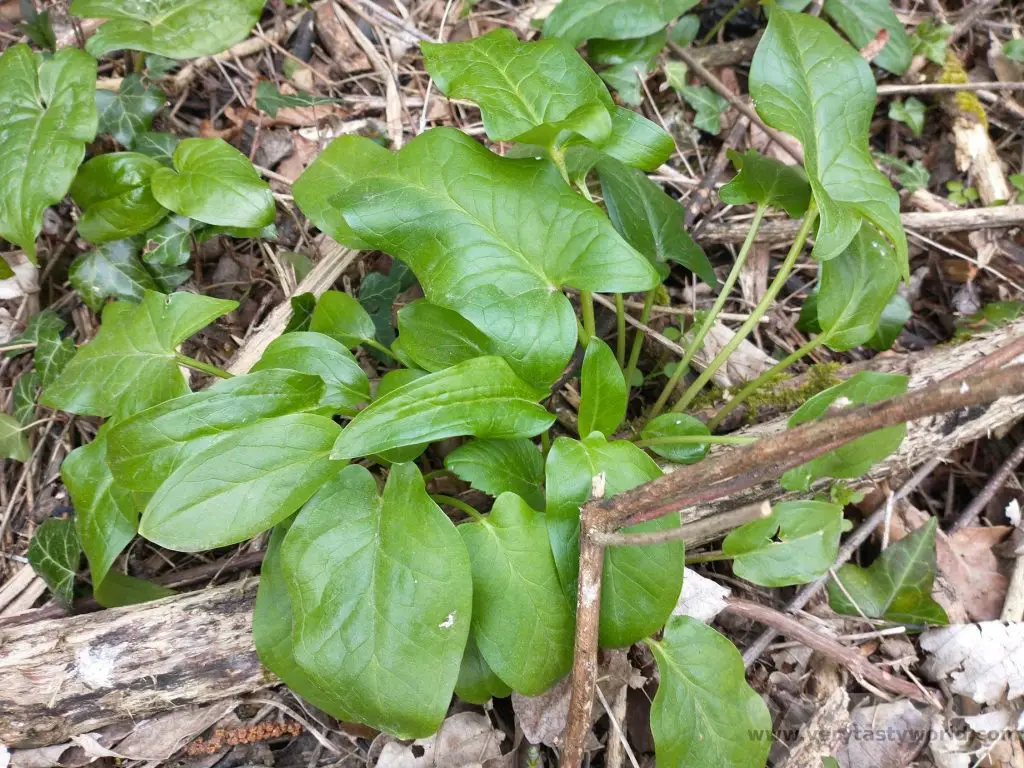
Bluebells, or their white-flowered counterparts, which can also easily be confused with wild garlic’s white flowers, can also grow nearby. Bluebells are extremely pretty but also poisonous.
If you are the slightest bit uncertain, DON’T eat it!
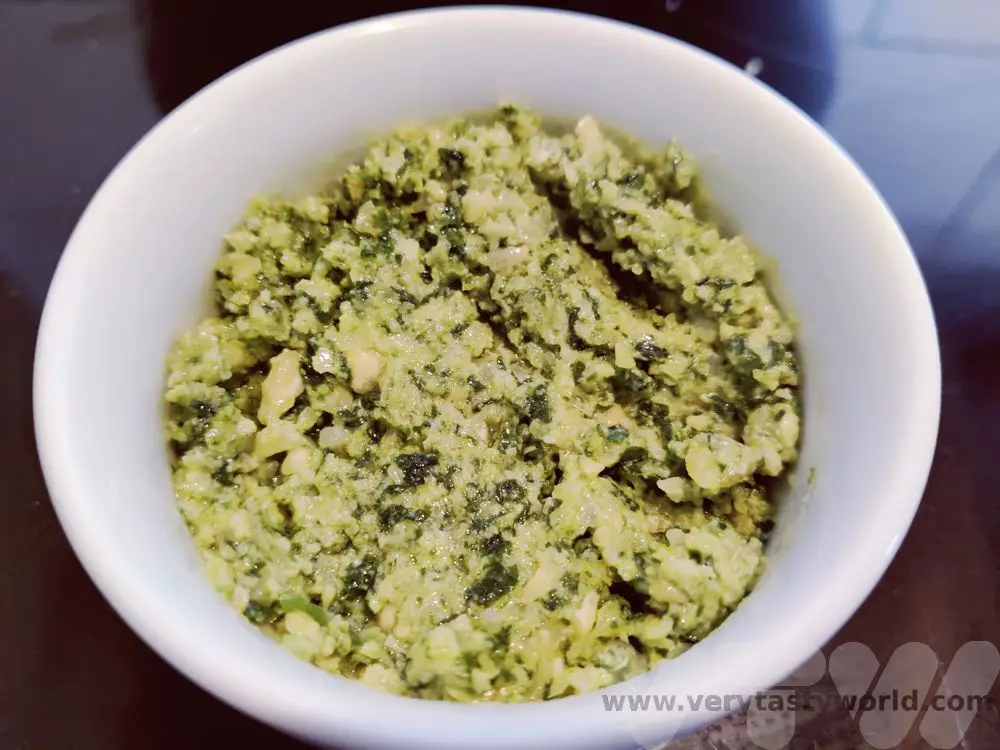
Vegan Wild Garlic Pesto Recipe
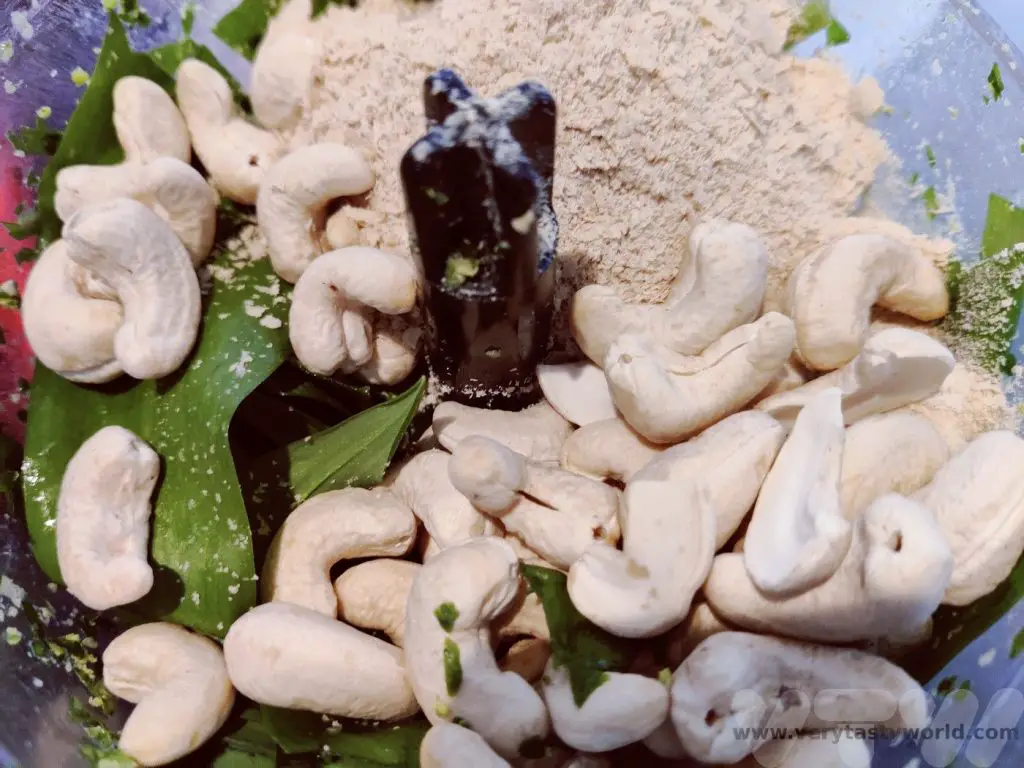
Just like our standard recipe our vegan wild garlic pesto isn’t precise. We use cashew nuts but you can also use pine nuts (and weep at the expense) or pistachios. You can use a blender to mix everything together but if you’re feeling hardcore you can use a pestle and mortar.
We use nutritional yeast as a substitute for the cheese. It’s a brilliant product that is really good for you – a great source of protein, fibre, vitamins and minerals. More importantly it has a cheesy flavour, perfect for adding that umami element to the pesto amidst the creamy cashew and heavenly garlicky scent.

Ingredients
Bunch of wild garlic leaves (around 150g)
Handful of cashew nuts (around 150g)
Generous sprinkle of nutritional yeast flakes (we recommend couple of tablespoons if you’re measuring)
Slosh of extra virgin olive oil
Squeeze of lemon
Pinch of salt
Method
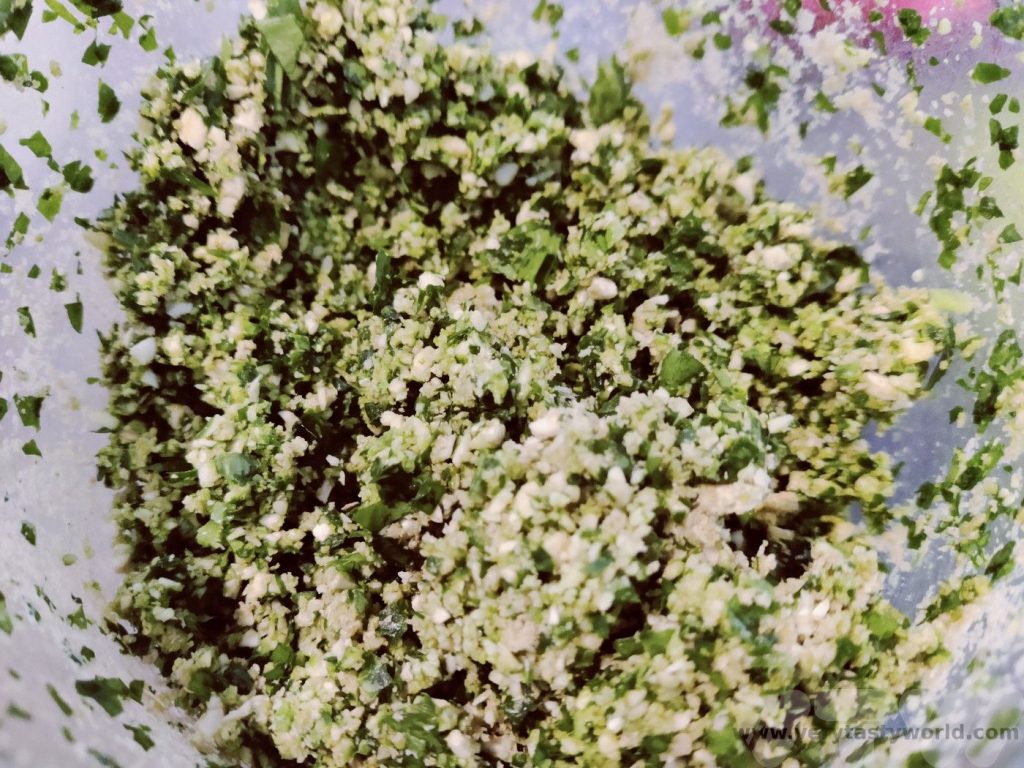
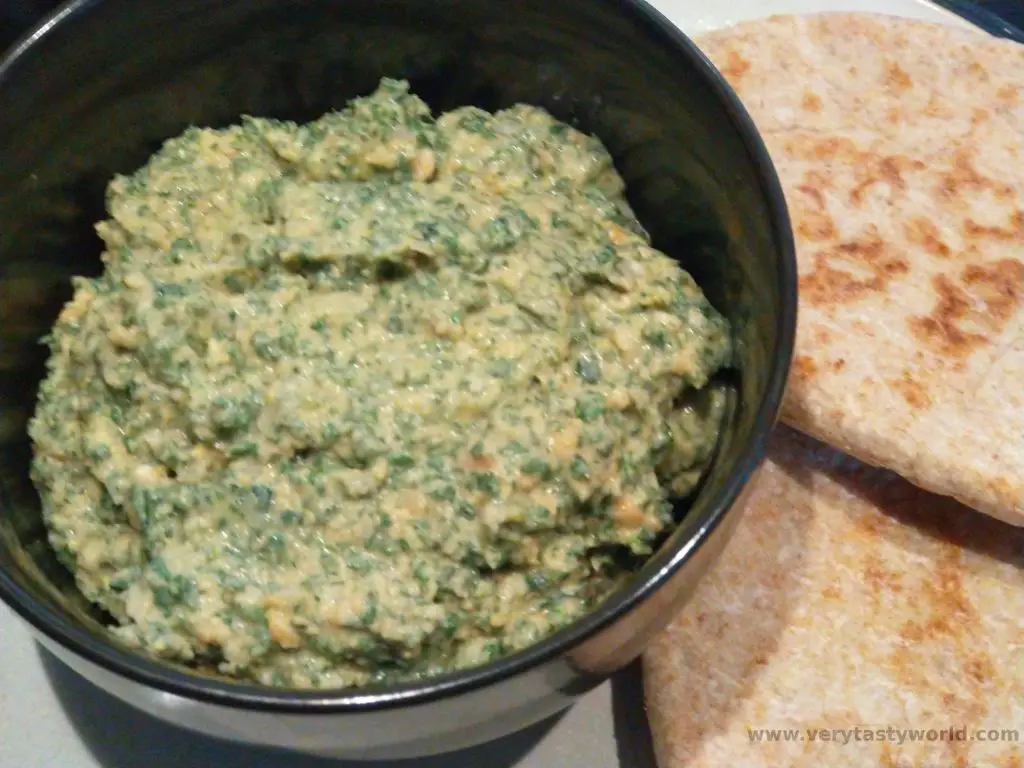
Roughly chop the wild garlic leaves and place into a blender. Throw in the nuts and nutritional yeast flakes. We recommend adding the leaves first – to the bottom of the blender – so that the weight of the nuts helps with the grinding process.
To take advantage of the season we make industrial quantities and freeze it, so we can enjoy the scented flavour of spring throughout the year. We don’t add the oil, lemon and salt before seasoning but stir it in after it has defrosted.
Blend together until you get the texture you like – smooth or nutty – both work well.
If you want to freeze the pesto, decant it into containers and put it into the freezer. It will freeze well and will last many months.
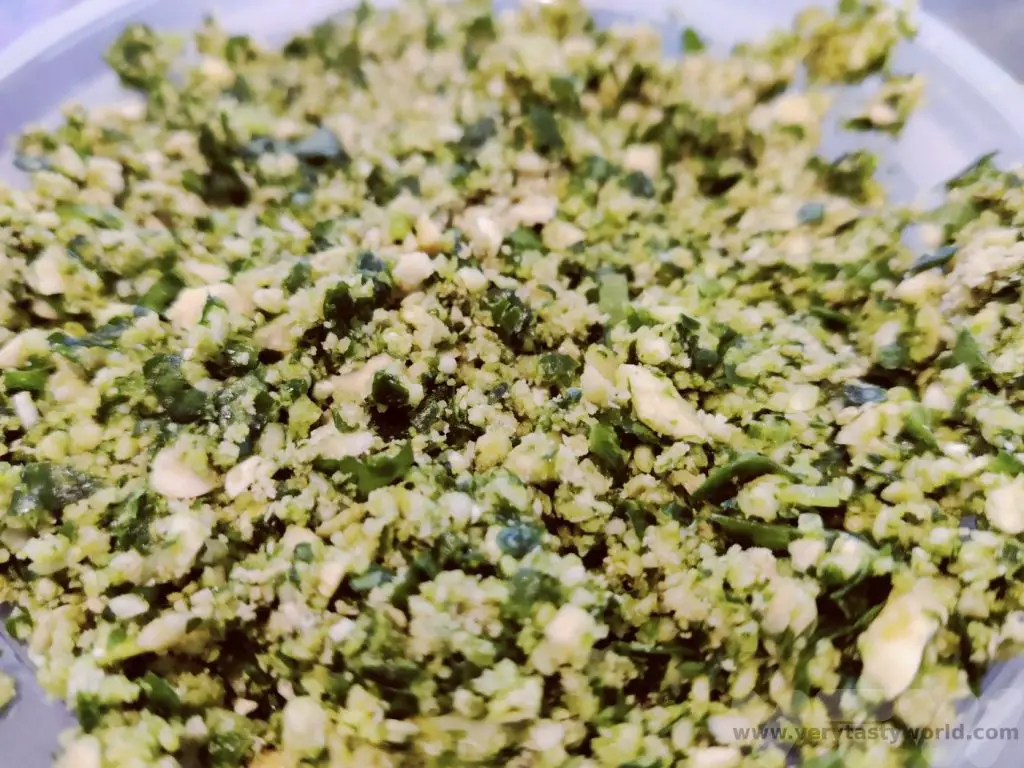
If you want to eat the pesto straight away (or store it in the fridge for a couple of days) add the oil, lemon juice and salt.
The great thing about this recipe is that is so easily adaptable – you can mix and match ingredients. It’s the underlying gentle garlicky flavour that the wild garlic leaves produce that make this such a brilliant pesto. We’ll be foraging and freezing for as long as the season lasts.
Related Posts You May Enjoy


- RECIPE: How To Make Elderflower Champagne

- RECIPE Oyakodon Donburi

- Zero Waste Recipes Before Your Holiday

- RECIPE: Vegetable Biryani Tamil Nadu Style

- RECIPE: Vegan Wild Garlic Pesto

- Recipe: Venetian Pasta Sauce

- RECIPE: Biryani Raita Recipe

- RECIPE: How to Make Costa Rica’s Gallo Pinto

- Recipe: Japanese Simmered Pork Belly – Buta no Kakuni

RECIPE: Biryani Raita Recipe
There are many cuisines around the world that use yoghurt-based dips or sauces to accompany particular dishes. Tzatziki is a Greek dish which incorporates cucumber and herbs into a Greek yoghurt. Salatat Khyar is an Arabic salad which is similar to tzakziki in that it uses cucumber and mint with the yoghurt but can be eaten as a standalone salad. And then there’s raita, often used in Indian cuisine as an accompaniment to ‘cool’ the spiciness of a main dish. This biryani raita recipe is simplicity itself to make and really delicious.
Yogurt is ideal to counteract the heat of chillies in any dish it accompanies. There’s a protein called casein which is found in dairy products. It binds to the active component of chillies which is called capsaicin and is the main cause of the burning sensation in the mouth. The casein helps soothe the burn. If you eat a spicy chilli, a drink of milk will help quash the heat far better than water.
(The combination of chilli and cheese in Bhutan’s national dish is cleverly designed to be spicy but the intense heat is tempered by the cheese.)
Raita uses cucumber but it can also have other vegetables such as onion and carrot, often diced. This dish can easily be adapted to incorporate different vegetables or even spices. If you wanted to add a warm earthiness, chuck in a teaspoon of cumin. Or add a touch of fire with a teaspoon of chilli or paprika. Harissa is a nice addition for a Middle Eastern dish. Similarly, you can vary the herbs – mint is a lovely alternative to the coriander or you can just add both in.
Our biryani raita is fantastically flexible in accompanying so many different types of dish.
Biryani Raita Recipe
Ingredients
3 heaped tbs plain natural yoghurt
2 garlic cloves (use 1 if you’re not so keen on garlic or are planning on kissing someone later on in the day)
Juice of half a lemon
Half a cucumber
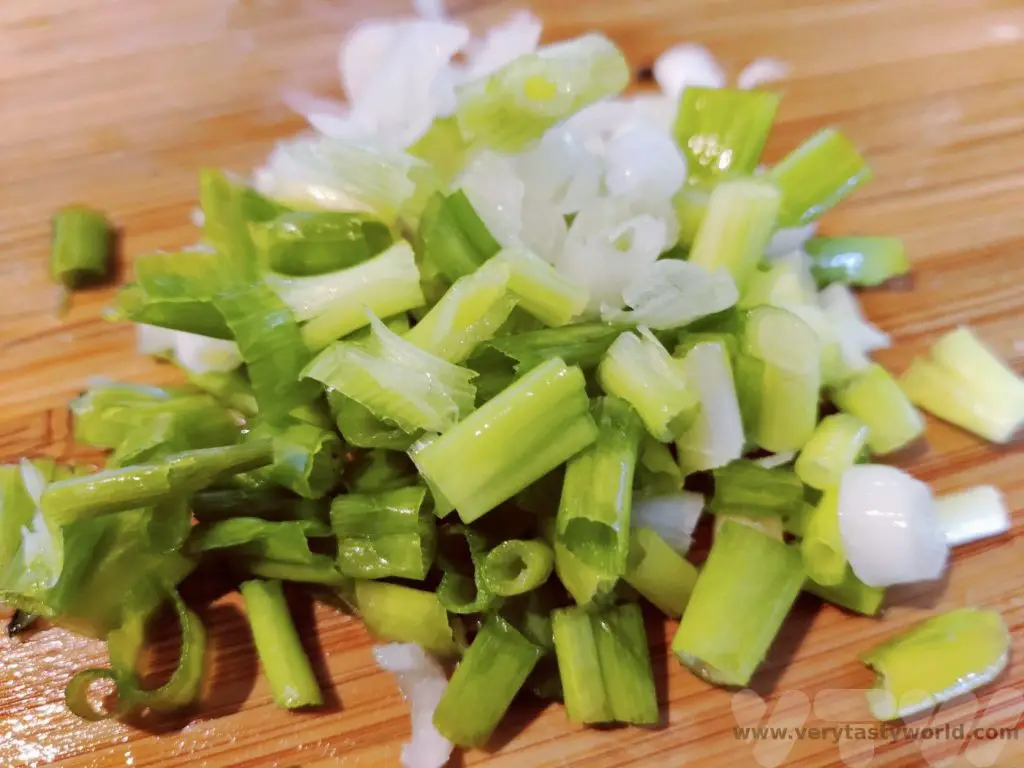
2 spring onions (green onions)
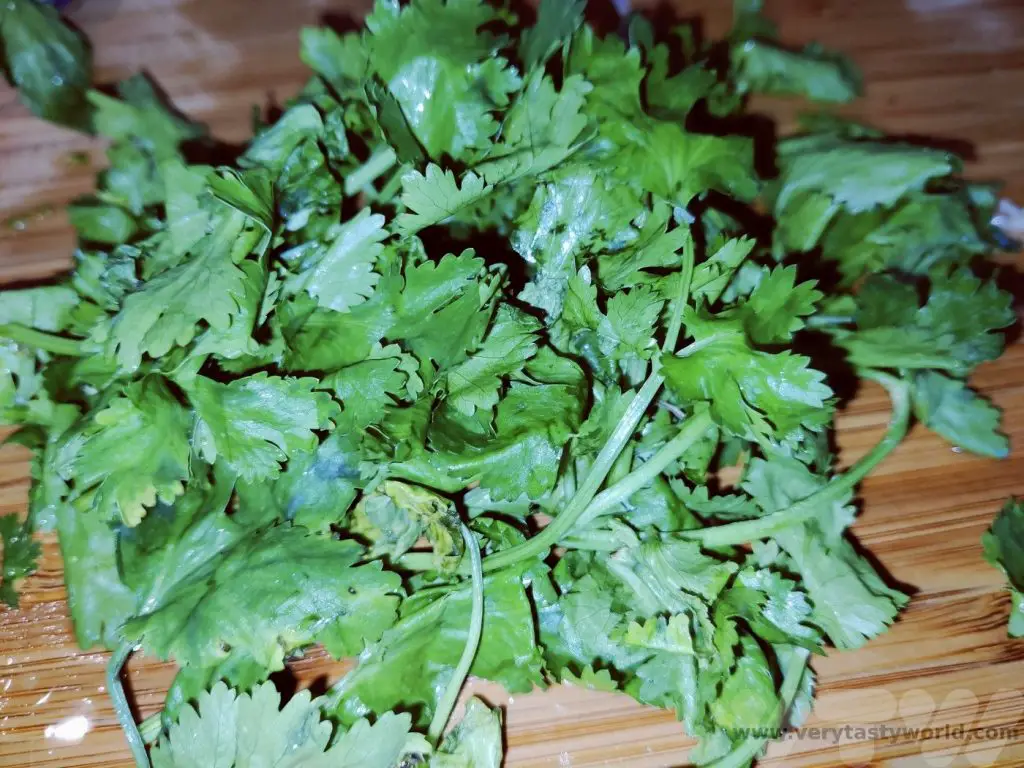
Bunch of coriander/cilantro (mint also works really wall, or combine the two)
Pinch of salt. We particularly like crystal salt rather than table salt
Method
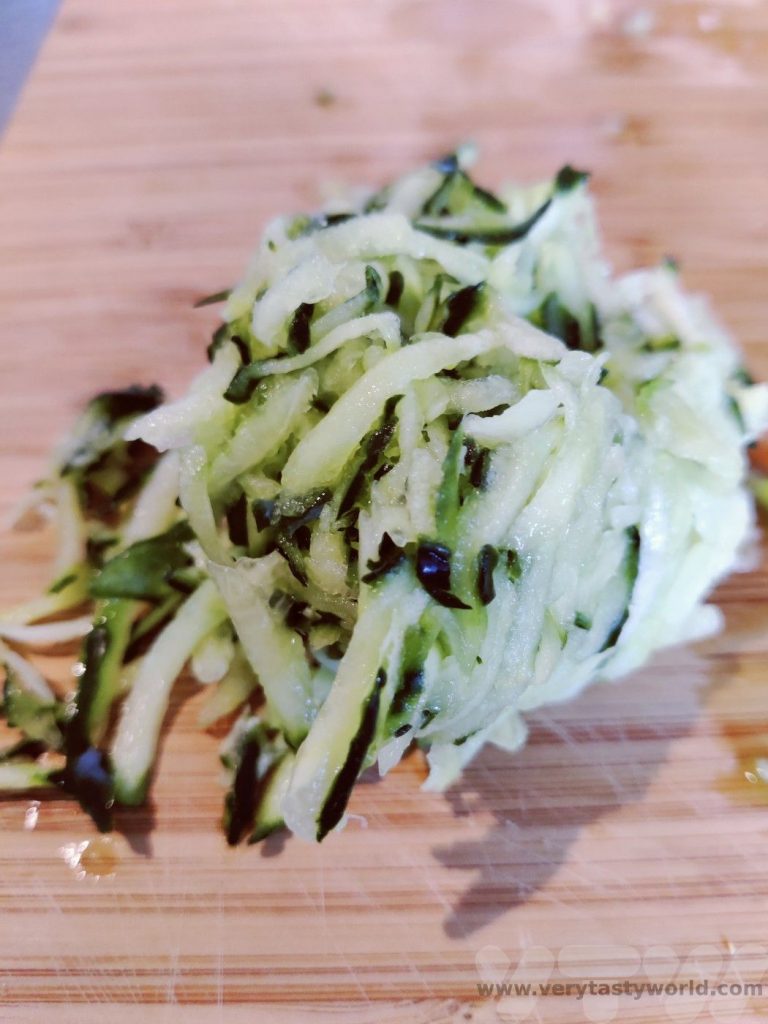
Grate the cucumber.
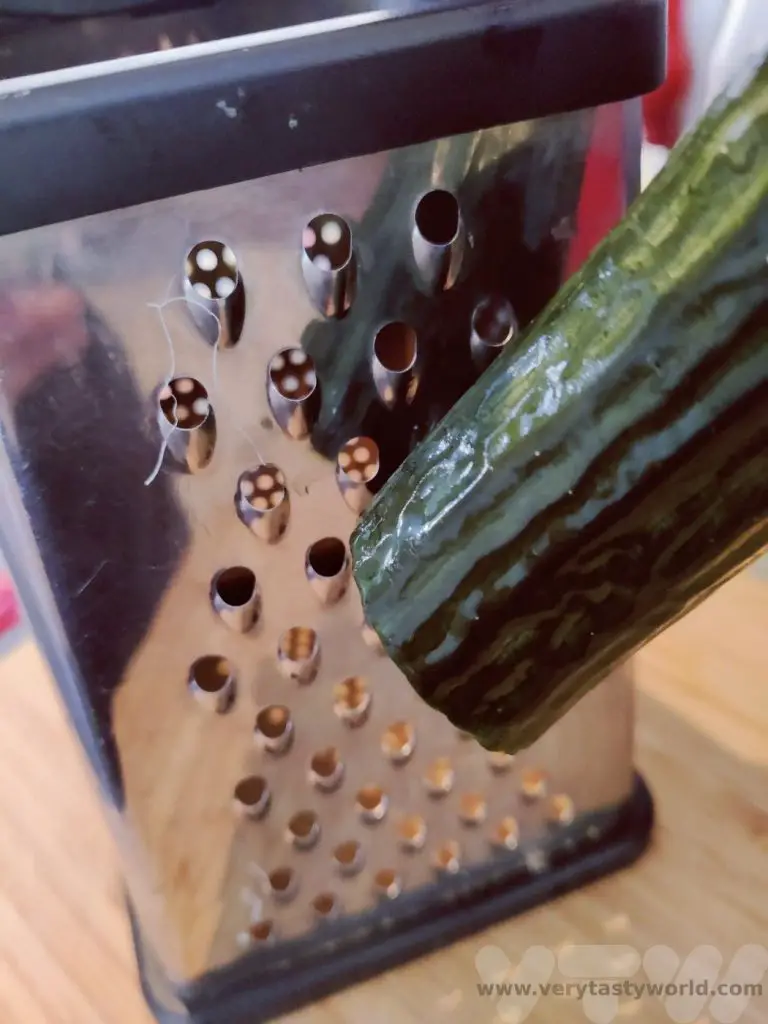
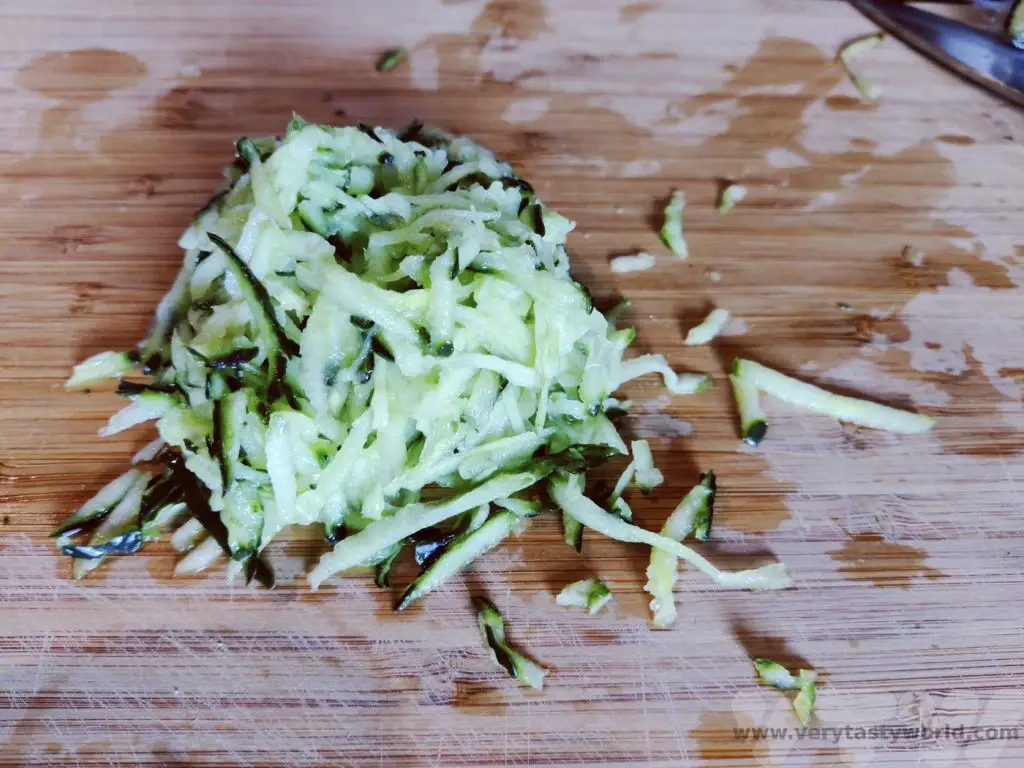
Gather up grated cucumber and squeeze the water out.
If you wish you can wrap the grated cucumber in a tea towel to absorb the rest of the water. It’s important to get as much water out of the cucumber as possible to avoid the raita becoming watery.
Finely chop the spring onions and coriander.
Place yoghurt in a bowl. Add the cucumber, spring onions and coriander.
Grate the garlic into the bowl – we find that a microplane grater is perfect for this. Our you could use a standard garlic press.
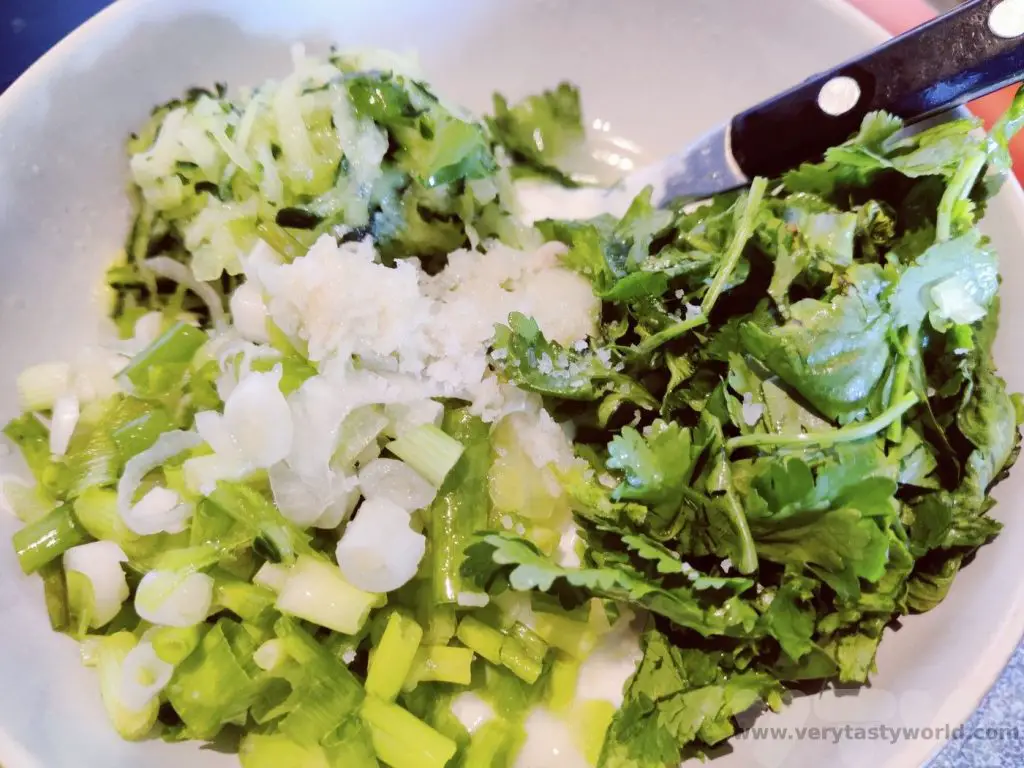
Squeeze the lemon to extract its juice, making sure that none of the pips end up in the mixture, and add the salt.
Mix together.
Ready to serve.

This works brilliantly to accompany a biryani, and cool it down if it’s particularly chilli hot.

Or a delicious dollop as a great accompaniment to felafel in a wrap.

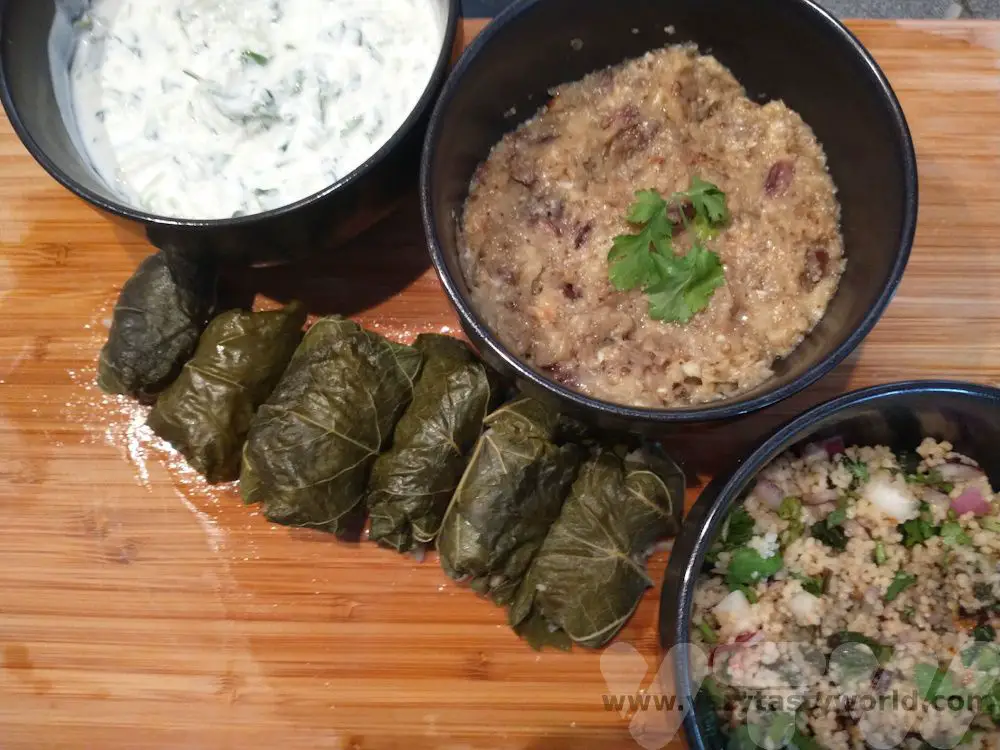
Or to accompany a Middle Eastern mezze. Here with home-made dolma (stuffed vine leaves), baba ganoush (aubergine dip) and tabbouleh (cous cous herb salad).
Related Posts You May Enjoy

- RECIPE: How To Make Elderflower Champagne
- RECIPE Oyakodon Donburi
- Zero Waste Recipes Before Your Holiday
- RECIPE: Vegetable Biryani Tamil Nadu Style
- RECIPE: Vegan Wild Garlic Pesto
- Recipe: Venetian Pasta Sauce
- RECIPE: Biryani Raita Recipe
- RECIPE: How to Make Costa Rica’s Gallo Pinto
- Recipe: Japanese Simmered Pork Belly – Buta no Kakuni


A Chiang Rai Temple and A Country Retreat
Sometimes it’s possible to visit a place without actually going to the place itself. If that makes sense? This happened on our trip to northern Thailand. We had spent some time in Bangkok and Chiang Mai before heading towards the city of Chiang Rai. But somehow we didn’t quite manage to visit the city itself. Having driven up from Chiang Mai, our first stop was a famous Chiang Rai temple – The White Temple – followed by a lovely couple of days exploring the local countryside.

Chiang Rai Temple – The White Temple
It’s located about 13 kilometres south of Chiang Rai city and we can honestly say it’s one of the most bizarre buildings we have ever visited.
The temple itself was conceived and designed by Thai artist Chalermchai Kositpipat and built on an enormous scale, designed in the style of a Buddhist temple. Kositpipat also supervised the construction of this remarkable building. Although it bears a strong resemblance to ancient temples of the region, it is a modern structure which opened in 1997.
The building also has ornate naga serpents, supernatural creatures that are part human, part snake, which typically decorate Buddhist temples and are revered throughout the region.

You cross the Bridge of the Cycle of Rebirth…

…passing by the fearsome guardians…

…over the lake of the damned souls…

…in order to reach heaven.

It is possible to go inside the temple, known as the ubosot, but, sadly, you are not allowed to take photos in there. We absolutely respected this, but it’s a shame because it contains the most astonishing bright and colourful murals. They combine Buddhist imagery with all sorts of modern historical and cultural icons – everything from Spider-man to Doraemon and Hello Kitty! The theme that pervades the White Temple is the conflict between good and evil in the world. You could spend hours enjoying the details, spotting all sorts of characters.
Chiang Rai’s White Temple Grounds
The temple itself was designed to be white to represent purity; a conscious choice to contrast with the temples throughout Thailand which are typically decorated in gold. Kositpipat apparently considered gold to be a colour for people who coveted evil thoughts and deeds. So it is the bathrooms that are decorated in a gorgeous gleaming gold. Possibly the most ostentatious toilets in the world!

Even the traffic cones and trees are bizarrely decorated!


Kositpipat didn’t want money to be a consideration for visitors, so when we visited entrance was free. However, these days there is a nominal charge that is used towards maintaining the temple and gardens. Which is fair enough.
A Rural Retreat
Having visited the Chiang Rai temple we then headed out towards the hills.
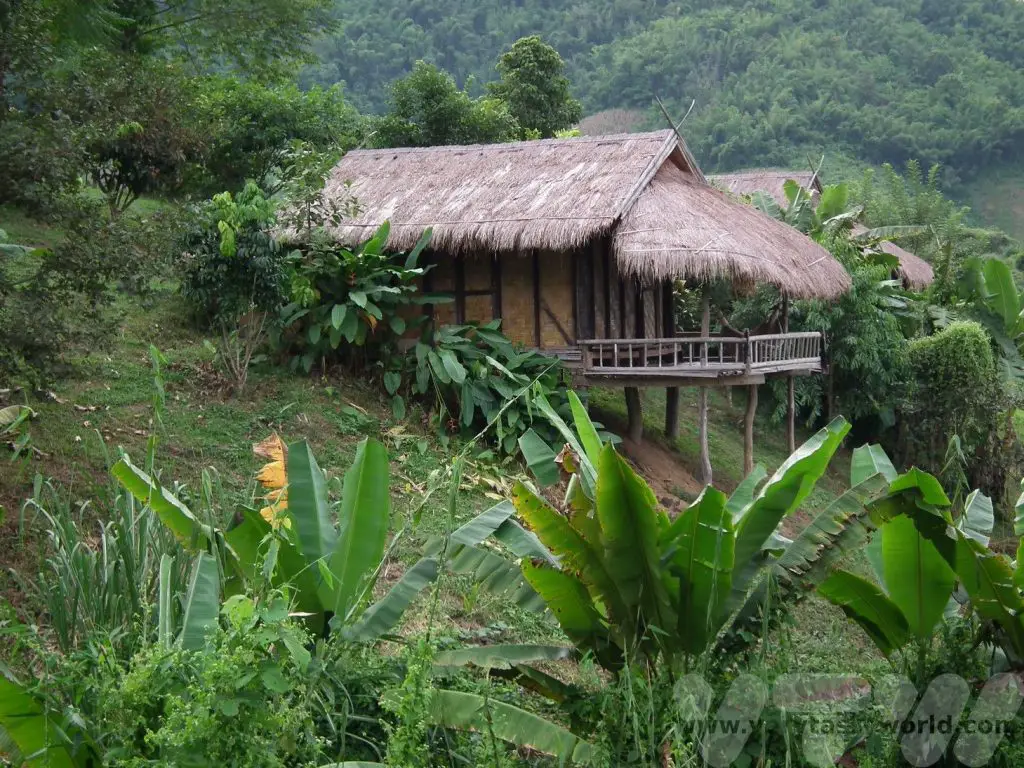
We were staying at the delightful Bamboo Nest, a rural retreat in the countryside. When you hear the phrase ‘rural retreat’ it often recalls images of luxury spas in pristine grounds but this was the opposite – a retreat much more suited to our tastes.
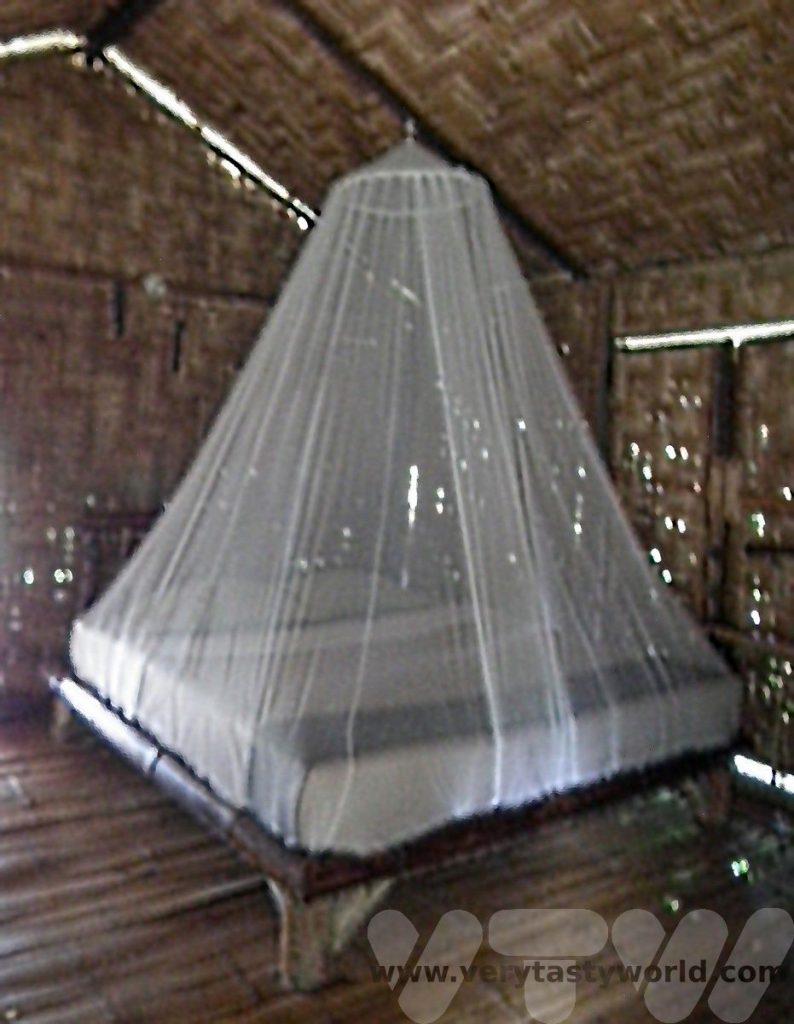
We stayed in a simple bamboo hut with thatched roof, which had no electricity and a wonderful view.

Dining was in a communal area where we enjoyed freshly cooked local meals with other guests. There was electricity available via a generator in this area which enabled the charging of phones and cameras and it also powered a fridge which conveniently contained cold soft drinks and beer, which you could purchase on an honesty basis. It was incredibly quiet and peaceful and a complete contrast to the hubbub of Thailand’s cities.
The Bamboo Nest team arranged our transportation to this remote site and will organise pickups if needed. Just get in touch directly to make a booking. We met Nok outside the White Temple and climbed into her 4WD, a vehicle that was most definitely essential for the area which we discovered as the car climbed higher and higher up the mountainside. The final leg of the journey was incredibly steep, muddy and occasionally slippery – a challenge even for a sturdy 4WD.
A Hike to the Hill Tribes
The main purpose of our visit was to enjoy some hiking in the area and to meet the local hill tribes. The hosts at Bamboo Nest can arrange a variety of excursions, either on a guided or self-guided basis, and we enjoyed a lovely long walk with Noi. It was initially a little disconcerting when he picked up a machete just before we headed out, but the walk was to take us through the mountainside forest and at times we would need to cut our own path. The treks offered are truly off the beaten track.

Thailand is hot and humid and occasionally rainy, so we had some slippery moments, particularly descending some of the steeper hills. It’s worth making sure you have good shoes and waterproofs as well as a change of clothing, just in case it rains and gets muddy.
The Chiang Rai area is home to a number of hill tribes, including the Akha and Lahu peoples. Hill tribes are ethnic minority groups who have settled in the region, living in a plethora of villages that are scattered across the mountains. The communities can be quite large or may comprise just a few families living together. Some of the villages are set up to receive tourists but Noi and Nok know the local people well, so we were able to visit a non-tourist village which gave us a much more personal and insightful experience.
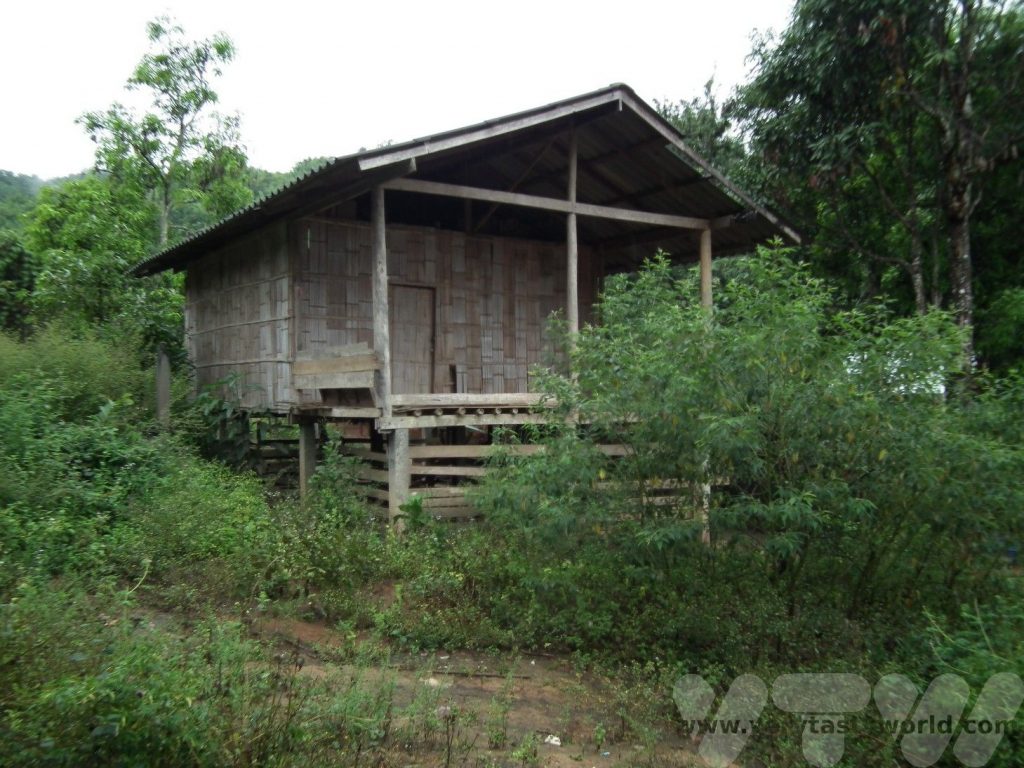
After a couple of hours hiking we arrived at one of the villages of the Lahu tribe. The homes are constructed on stilts and have adjacent buildings where the farm animals reside.
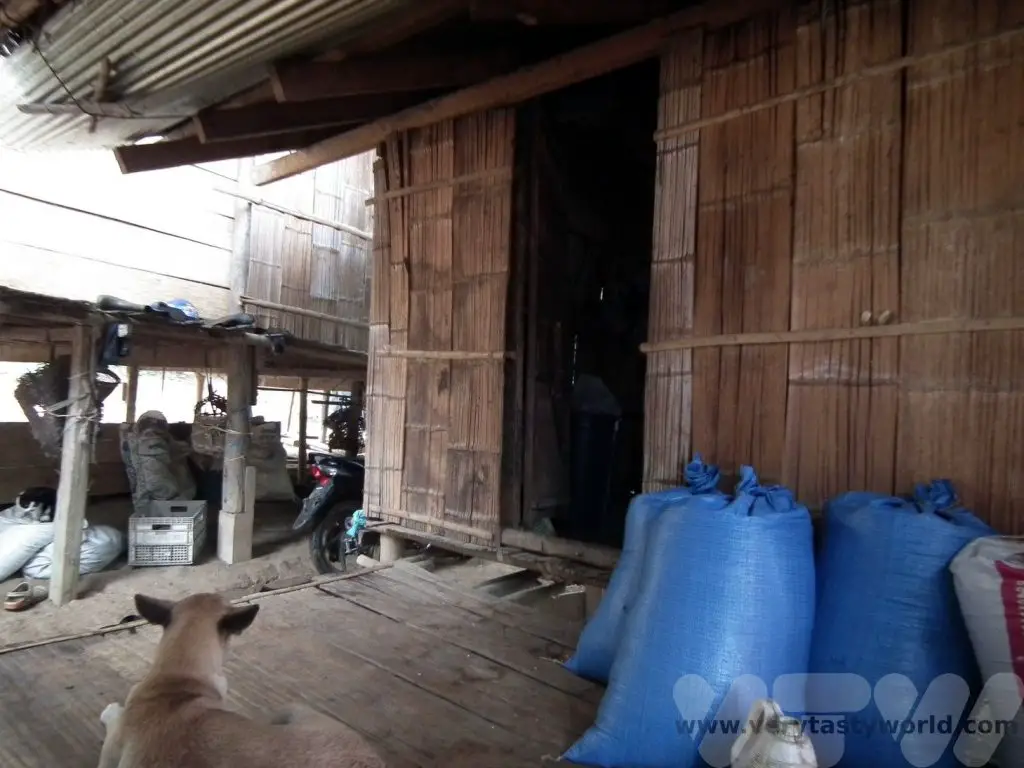

We were invited into a house to join a family where we helped prepare lunch.

The houses have an open fire inside the main living area. River fish was ponassed onto sticks and cooked directly over the fire.
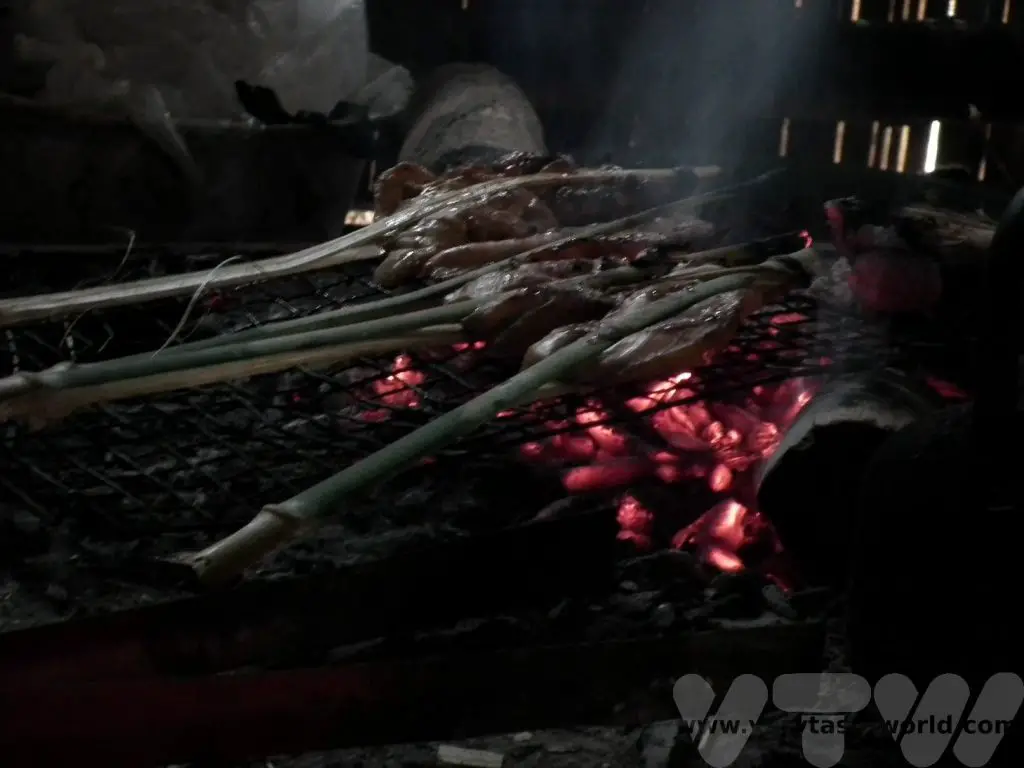
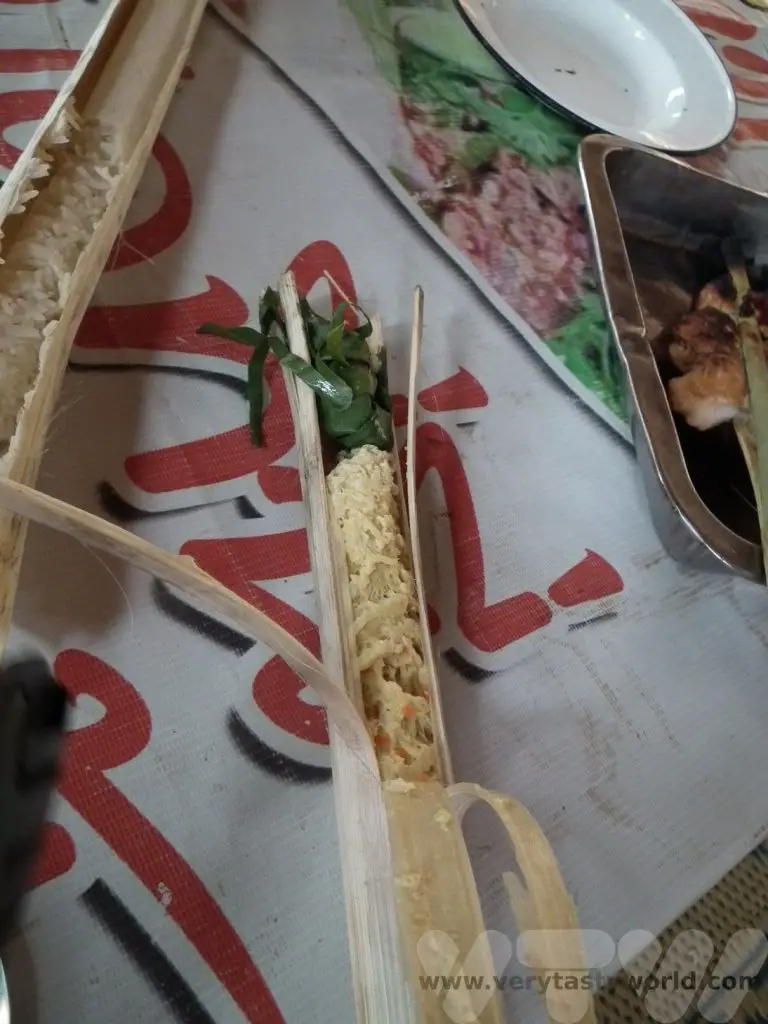
Bamboo stalks are segmented and hollow, so another part of meal was actually cooked inside these: Add sticky rice and water to a bamboo stalk, place it over a fire for a few minutes and… yummy sticky rice!
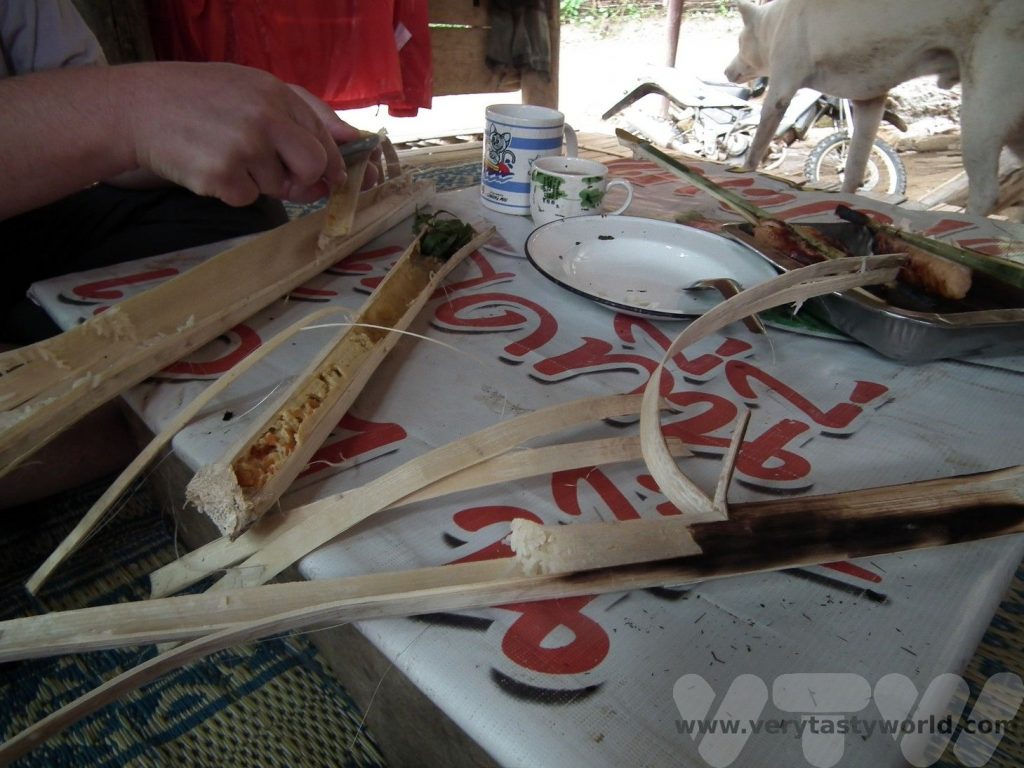
Pour some water into a stem, add a teabag, place over the fire and a few minutes later… a ‘pot’ of tea! Best of all was the egg – crack a couple of eggs, add some herbs, pour the mixture into the bamboo stalk, shake a bit, place over a fire (you guessed it) and a few minutes later… delicious cylindrical omelette.
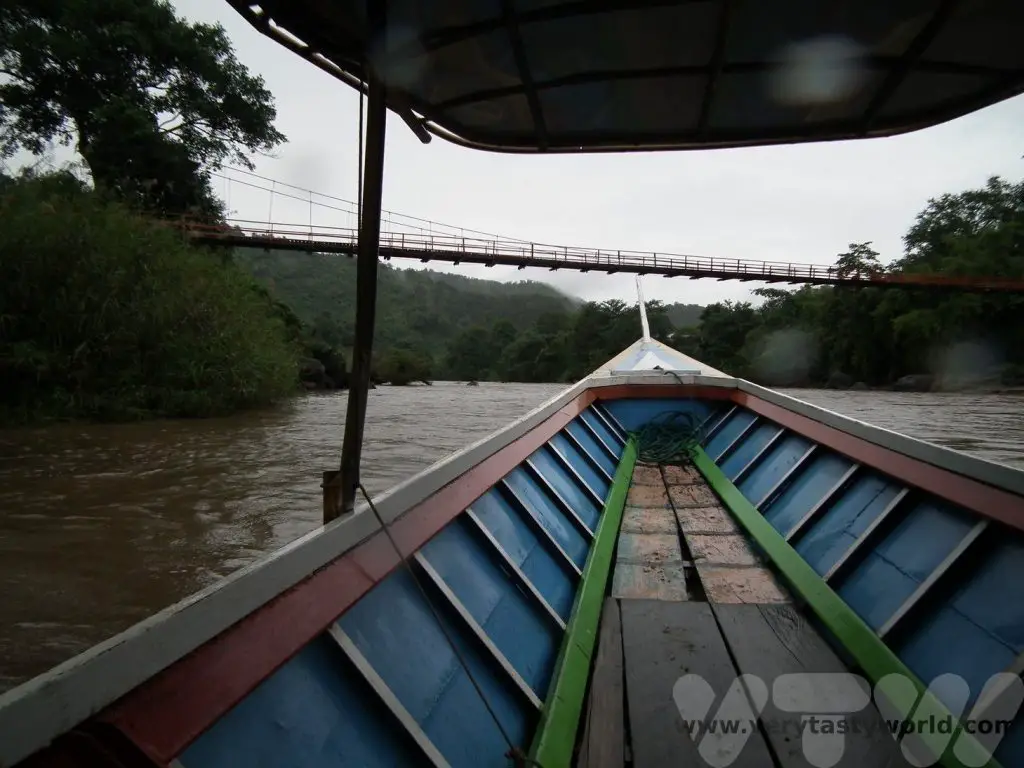
We then enjoyed a longboat ride along the Mae Kok river to visit the hot springs.
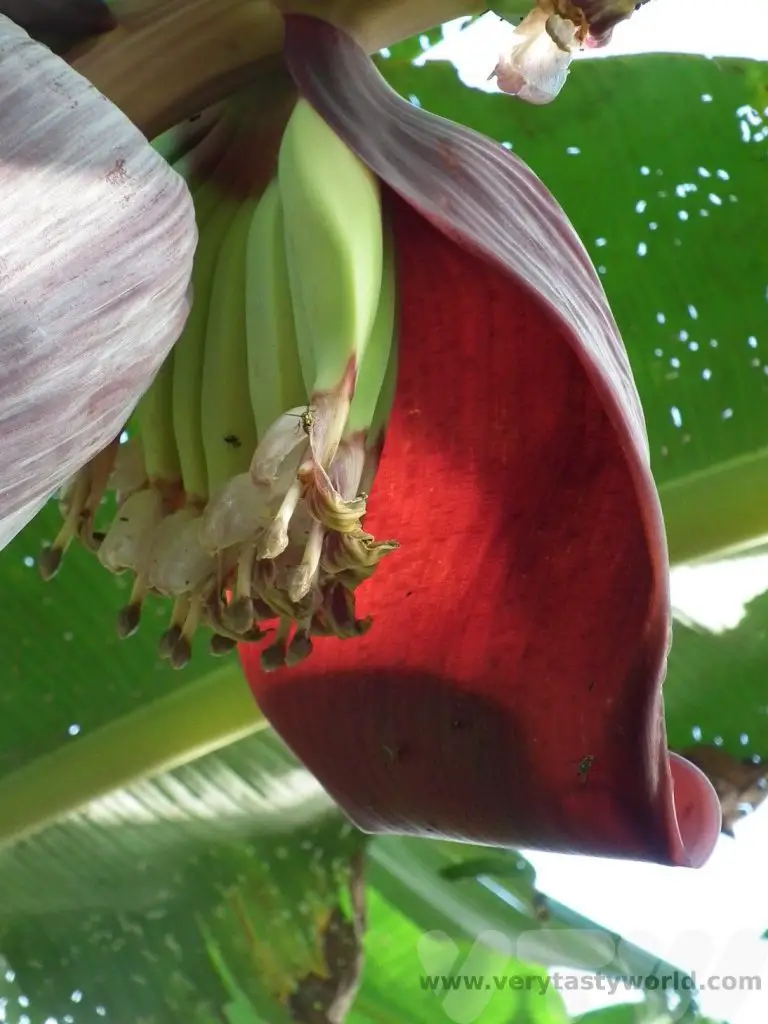
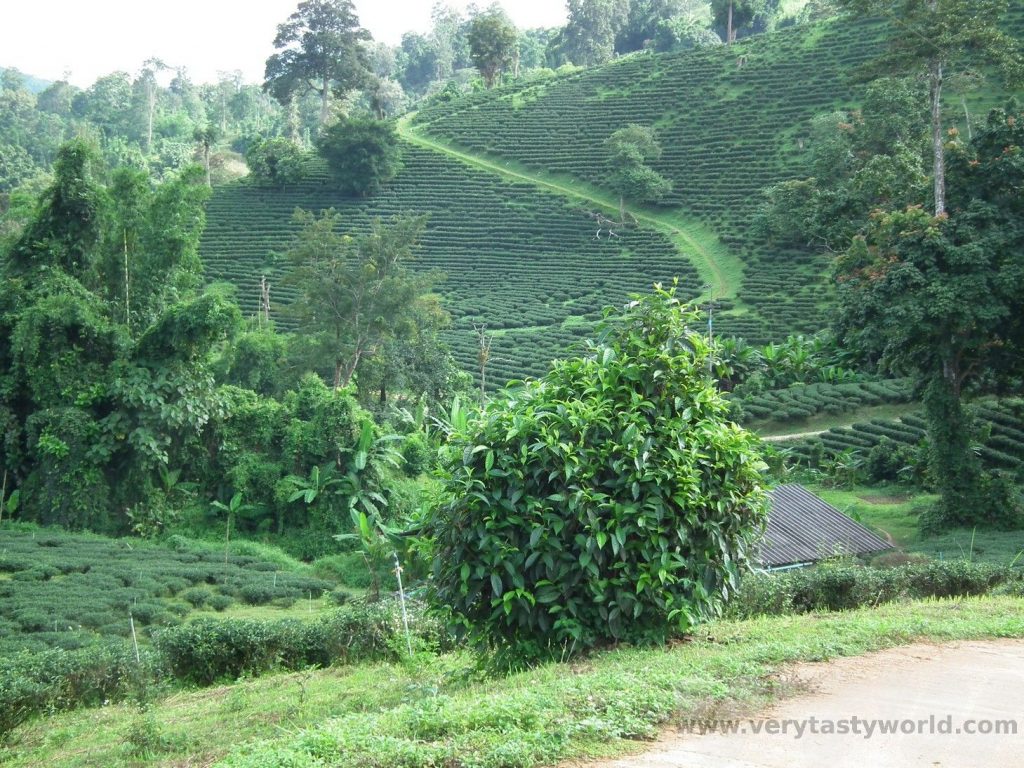
Some of the land in the area has been given over to commercial agriculture so it was also possible to walk to visit the local plantations. We could see bananas…
Pineapples…

And tea.
There were also some lovely waterfalls in the area.

Each night a bonfire would be lit at Bamboo Nest and we could chat with the other guests and watch the glow of the fireflies flitting through the forest.
From the ostentation of the Chiang Rai temple to the simplicity of the remote hills of the Mae Bok basin, we couldn’t have had a more contrasting experience in this region of northern Thailand.
We just didn’t have time to visit Chiang Rai itself!
Related Posts You May Enjoy


Recipe: Japanese Simmered Pork Belly – Buta no Kakuni
Japanese simmered pork belly, known as buta no kakuni, is a rich, indulgent dish that is sweet, savoury, sticky and utterly sumptuous. Pork belly is a really fatty cut of meat but fat means flavour and the process of cooking the pork for a long time ensures that a lot of the fat will melt away. Any fat that remains is soft and juicy.
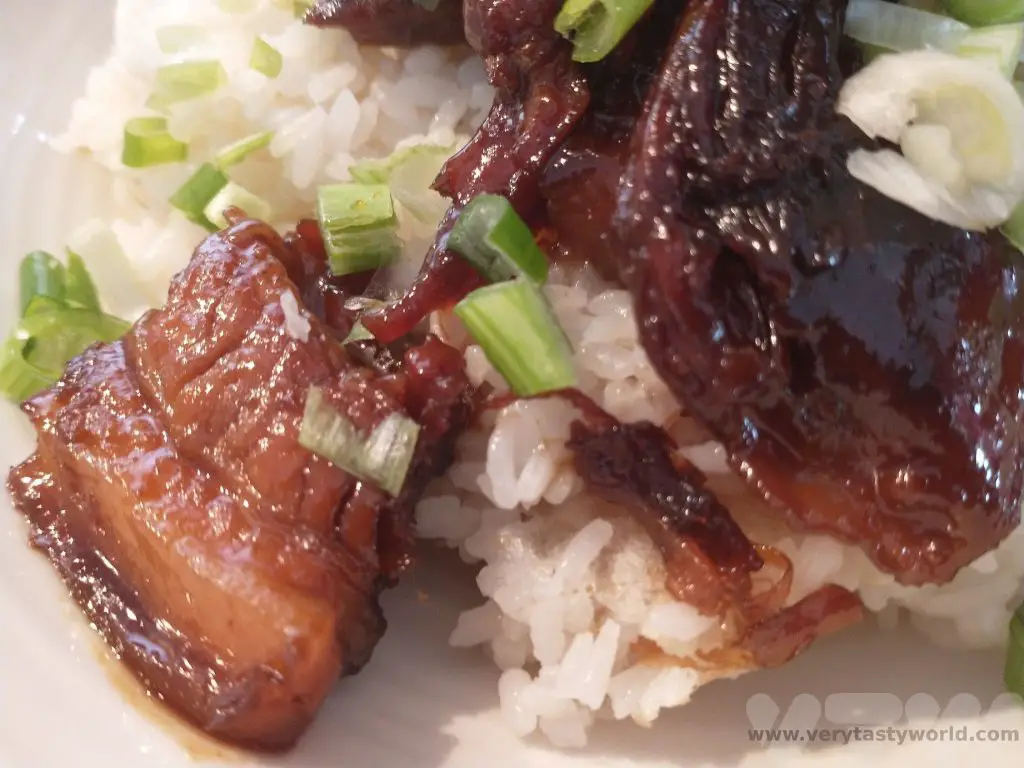
In Japanese, buta means pork and kakuni derives from two longer words: kaku- to cut into cubes and ni – simmer.
It is traditional to serve kakuni with a drop of Japanese mustard called karashi (辛子 or からし). Karashi is a bit darker yellow than most other mustard. It does not really have much acidity in it (unlike other mustards) and very hot. It is perhaps closest to hot English mustard, which is a good substitute.
How to Make Buta No Kakuni Japanese Simmered Pork Belly (Serves 2)
Ingredients
Portion of pork belly per person (allow around 150-200g per person depending on how hungry you are)
Water
Stock cube – dashi stock if possible or you can make your own
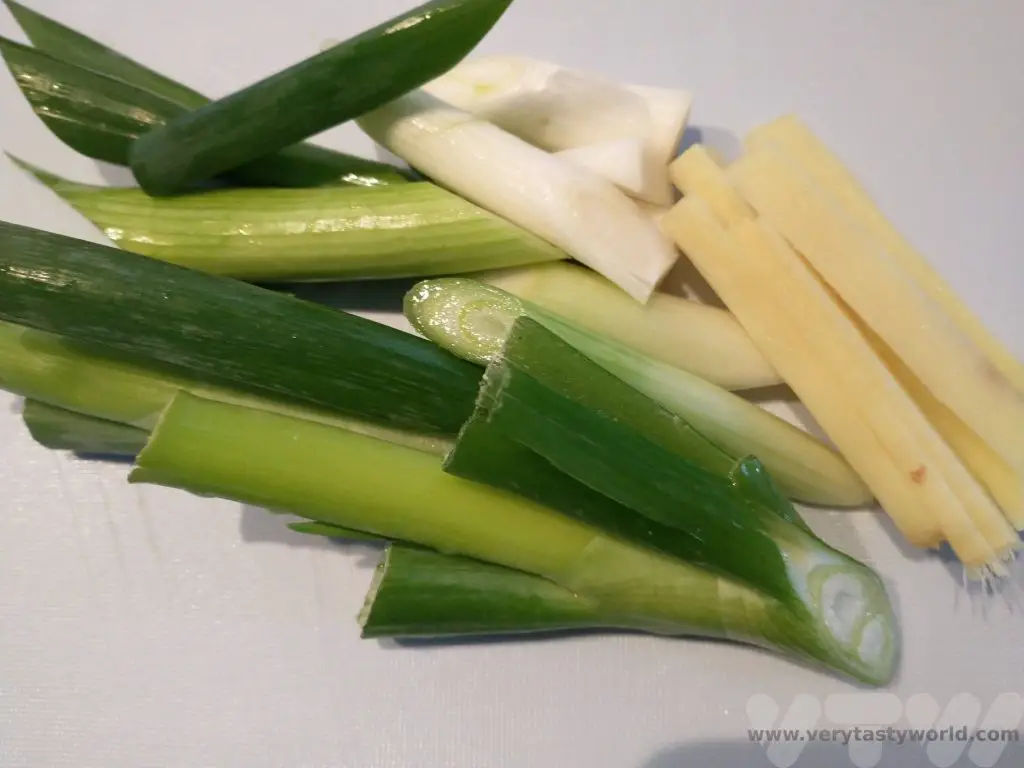
2 spring onions, sliced into 2-3cm chunks plus another for garnish
2 inches of ginger, peeled and cut into strips
16 tbs (1 cup) of water
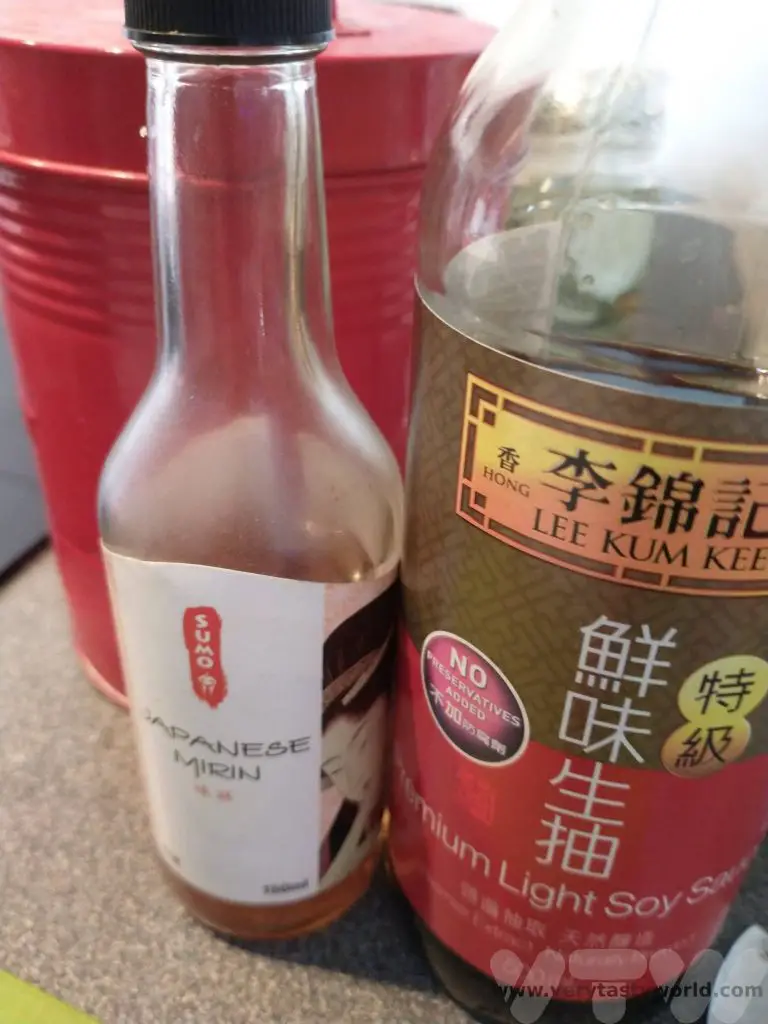
4 tbs (1/4 cup) soy sauce
4 tbs (1/4 cup) cooking sake (if you can’t get sake, white wine will be a good substitute)
4 tbs (1/4 cup) caster sugar
4 tbs (1/4 cup) mirin (if you can’t get mirin, add a little more sake and sugar)
Generous splash of rice vinegar (we like this to counterbalance some of the sweetness of the dish)
Method
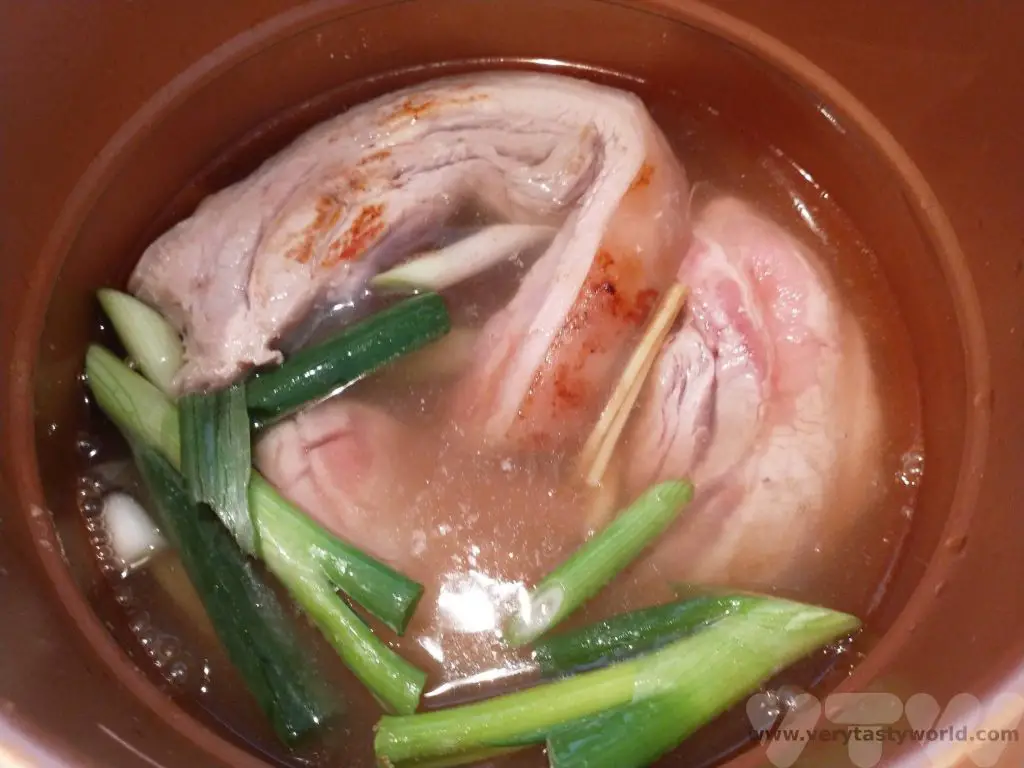
Place the pork belly in a frying pan and sear on both sides for a couple of minutes.

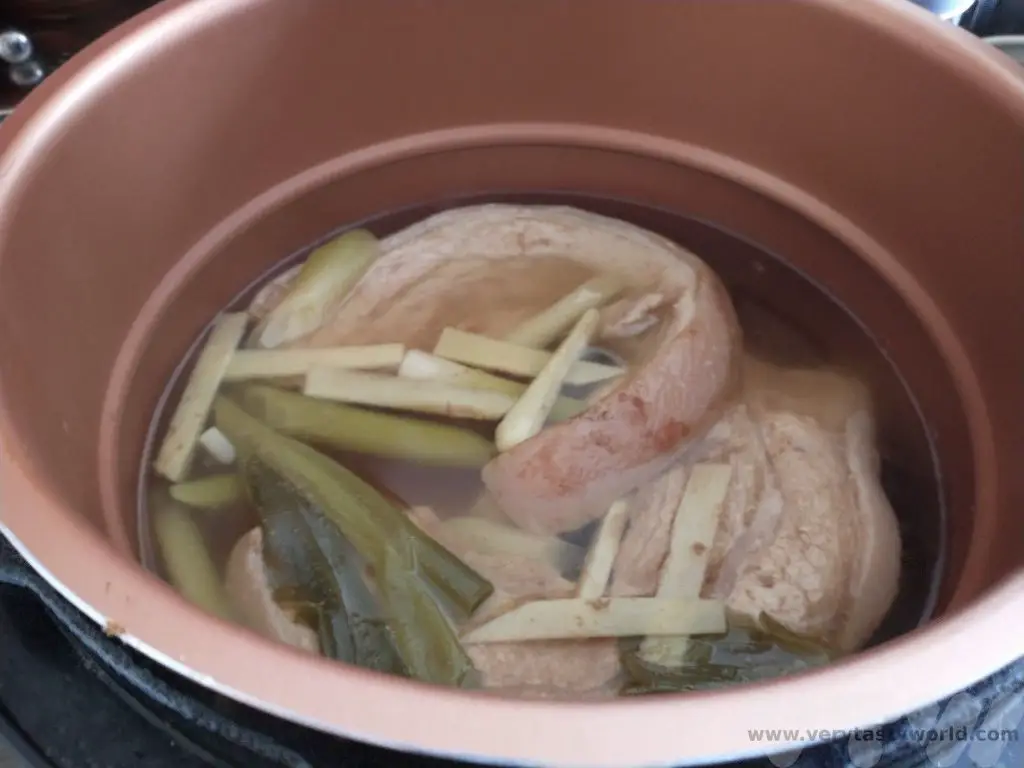
Place the pork belly in a pot and cover with water. Add the stock cube, spring onion and ginger. Turn on the heat and bring the water up to a simmer. Simmer the pork for 2 hours or until nice and tender. Alternatively, you can do as we do and use a pressure cooker. Just prepare the pork as above and cook at pressure for 40 minutes.
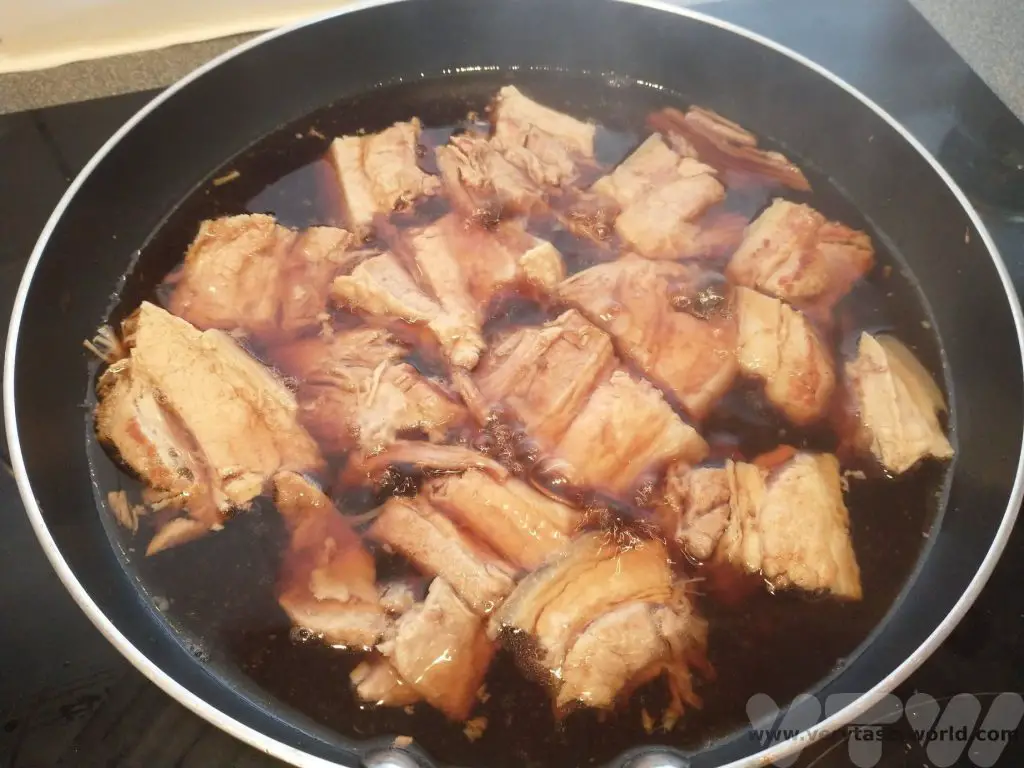
When the pork comes out it should be wonderfully soft and close to falling apart (but not actually falling apart). Cut the pork into chunks – about 2cm length. We also decided to cut off the rind at this stage.
Don’t forget to keep the stock – it will make a wonderful base for ramen noodles or soup. You can pop it into the freezer if you’re not going to use it immediately.
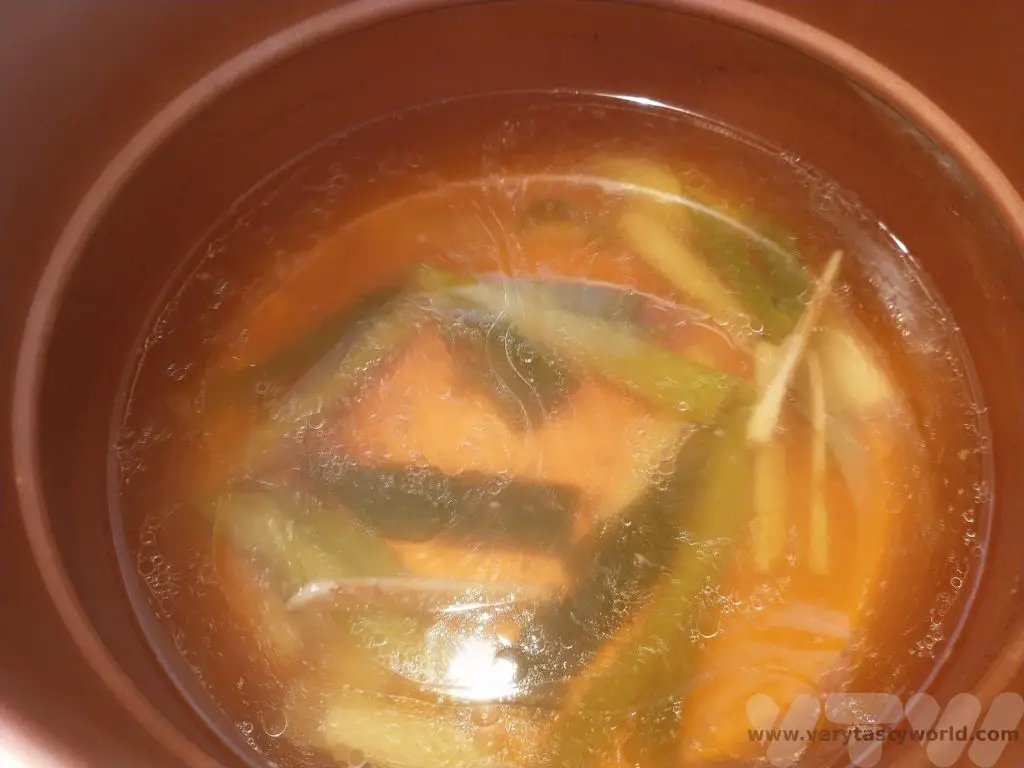
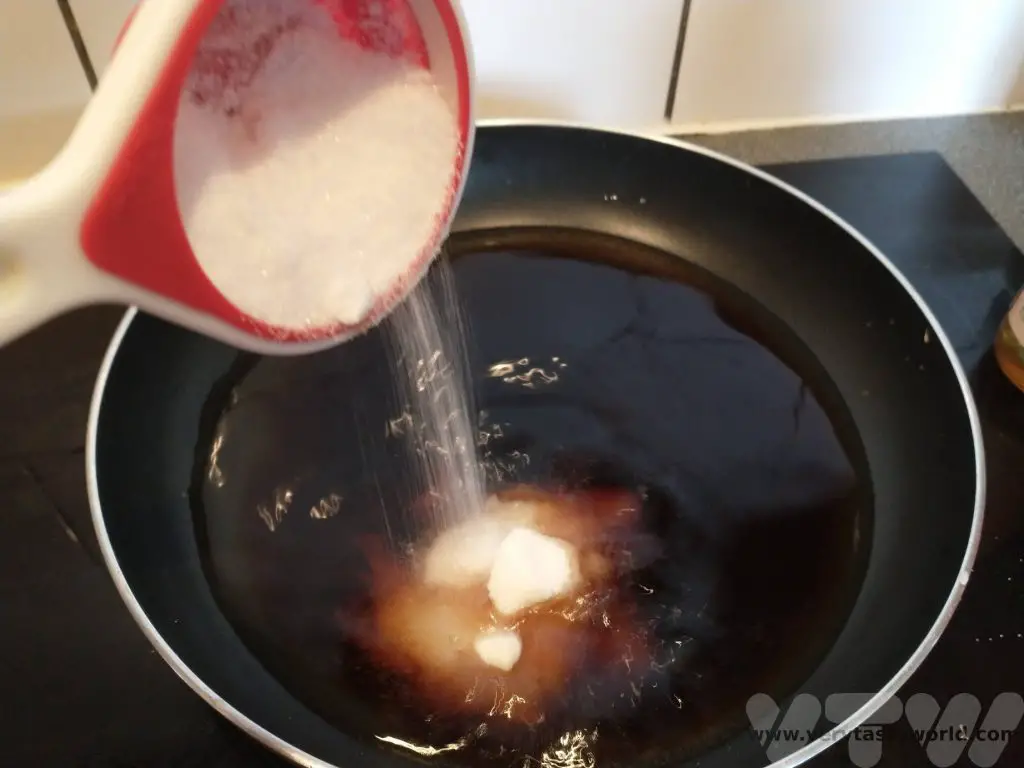
Put the water, soy sauce, sake (or wine), mirin and sugar into a pan and bring to the boil.
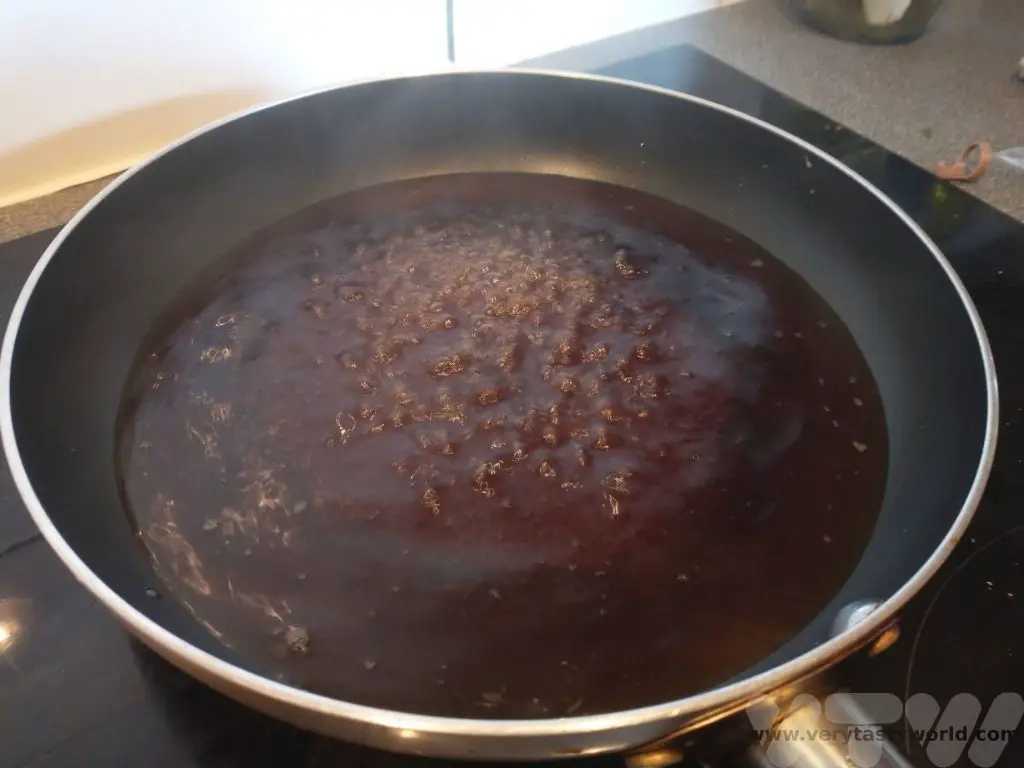
Carefully place the pork chunks into the pan and press down so that the sauce completely covers them.
(In retrospect we should have put the pork into a deeper pan – a casserole dish – because the sauce did splutter a lot and because there was sugar in it, it stuck to our hob which made clearing up a bit of a nightmare!)
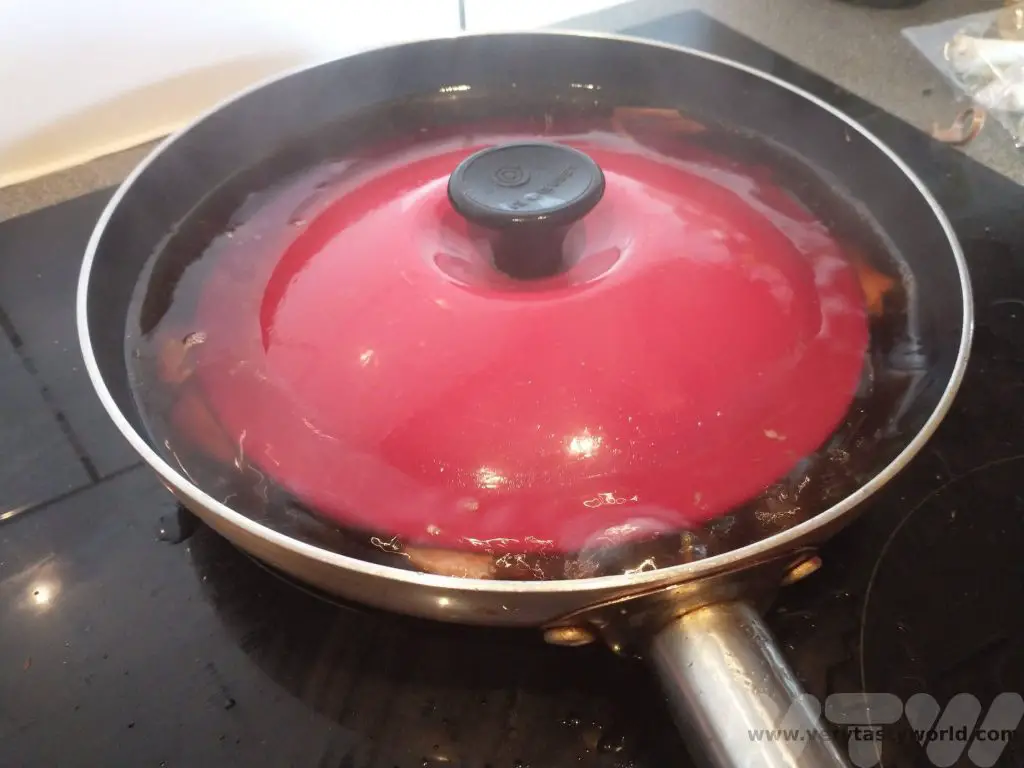
Reduce the sauce until it has almost become a paste – it will have coated the pork and caramelised on the underside. It will look glossy and luscious.

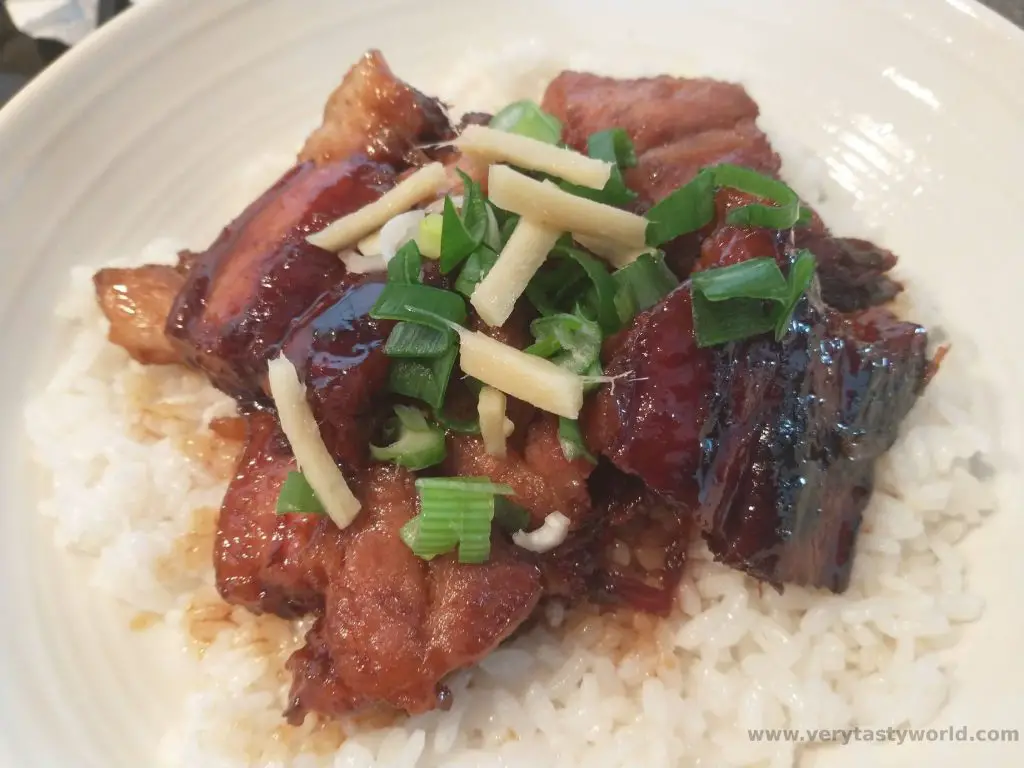
Serve atop plain white rice garnished with chopped spring onion. It is often accompanied with a splodge of karashi. We like adding some pickled ginger as well.
- RECIPE: How To Make Elderflower Champagne
- RECIPE Oyakodon Donburi
- Zero Waste Recipes Before Your Holiday
- RECIPE: Vegetable Biryani Tamil Nadu Style
- RECIPE: Vegan Wild Garlic Pesto
- Recipe: Venetian Pasta Sauce
- RECIPE: Biryani Raita Recipe
- RECIPE: How to Make Costa Rica’s Gallo Pinto
- Recipe: Japanese Simmered Pork Belly – Buta no Kakuni

- Kobe Beef in Kobe – Is It Worth It?

- World’s Best Breakfasts -Breakfast of Champions!

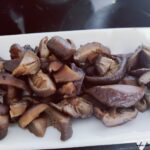
- Recipe: Simmered Shiitake Mushrooms
- How to Use Public Transport in Japan

- RECIPE Oyakodon Donburi
- Planning a Trip to Japan

- The Makanai: Cooking for the Maiko House

- Setsubun Food – Bean Throwing Day

- The Gassho Farmhouses of Rural Japan

RECIPE: Salmorejo
Andalusian Cold Tomato Soup
In Spain, cold soups are perfect for a hot summer’s day. Gazpacho is probably the most well known – a blend of fresh tomatoes and other vegetables, such as cucumber, peppers and garlic. Salmorejo is another cold soup, which also originated in Andalusia. We first tried it in a tapas restaurant when we visit Seville and absolutely loved it. It is a blend of tomatoes but has the addition of bread which thickens the soup. It’s a great soup that also helps to avoid food waste as it works really well if the bread is slightly stale.
In the UK tomatoes aren’t that great. Supermarkets often sell perfectly round, perfectly red tomatoes that basically taste of water. We go to our local market for our toms or grow our own. (And home grown always taste better.) What is great about Salmorejo is that even if the tomatoes are a bit insipid, the flavourings ensure that the dish will be delicious.
Our recipe for salmorejo is really easy to make but you will need a blender. This will serve four if part of a wider tapas meal/starter or two hungry people. Also, it’s the sort of soup that you can make first thing in the morning and let the flavours infuse during the day. It even tastes great after being in the fridge overnight.
Ingredients
About 10 ripe tomatoes
3 slices of stale white bread
Clove of garlic (or another if you like garlic but we prefer subtle garlic here)
Good slosh of extra virgin olive oil
Salt and pepper
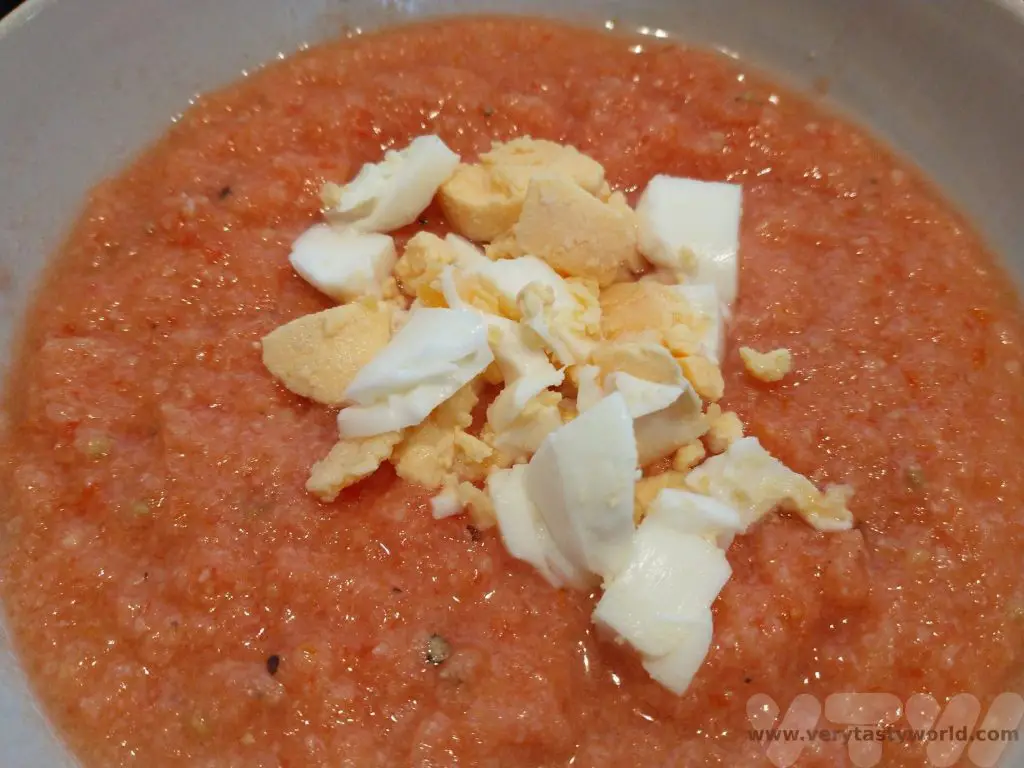
1 boiled egg per 2 servings
Couple of slices of ham
Method
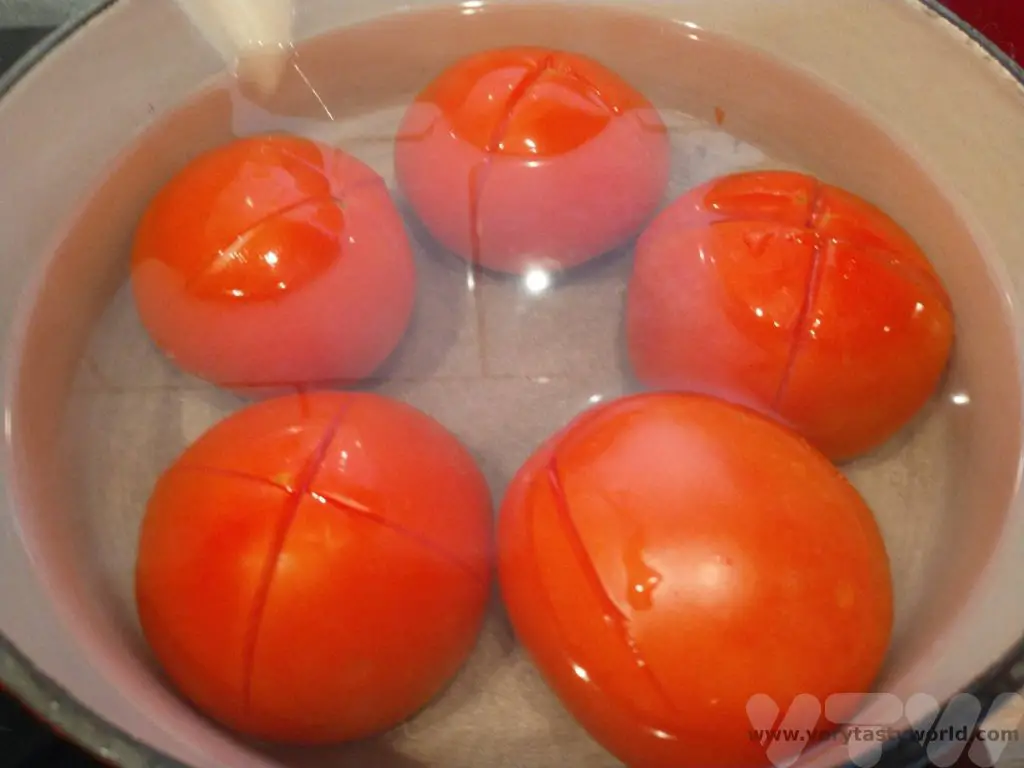
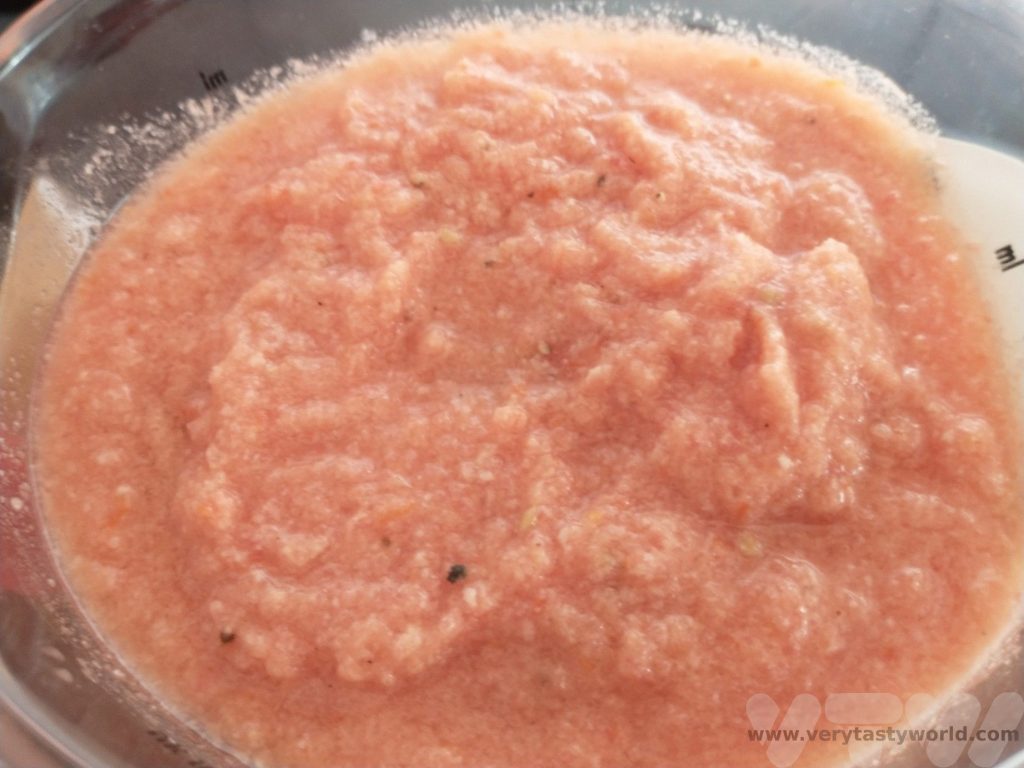
First of all the tomatoes need to be skinned. The easiest way to do this is to cut a cross at the end of the tomato (the opposite end to the stalk). It doesn’t need to be precise and it doesn’t matter if you cut into the tomato’s flesh -it’s all going to be blended anyway.

Pour boiling water over the tomatoes and let them sit in the water for a couple of minutes. Then transfer them to a bowl of cold water.
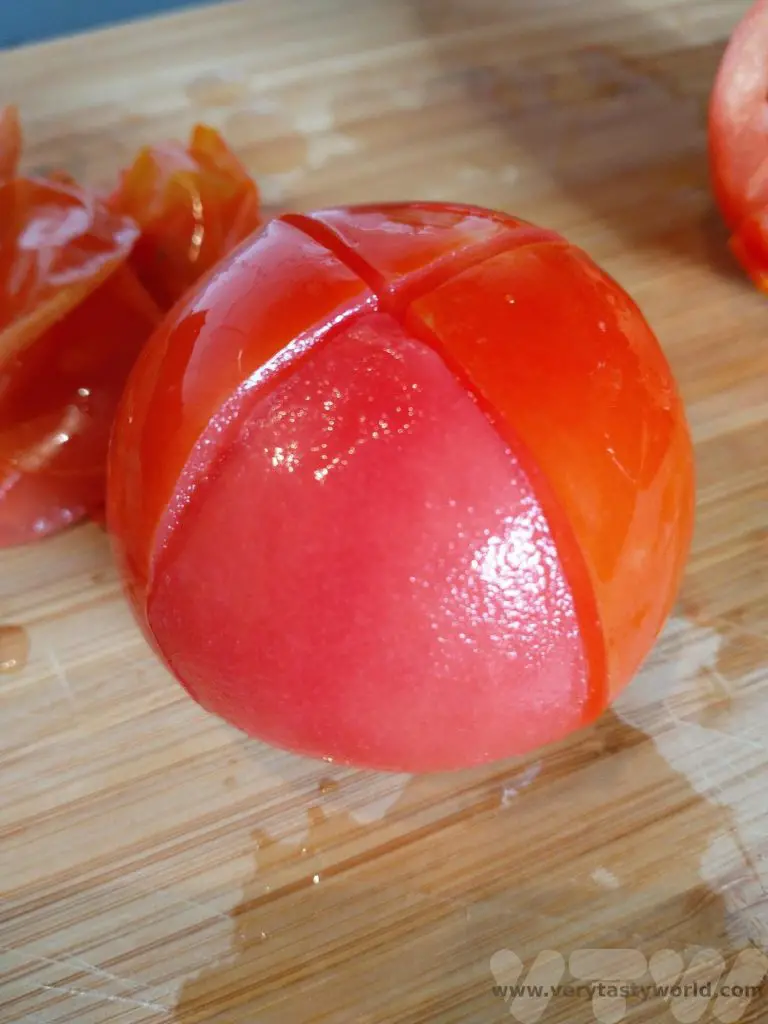
Grab a corner where the slice was made and the skins should just peel away. It’s not the end of the world if you don’t get all the skin off.
Put the tomatoes in the blender and give them a quick whiz.
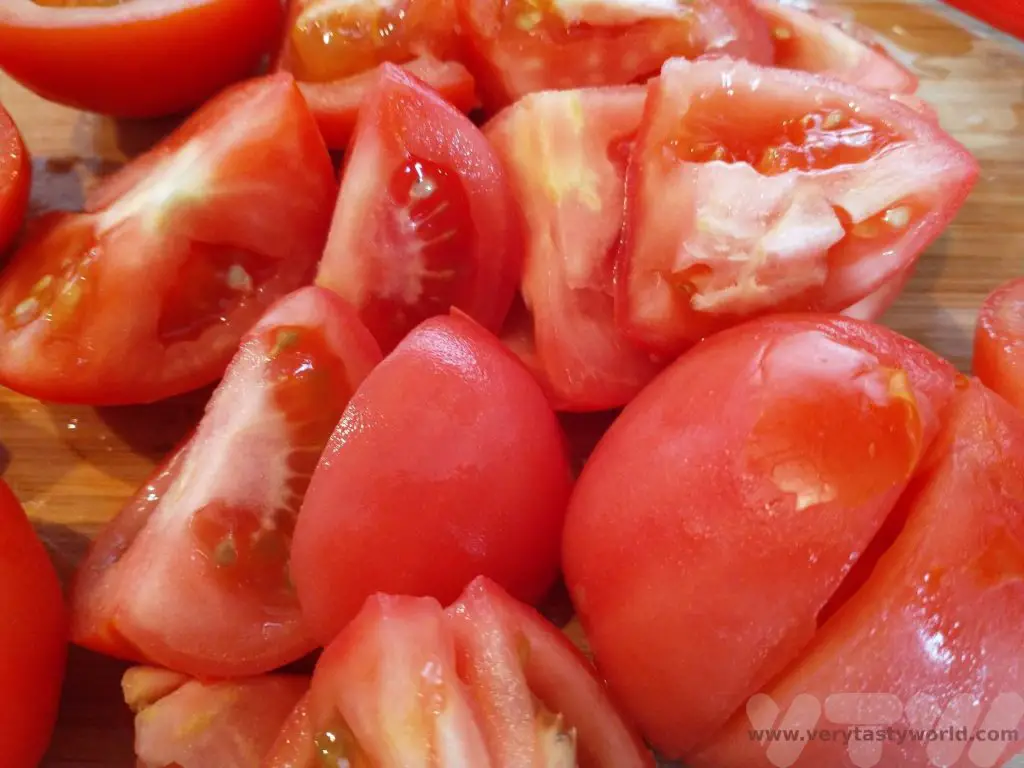
Then tear the bread slices and add those, along with the garlic, oil, salt and pepper.

Blend again until you have a smooth, thick soup.
Pour into a jug then put into the fridge and let the flavours infuse.
Serve into individual bowls and garnish with chopped boiled egg and/or chopped ham.
- RECIPE: How To Make Elderflower Champagne
- RECIPE Oyakodon Donburi
- Zero Waste Recipes Before Your Holiday
- RECIPE: Vegetable Biryani Tamil Nadu Style
- RECIPE: Vegan Wild Garlic Pesto
- Recipe: Venetian Pasta Sauce
- RECIPE: Biryani Raita Recipe
- RECIPE: How to Make Costa Rica’s Gallo Pinto
- Recipe: Japanese Simmered Pork Belly – Buta no Kakuni
How Hot Is Wasabi?
A Guide to Fresh Wasabi
Did you know that a lot of the time the fiery, nose-wince-inducing, slightly-eye-watering wasabi that you eat with your sushi doesn’t actually contain much wasabi? The wasabi powders and pastes that you buy in the shops or which are used in many restaurants are usually a combination of mustard, horseradish, green food colouring and just a hint of wasabi, probably from the stem or leaves. Eating fresh wasabi is a completely different experience. And how hot is wasabi?
Growing Fresh Wasabi
Wasabi as a plant is similar to horseradish in that both belong to the Brassica family (which is quite a broad family as it also contains vegetables such as cabbage, broccoli and kale) and both have a fiery pungency but they are different species and offer very different flavours.
Horseradish is really easy to grow in the UK. It’s like a weed and grows rapidly in the wild. We regularly see horseradish growing by the roadside or in parks. (We would like to forage for it but although we could pick the leaves it’s against the law to dig up roots on land you don’t own.) It’s the long white root that provides the flavour. Wasabia Japonica’s flavour comes from its rhizome, which is kind of like a swollen stem.

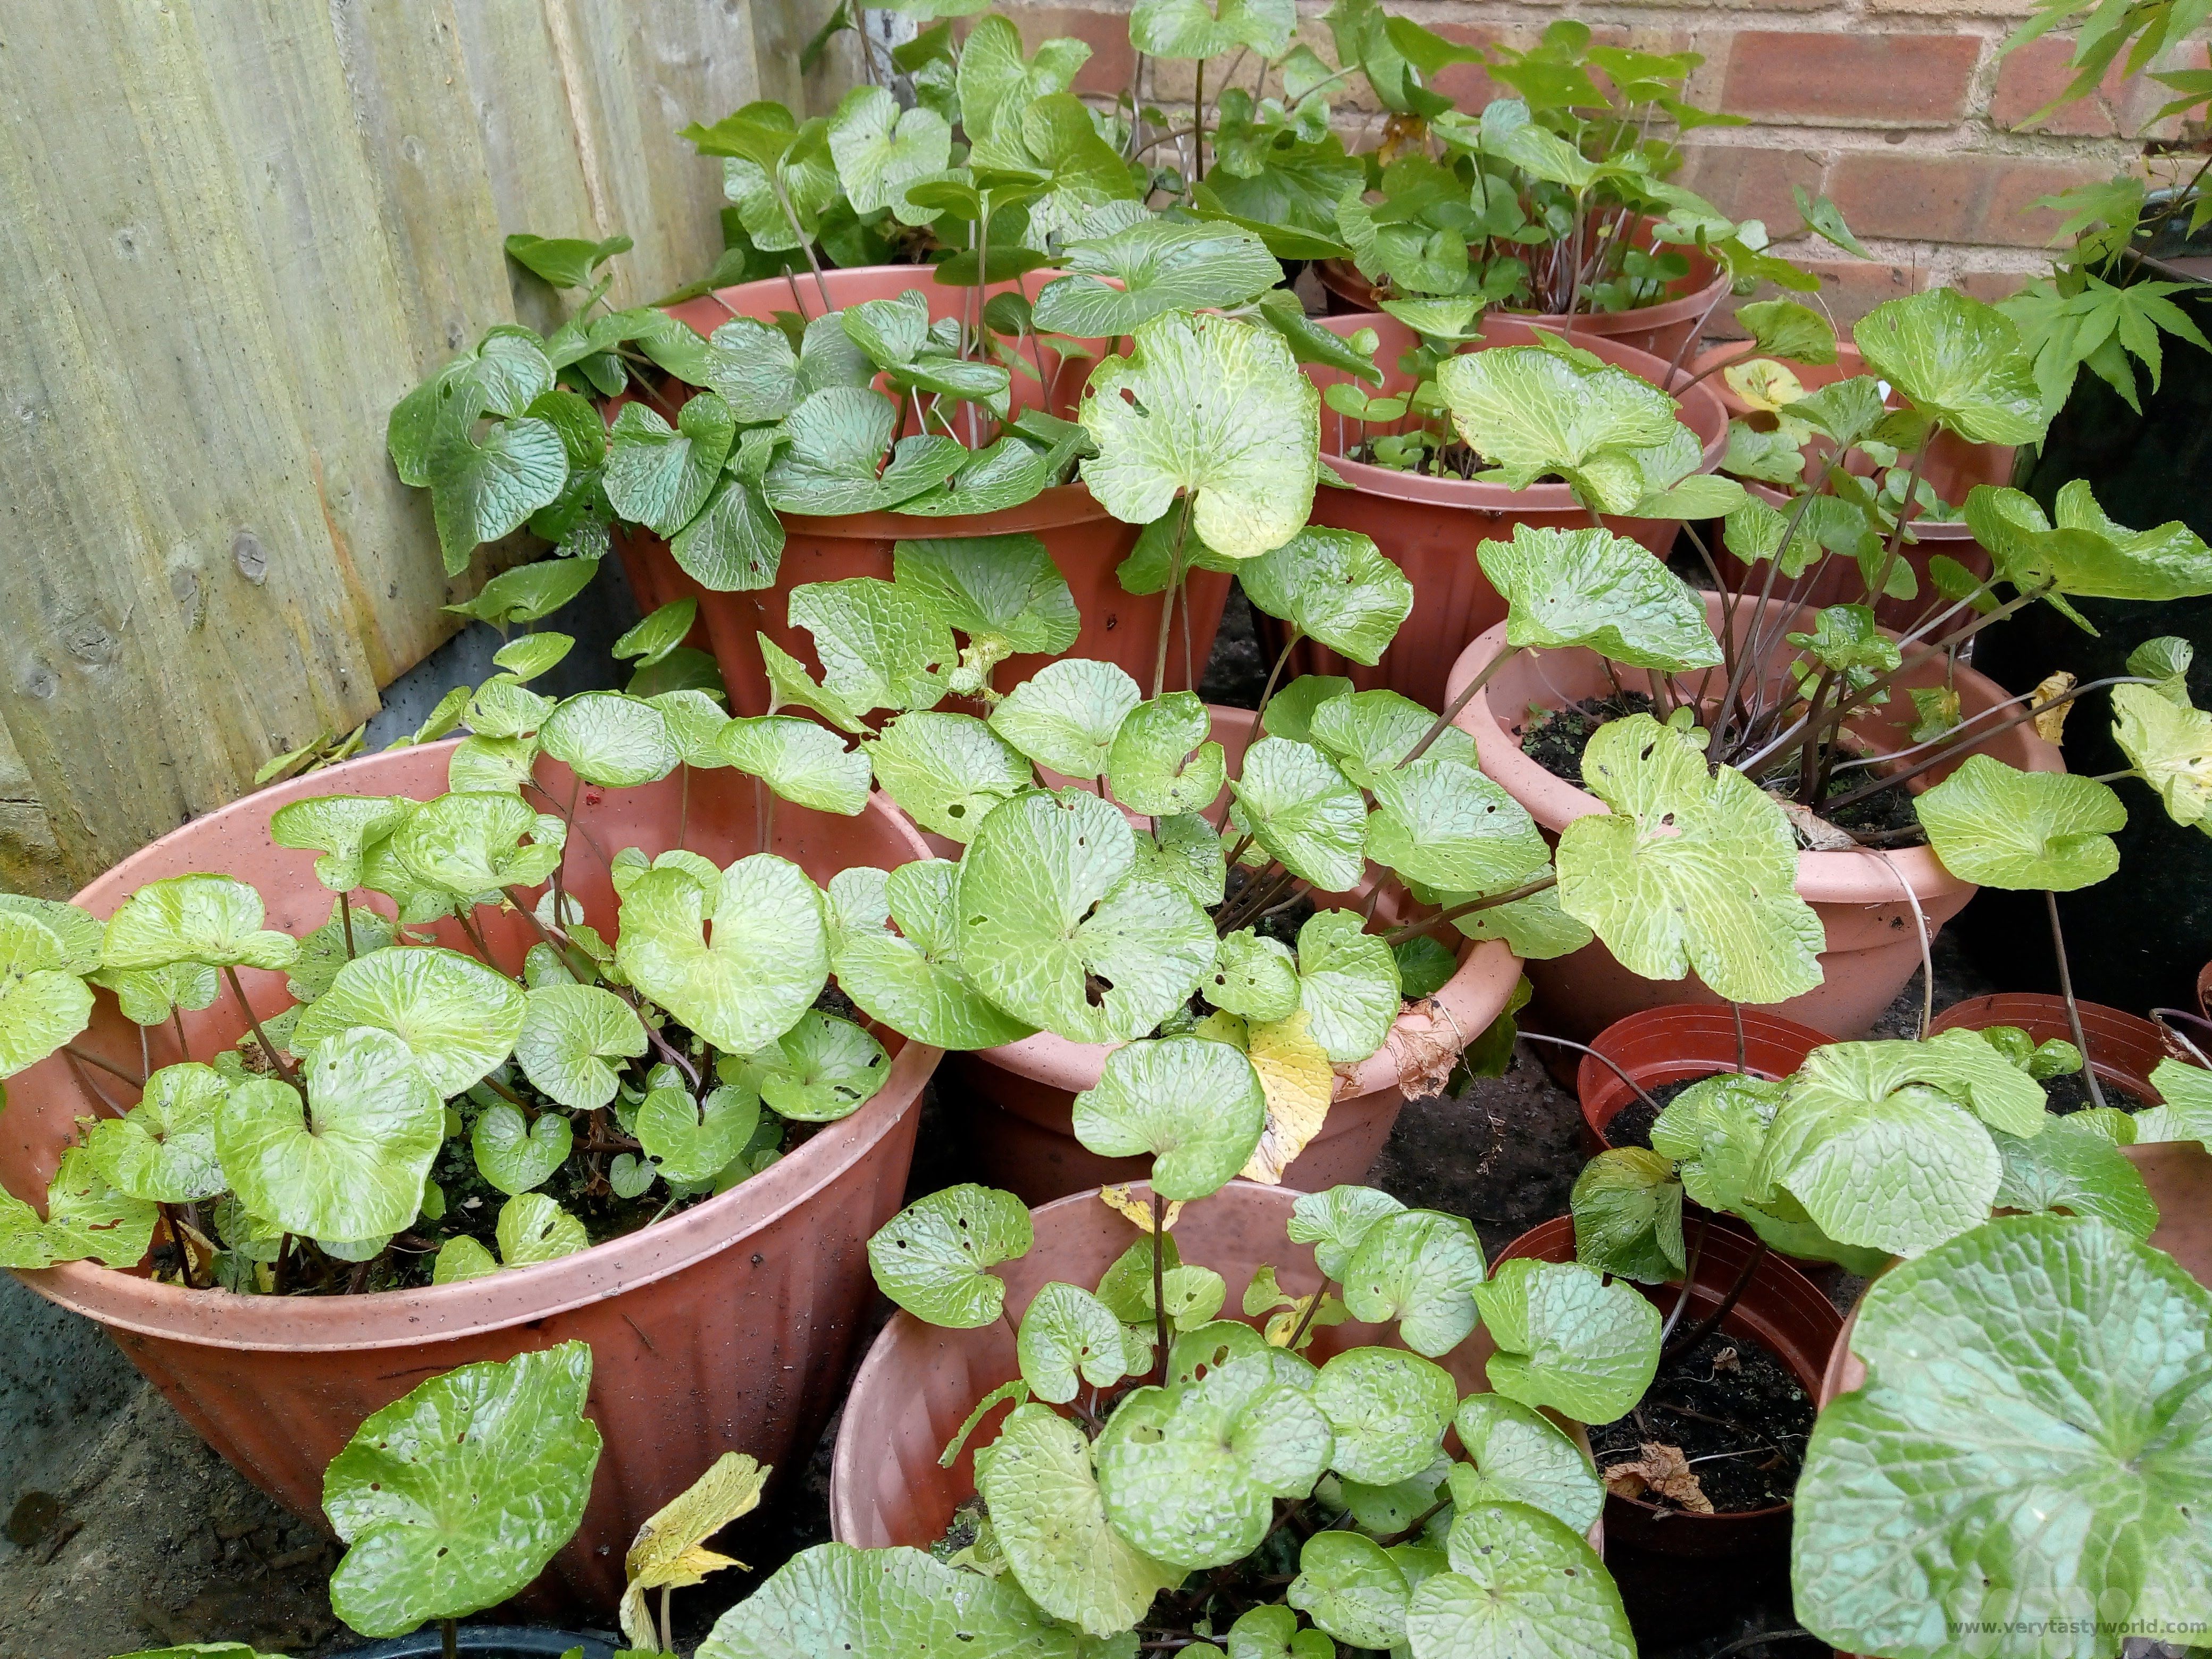
Traditionally wasabi grows next to crystal clear gravelly mountain streams in rural Japan (a delightfully romantic image) but it is actually possible to grow wasabi in the UK (although our garden is significantly less romantic than a beautiful mountain region). Water grown wasabi is known as sawa- or mizu-wasabi, soil grown is known as hatake-wasabi.
Our soil grown wasabi needs a little love. It likes relatively cool conditions and much prefers the shade to the sunshine. We once had to move our wasabi into a sunny spot temporarily and it wilted like the Wicked Witch of the West. (It recovered 24 hours later when it was back in the shade.) It also needs to be well watered, although it doesn’t like to sit in water. A cool, rainy British summer is ideal. We grow it in pots close to the north facing wall of our house. It takes a while for the rhizome to grow – you need to be patient for a couple of years – but the result is worth it. The cat was very impressed with our attempts.

Eating Fresh Wasabi
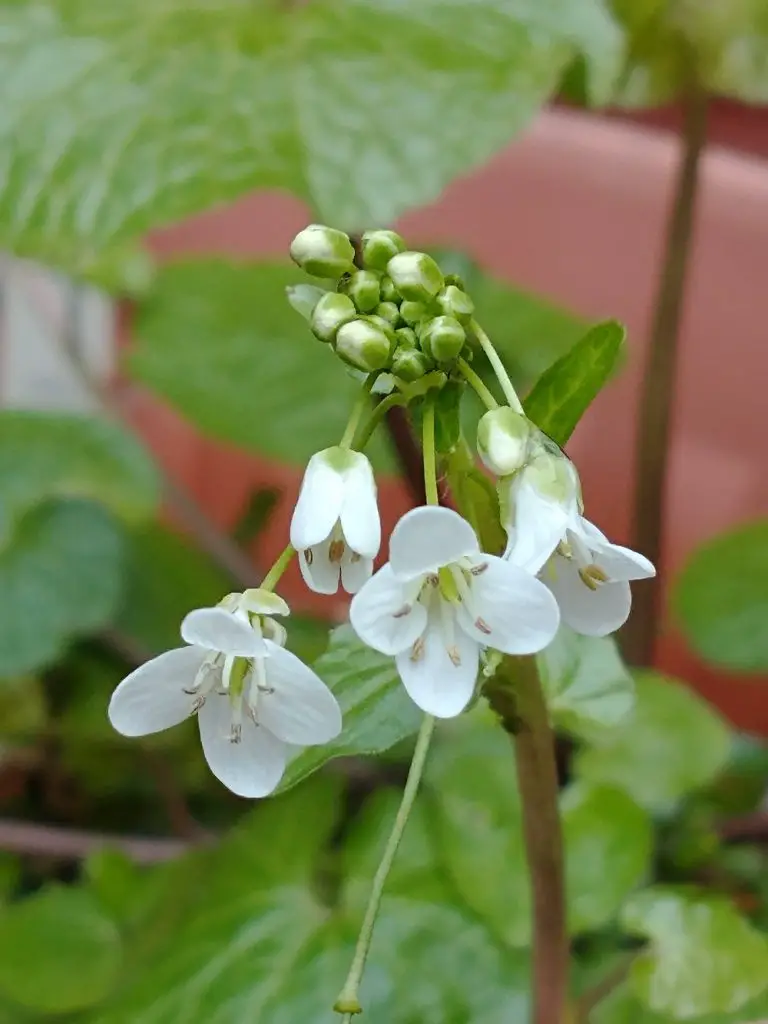
The first time we ate fresh wasabi, it was a revelation. It did have that amazing familiar pungency but it also has a sweetness that you don’t expect. One of the advantages of growing wasabi is that the other parts of the plant are all edible: the lovely heart shaped leaves can be used as a garnish (and eaten), the stems chopped up like herbs and even the delicate flowers, which are especially good in a tempura. The other parts are much more mild and, while they impart flavour, don’t have the pungency of the rhizome.
How To Prepare Fresh Wasabi
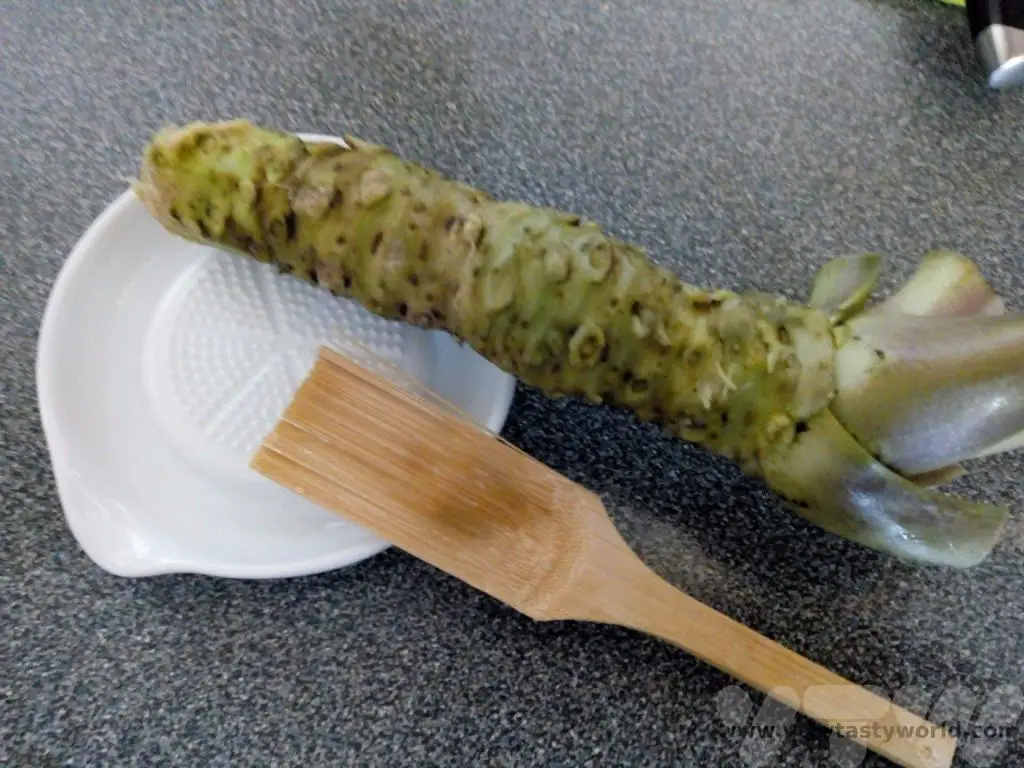
Wasabi rhizomes can grow up to 100g in size, although some can be bigger. You would have to have a big sushi party to get through that amount but it is possible to store it.
The pungency of the wasabi fades when it is exposed to air, so it is best to grate it just before serving. There are various graters you can buy. Traditionally, a shark skin grater is used, although it is usually made from a type of ray. Purists prefer this, claiming that this is the one that ensures that the wasabi has the best creamy consistency and brings out the best flavour. But you can also get other types, including a metallic grater or, our preference, a ceramic grater.
Using a vegetable peeler, we just scrape off a small amount of the rhizome’s outer layer, up to the length we wish to grate, then grate the wasabi in a circular motion.
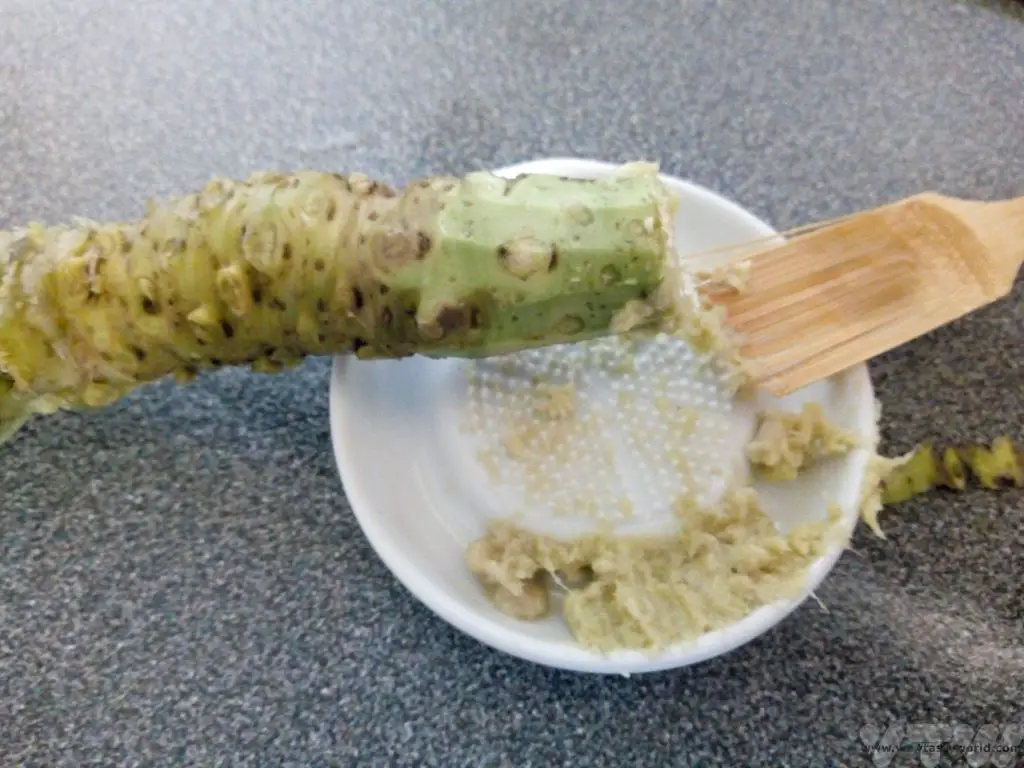
One useful little implement is a bamboo brush which you can use to gather up the grated wasabi. The stiff bristles are much more efficient at negotiating the grater’s bumps than our fingers. Gather the grated wasabi up into a nice little ball and serve. It’s worth grating slightly less than you think you will need – you can always grate more.
Storing Wasabi
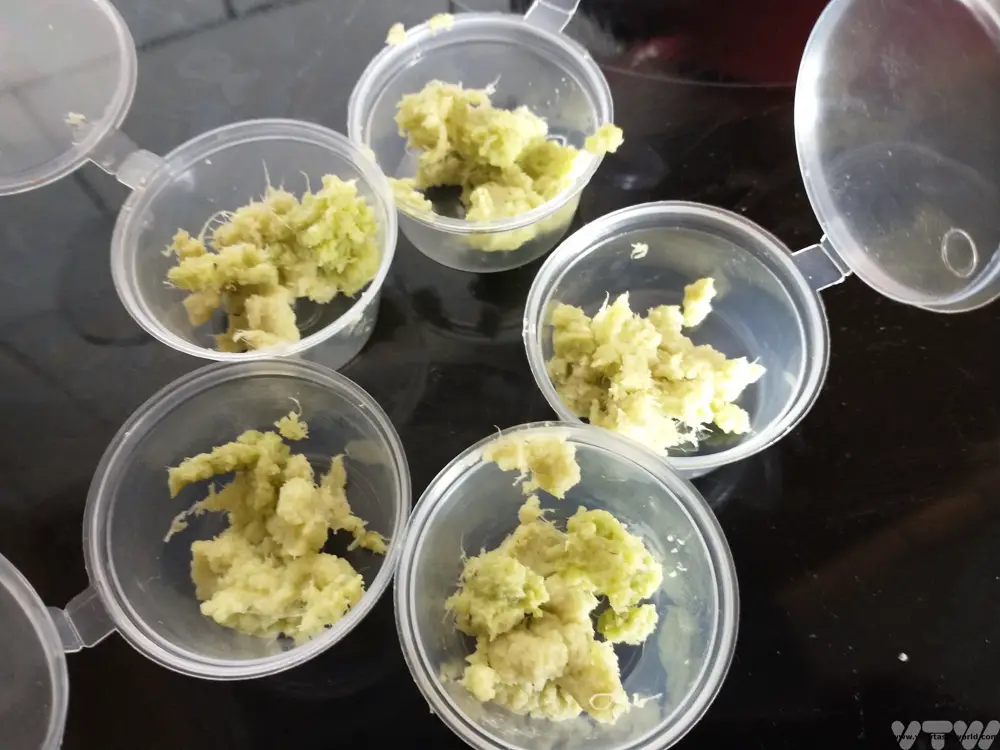
A fresh rhizome will store well in the fridge for a couple of weeks. We tend to keep it wrapped in damp kitchen paper and grate as much as we need. If we don’t get through an entire rhizome in that time, it tends to go a bit black, so the best thing to do is freeze it. The whole rhizome doesn’t freeze well but grated wasabi freezes brilliantly.
We tend to grate into portions and then store inside little plastic tubs – the sort you get sauces/dips in with a takeaway meal. Then we seal – in order to minimise exposure to the air and pop into the freezer. Take them out when you need them. The portions thaw in no time at all. Alternatively, you can wrap the grated wasabi into parcels of clingfilm.
So How Hot Is Wasabi?
Unlike chillies, which have the Scoville scale to measure their heat level, wasabi heat doesn’t really have a similar measurement system. The Scoville scale is based on dilution of the chemical capsaicin – how much water it takes before you can no longer detect the heat of the chilli. But wasabi is a root not a pepper and instead of releasing capsaicin, it contains allyl isothiocyanate, a compound which is also found in mustard, radish and horseradish. Its pungency is a result of its volatility – the gas it releases feels as though it goes straight up your nose rather than remaining on your tongue like the capsaicin of chilli.
People’s reactions to wasabi will differ quite widely. Some people can scoff the hottest of chillies but can’t take the heat of wasabi. But it is undoubtedly hot! Fresh wasabi has a milder pungency than the horseradish/mustard/green paste.
How To Eat Wasabi With Sushi
Wasabi and sushi go together like fish & chips, salt & pepper and gin & tonic. Wasabi was originally used with sushi in the Edo period in Japan and was thought not only to help mask any smells from the fish it was also considered to have properties that help prevent the growth of bacteria.
The best way to eat wasabi with sushi is to mix it with a small amount of soy sauce in a little dish. Never dip the rice part into the dish – the rice will soak up the soy sauce and all you’ll get is a mouthful of nose-wincing salt, losing the delicate flavour of the fish. Instead, turn the sushi upside down and dip the fish side into the sauce. (It’s absolutely fine to eat sushi with your fingers.) If you are having an omakase meal, where the chef prepares the sushi for you, it is likely that they will add exactly the correct amount of sauce and wasabi, so you won’t need to worry.
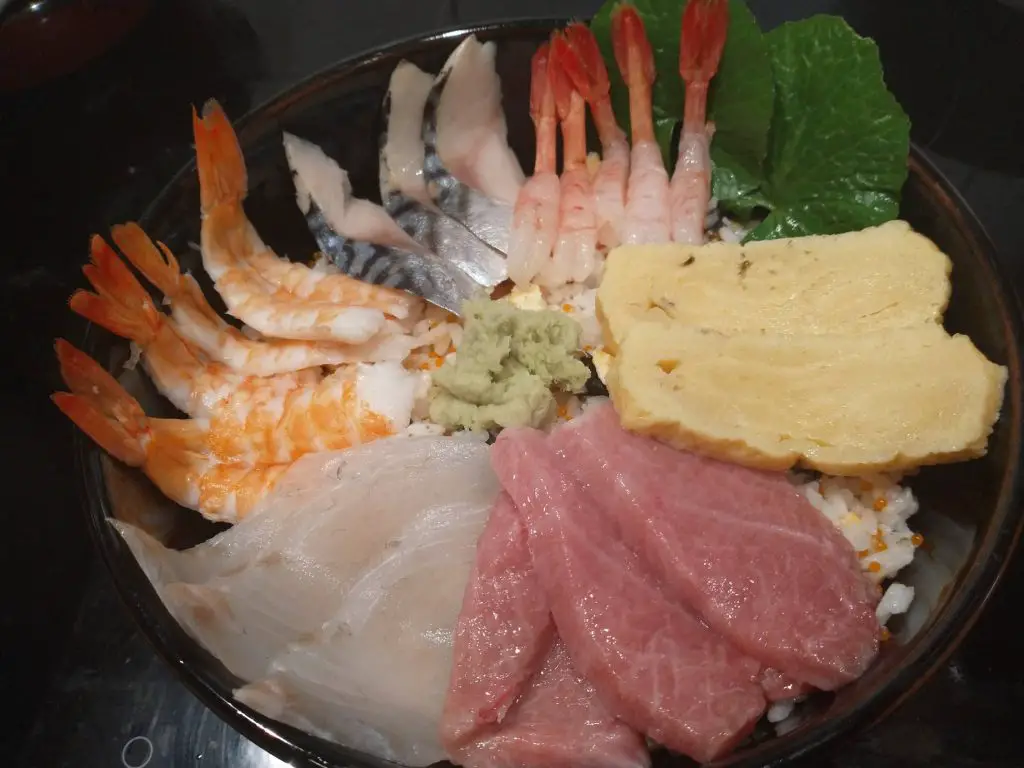
We love making chirashizushi – a bowl of seasoned rice with a layer of seafood atop – which we serve with our own fresh wasabi and garnished with the lovely heart-shaped wasabi leaves.
Related Posts You May Enjoy


- Kobe Beef in Kobe – Is It Worth It?
- World’s Best Breakfasts -Breakfast of Champions!
- Recipe: Simmered Shiitake Mushrooms
- How to Use Public Transport in Japan
- RECIPE Oyakodon Donburi
- Planning a Trip to Japan
- The Makanai: Cooking for the Maiko House
- Setsubun Food – Bean Throwing Day
- The Gassho Farmhouses of Rural Japan
- RECIPE: How To Make Elderflower Champagne
- RECIPE Oyakodon Donburi
- Zero Waste Recipes Before Your Holiday
- RECIPE: Vegetable Biryani Tamil Nadu Style
- RECIPE: Vegan Wild Garlic Pesto
- Recipe: Venetian Pasta Sauce
- RECIPE: Biryani Raita Recipe
- RECIPE: How to Make Costa Rica’s Gallo Pinto
- Recipe: Japanese Simmered Pork Belly – Buta no Kakuni
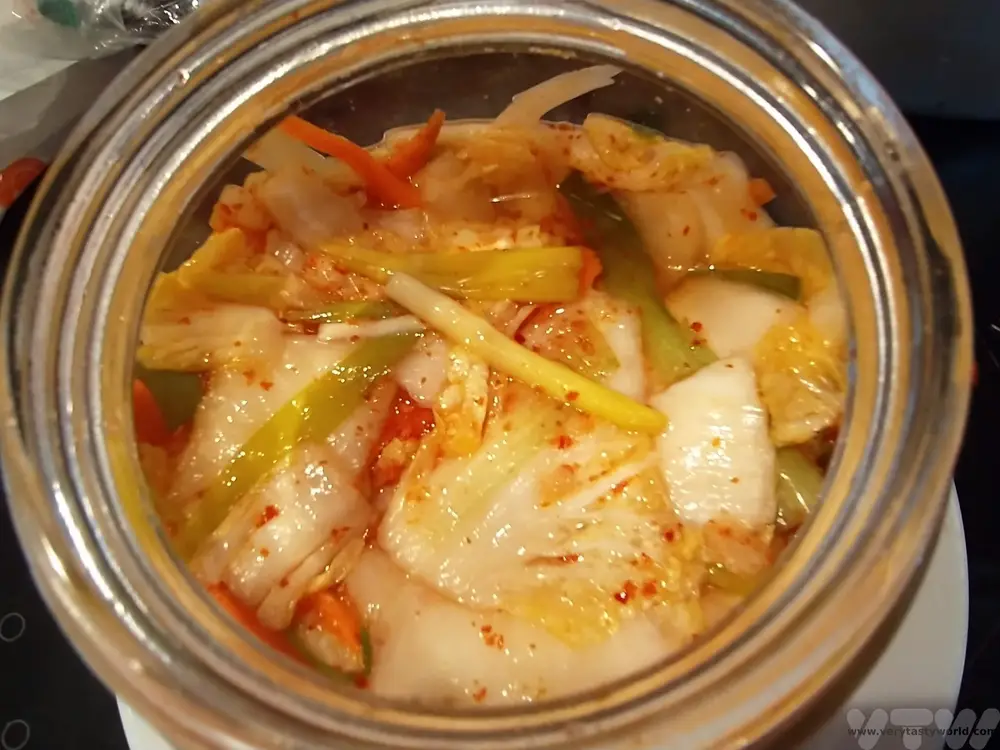
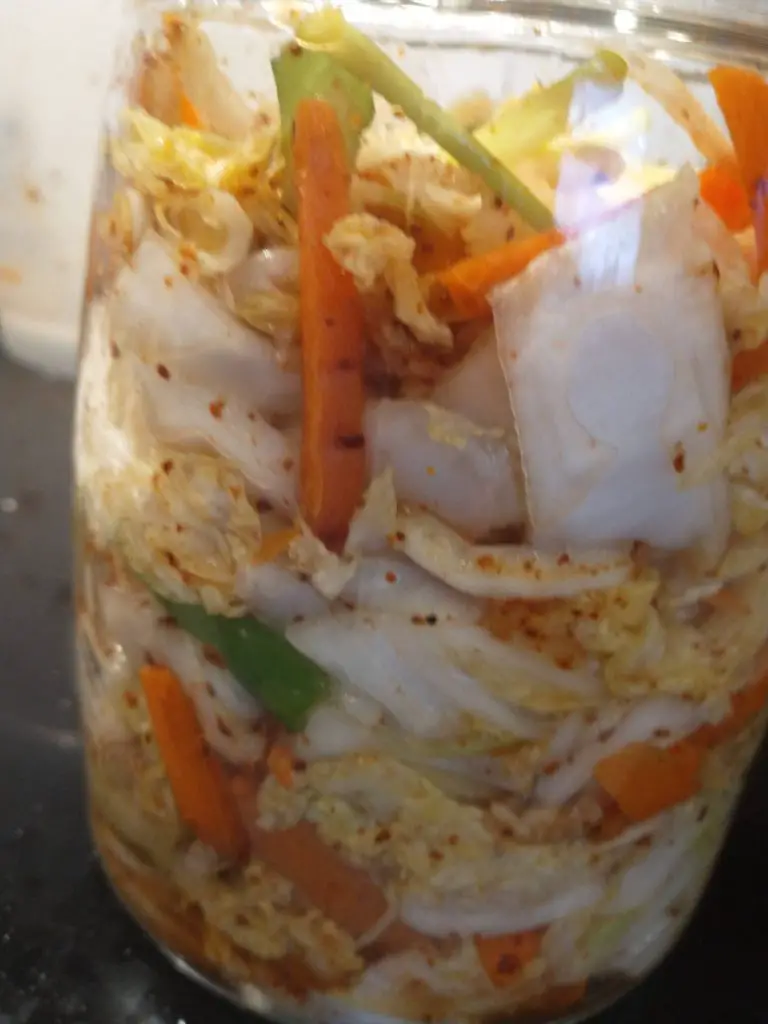
RECIPE: How To Make Kimchi
Kimchi is a fundamental part of society in Korea. It is Korea’s national dish and is usually eaten with most meals there. In fact, kimchi making has been assigned as a UNESCO cultural heritage and even has its own day – 22nd November. Kimchi is great fun to make and we have a recipe for how to make kimchi. It isn’t a traditional Korean style but it’s easy to make, is ready very quickly and we reckon it’s much more delicious than shop-bought.
We first tried kimchi over 20 years ago and it was love at first bite – sour, spicy and crunchy, it has a unique flavour. Being a fermented food it is also purported to have properties that are beneficial for your gut health but, far more importantly, it’s delicious.
It’s surprisingly easy to make but it does take a while to ferment and you do have to watch out for potential explosions but that is what makes it so exciting! (Don’t worry, we’ve been making it for years and have never had an explosion) We have tried fermenting lots different foods over the years, including miso, and it’s a very satisfactory process.
Kimchi is made via a lacto fermentation process whereby good bacteria, known as lactic acid bacteria, convert the sugars in vegetables into lactic acid. The joy of fermentation is that it isn’t a precise art. You need a bit of patience while the bacteria do their thing but once fermentation is complete, the finished product will last for many months, if not years – that is, if you don’t eat it straight away!
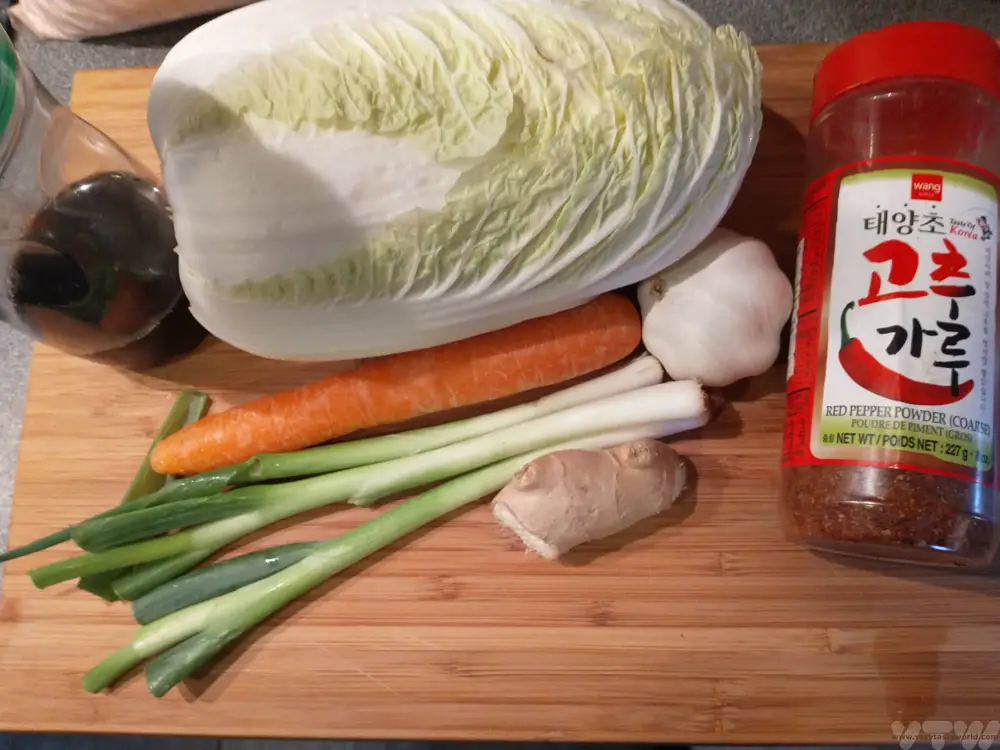
Ingredients For Making Kimchi
1 Chinese leaf cabbage (also known as Napa cabbage)
1 carrot
2 spring onions (green onions)
A carrot’s length of daikon white radish, also known as mooli (optional)
2 fat cloves of garlic (3 if your garlic isn’t portly enough)
1 tbs fish sauce (vegetarians can use soy sauce, but use less – 1/2 tbs)
1 thumb-sized piece of ginger
1 tbs Korean chilli red pepper powder known as Gochugaru (you should be able to find this in Asian stores and even supermarkets these days). A variation is to use Korean chilli paste, known as Gochujang. Gochujang is traditional but we prefer the chilli powder for this kimchi.
3 tbs salt. You want to use a salt that doesn’t have anti-caking additives. Table salt isn’t recommended. Equally you don’t really want to use really posh salt. We tend to use Himalayan pink salt.
How To Make Kimchi: Method
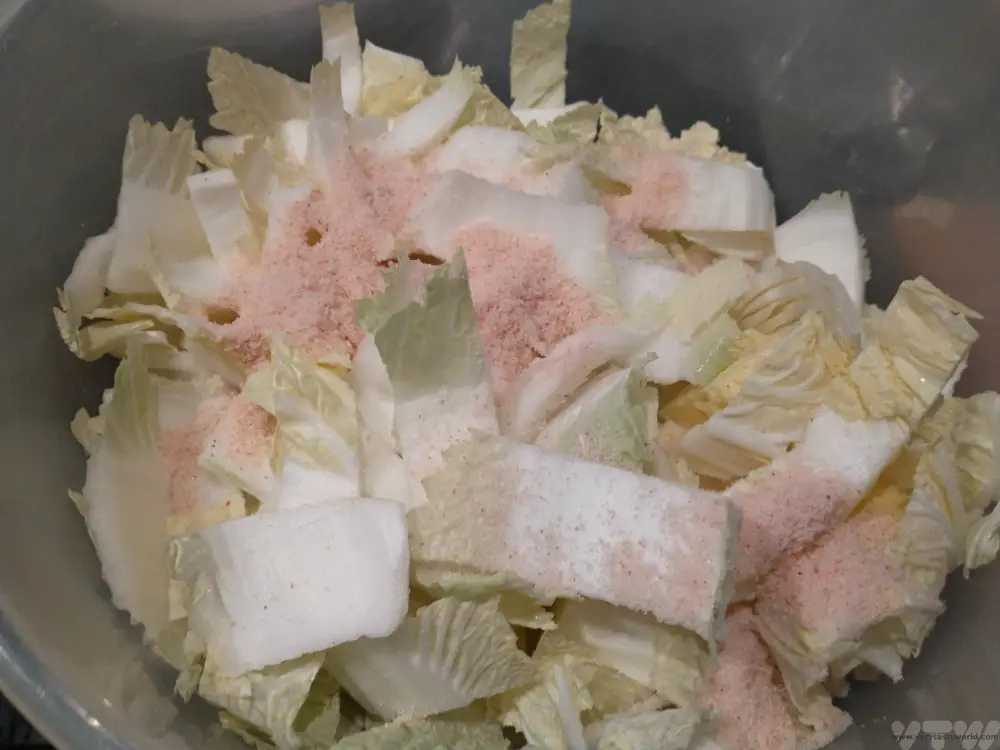
Slice the cabbage into chunks. You want to have easily pick-upable bite-sized pieces. One of the nice things about the Chinese leaf is that it has a lovely broad ribs which retain their crunch when the kimchi is finished which makes a nice contrast with the softer leaves.
Place cabbage into a bowl and sprinkle with the salt. Massage the salt into the cabbage and wait a couple of hours. It is a lot of salt but you will be washing it through later.
Prepare your fermentation jar. The size of the jar is important. You want to fill the jar up as much as possible and not have too much headspace. The jar size that suited our cabbage was 1.4 litre capacity. We recommend clip top Kilner jars as they have a good seal to keep air out but also let the liquid escape. There are some types of jar specifically designed for fermentation. We’ve had greater success with some than others.
The jar needs to be clean. We find the best way to clean the jar is to wash it in warm, soapy water and rinse. Then we boil a kettle and fill the jar (not forgetting the lid) with boiling water. After 10 minutes, drain and let the jar cool down. Some people put the jar into the oven on a low heat for 20 minutes but we haven’t found this step to be necessary for this type of fermentation.
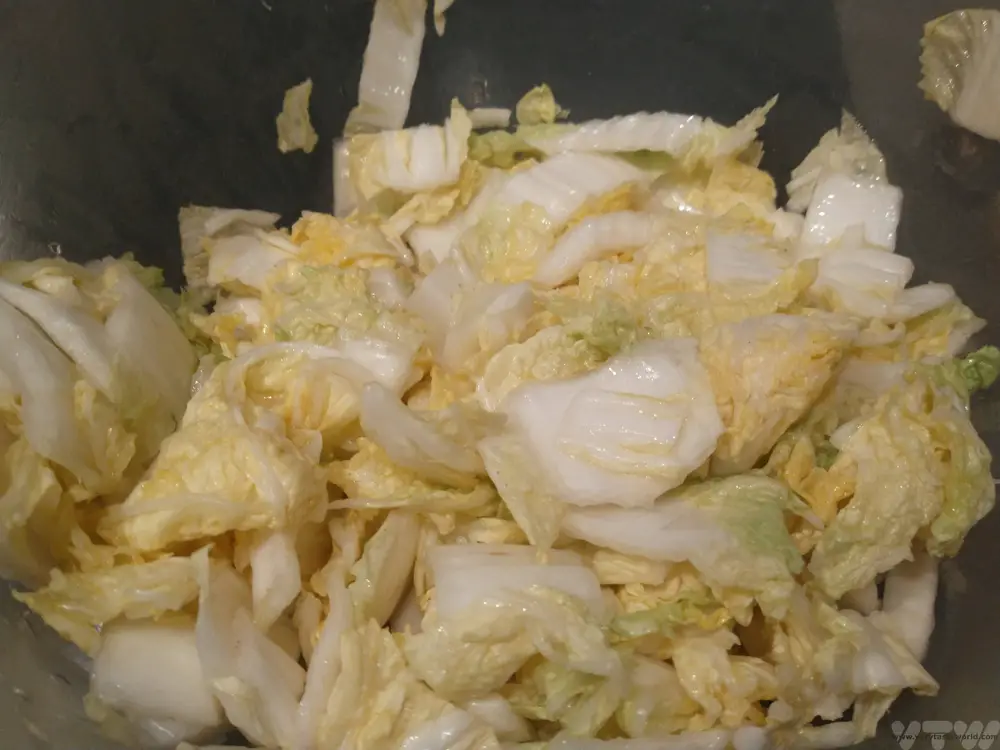
After some time has passed, give the cabbage a quick rinse with water. Have a taste – it should taste salty but not overpoweringly salty. You don’t need to pat the cabbage dry.
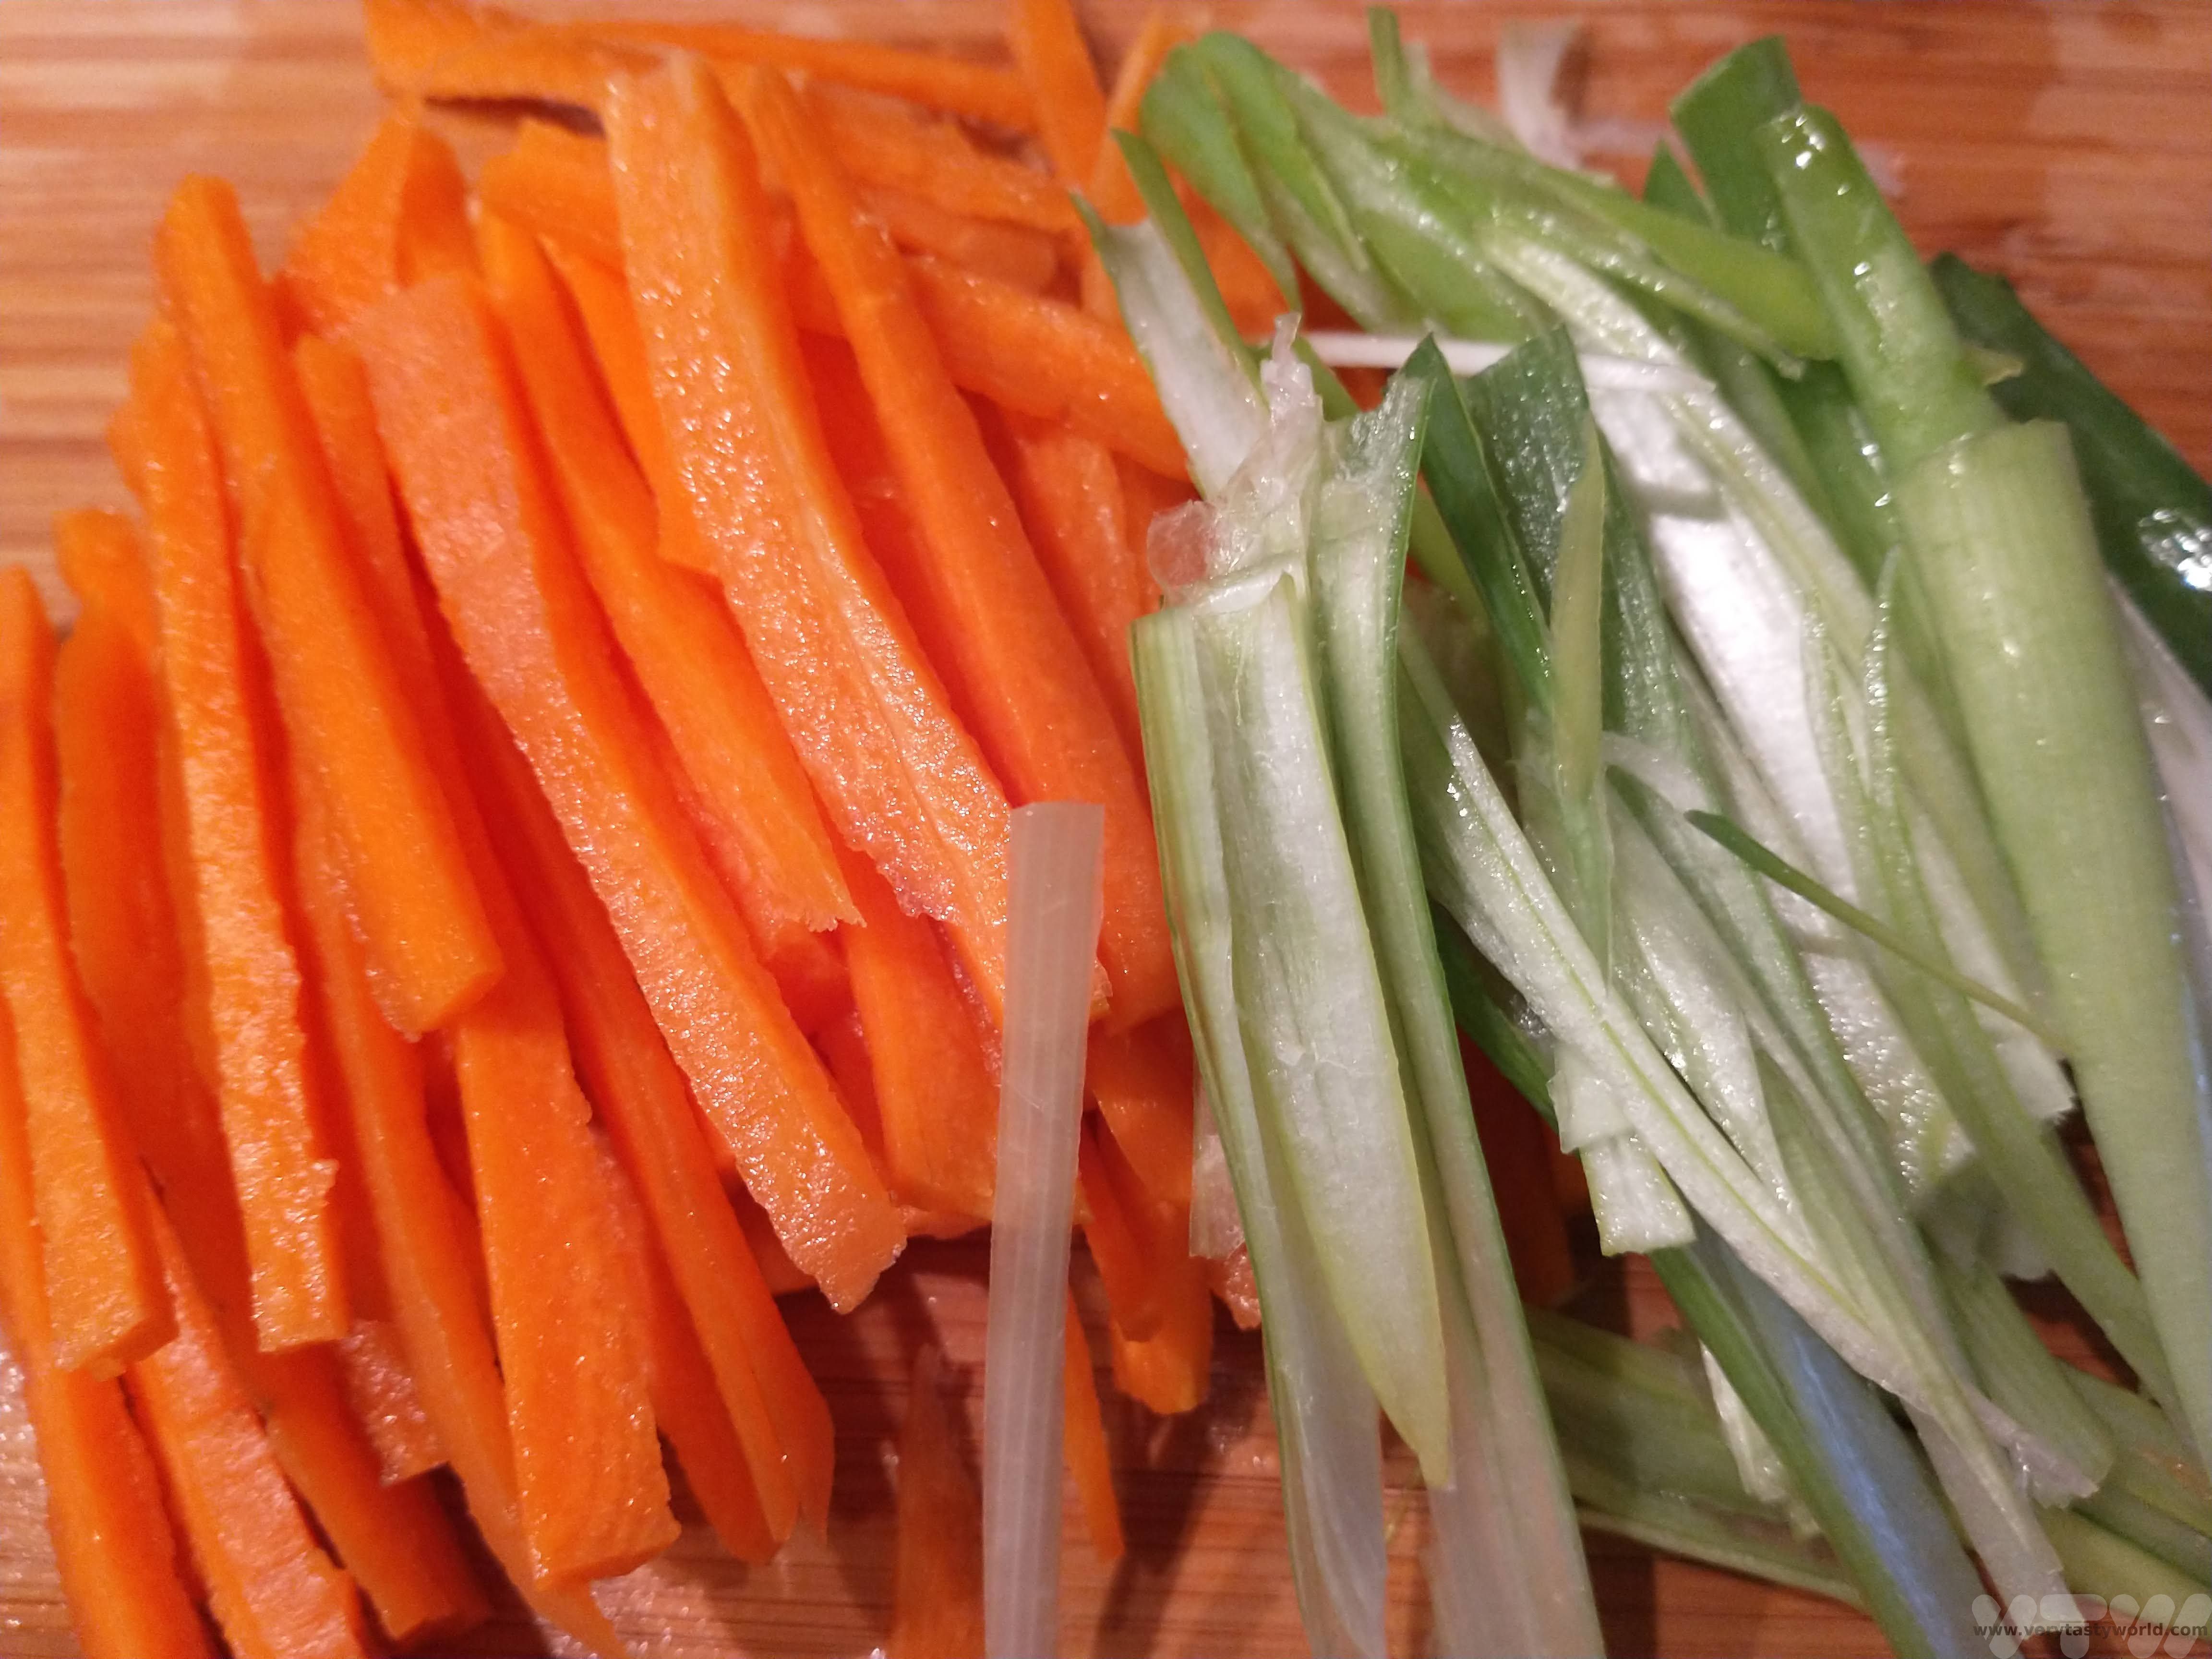
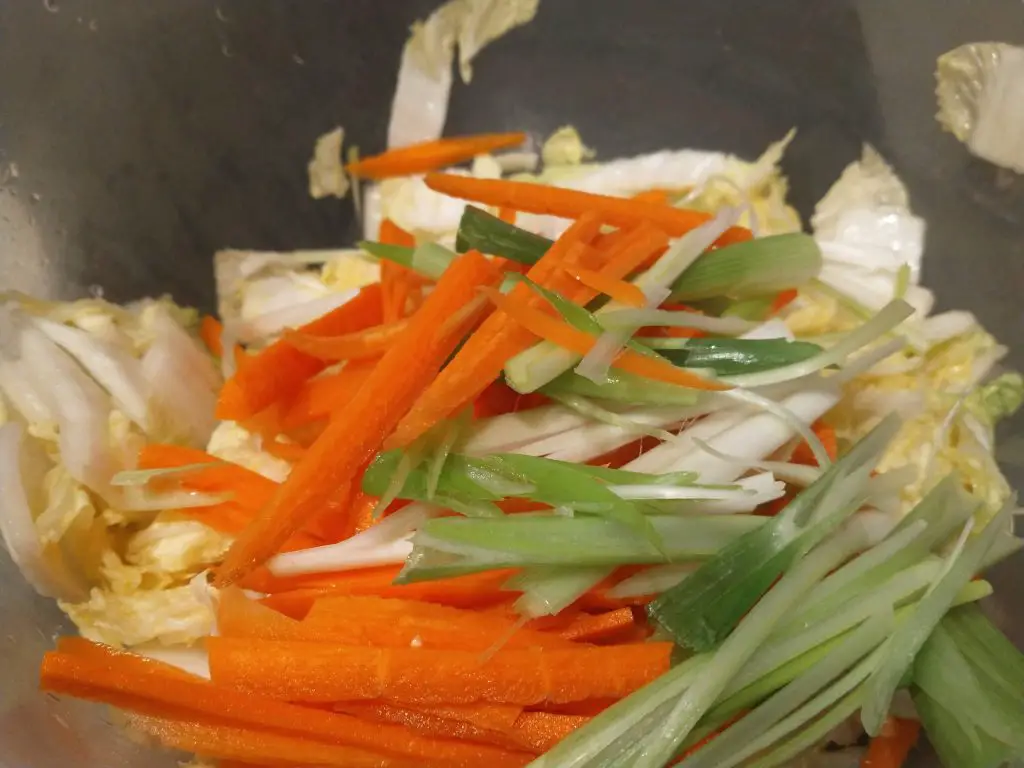
Julienne the carrot and daikon, if you are using it, slice the spring onions lengthways.
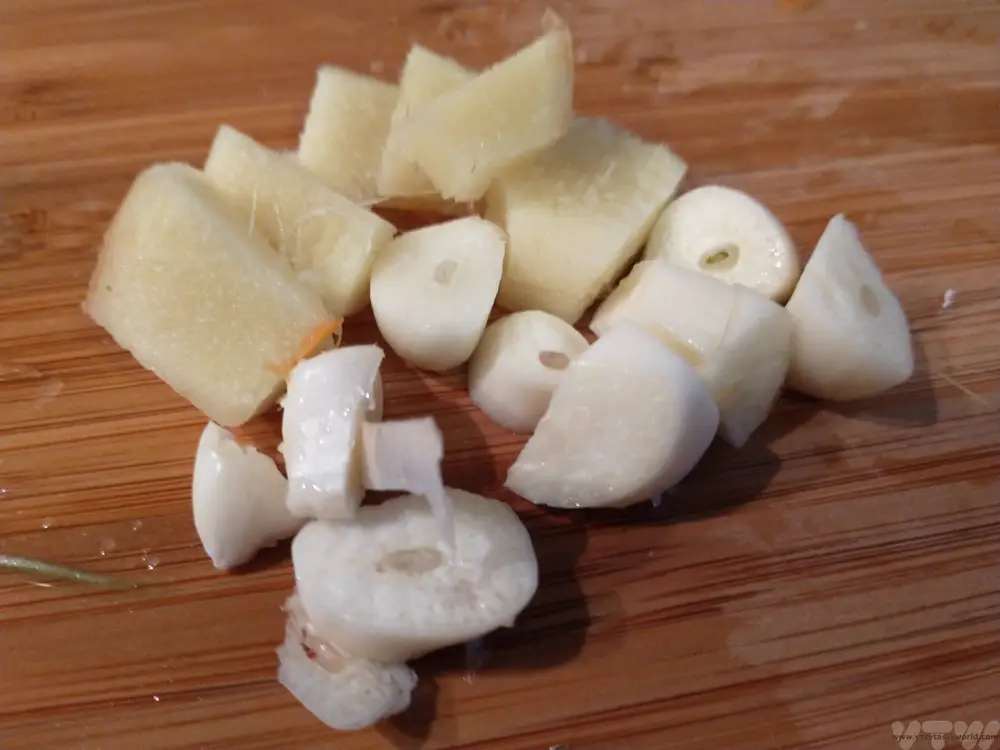
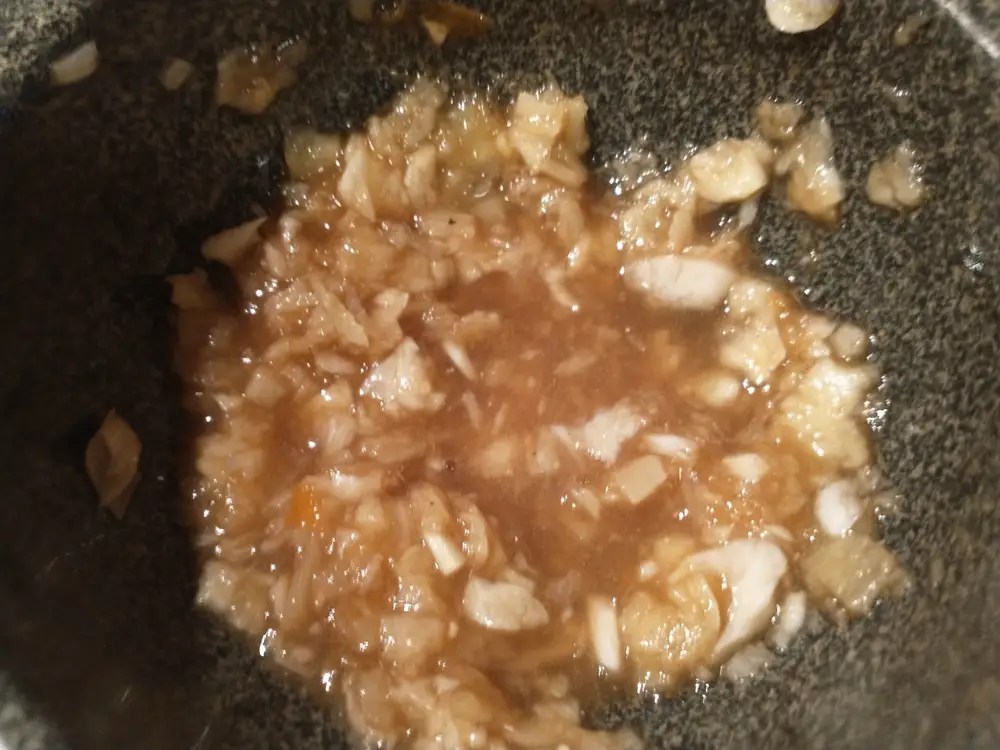
Put the garlic, ginger and fish sauce into a pestle and mortar and grind them together to create a paste. It will have quite a liquid consistency.
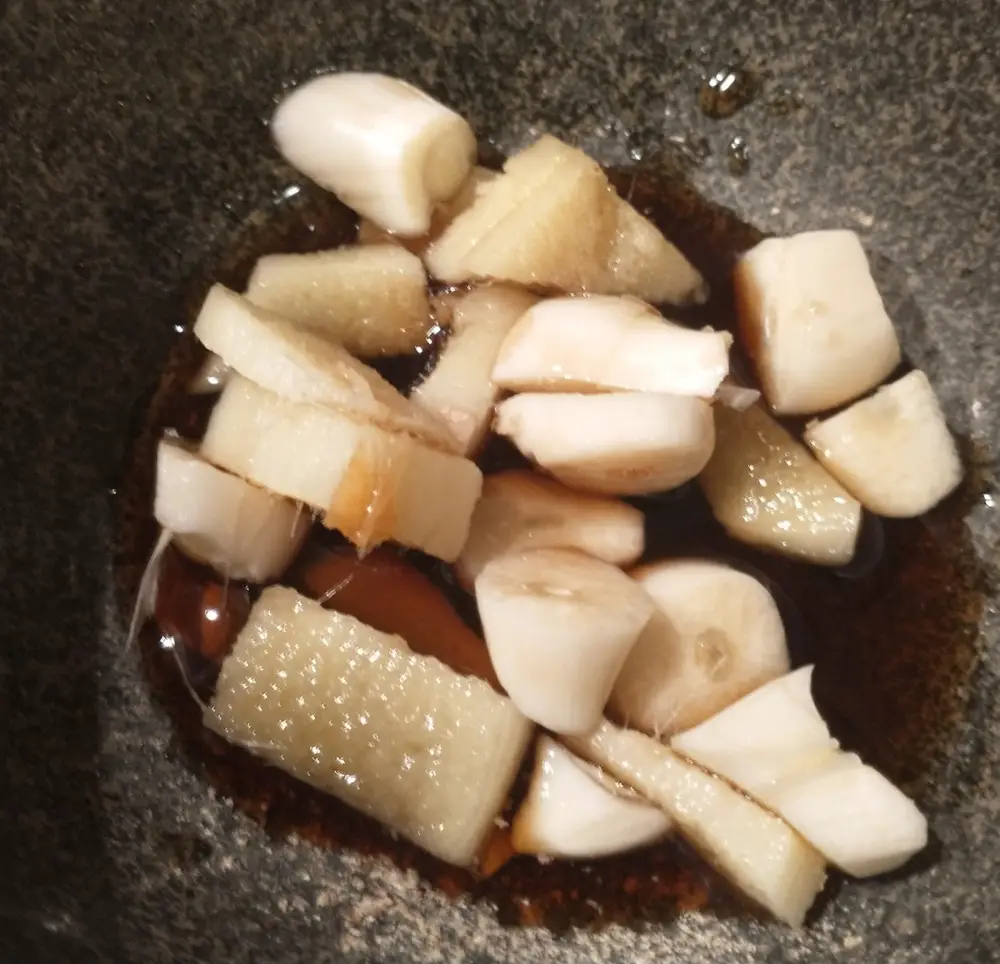
Add the vegetables to the cabbage.
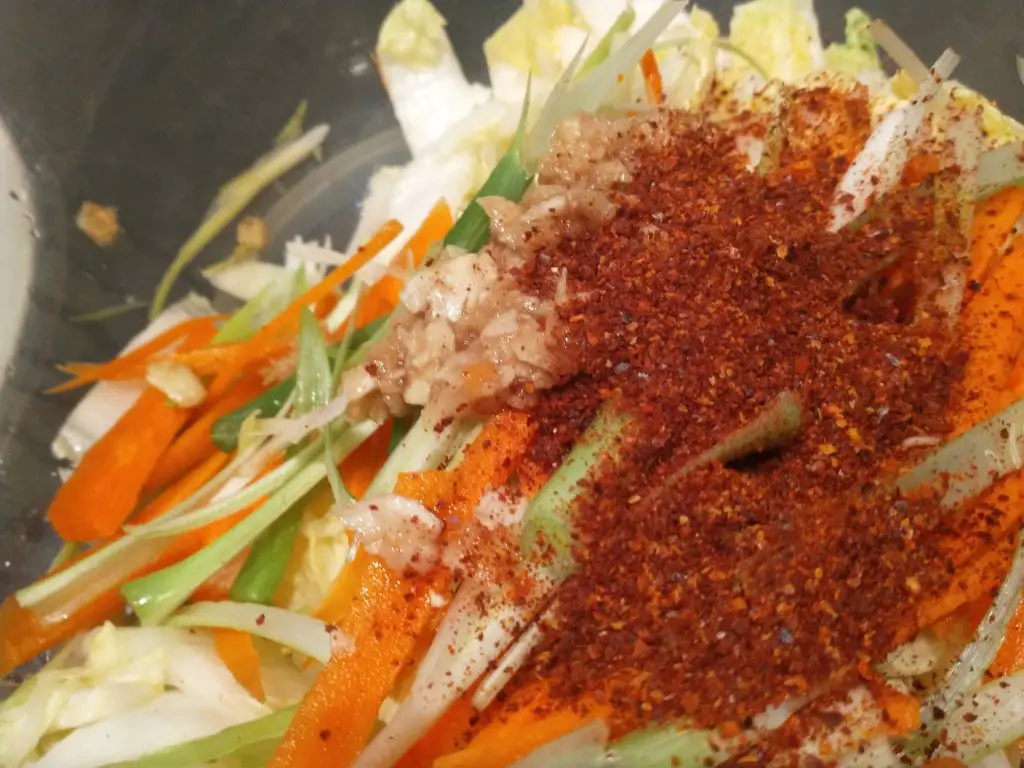
Pour over the garlic-ginger-fish sauce paste and sprinkle the chilli powder over the cabbage and veg. Mix well. We find it’s easiest to do this with our bare (clean) hands.
Then you need to pack the jar. Pick up handfuls of the cabbage mix and place into the jar, pushing down to squish it in – really pressing hard to make sure there aren’t any air gaps.
You should try and aim for minimum headroom at the top of the jar to reduce the air space. You also want to make sure the cabbage mixture remains pressed down. You can get all sorts of weights but a glass dessert ramekin type container (e.g. Gu) works well or, cheaper and less calorific than eating a chocolate dessert, fill a small plastic bag with water, tie at the end and squish into the top of the jar.
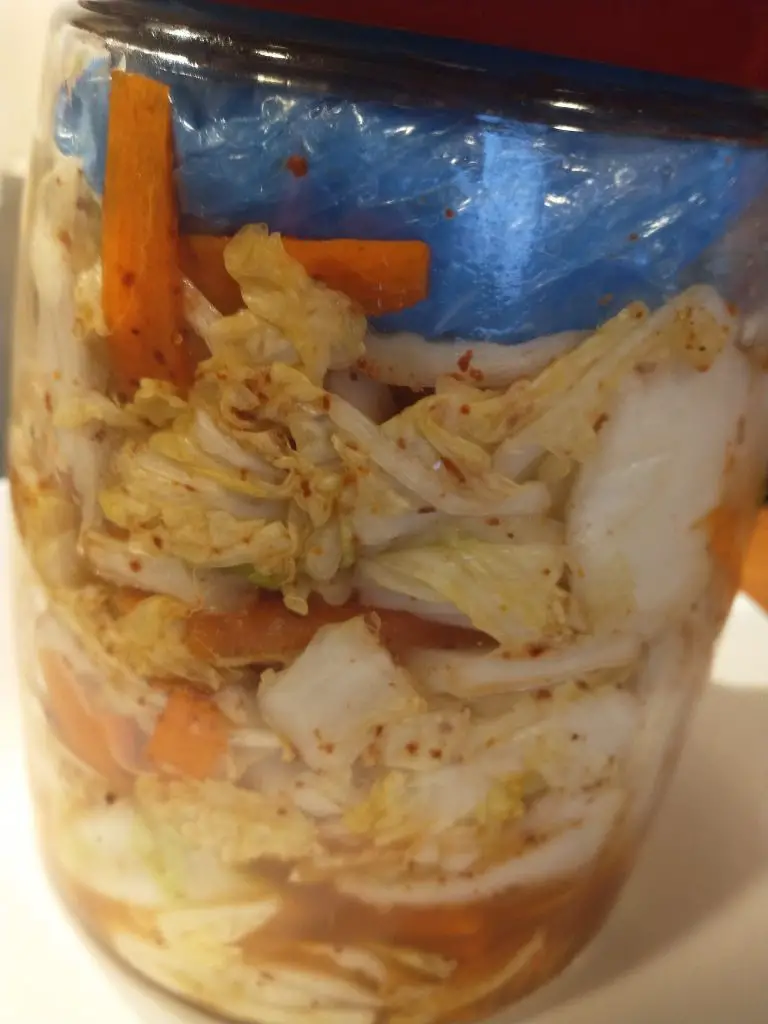
Close the jar and place the jar on a deep plate or in a bowl to catch any liquid escaping.
Check The Ferment Over Several Days
Over the next few days the cabbage will begin to ferment. The time it takes will depend on how warm the ambient temperature is. You’ll see a liquid start to form in the jar and cover the cabbage and the lactic acid bacteria will start to form lactic acid and C02. It is because of the C02 that you need to keep an eye on your ferment. If you are using a specific fermentation jar you should be fine. If you are using a conventional jar you will need to ‘burp’ your ferment, at least once a day. Open the lid – very briefly – and close immediately, just to let the C02 out. This will ensure that the pressure doesn’t build up. If you don’t burp there is a risk of the jar exploding. We’ve never had a glass jar break but there have been numerous occasions when I’ve burped the jar and ended up with a brine shower!
The kimchi should be ready within a week to 10 days. You can leave it longer if you wish and this will ensure further development of the flavours.
When the kimchi is ready you can store the jar in the fridge or decant it into smaller jars (just go through the process of cleaning them, then adding boiling water and letting them dry). The kimchi will store in the fridge for months as long as it is airtight.

Beware
The two greatest issues with fermenting food is risk of explosion (which can be reduced/eliminated if you use the right equipment) and mould. When the ferment is exposed to air there is the potential for mould to develop. If you open your jar and see fuzzy mould of any colour you should discard the ferment. It’s heart-breaking but the safest thing to do as the mould could make you very ill. (It’s not advisable to scrape off the mouldy bits – by the time the fuzz has appeared the spores will have permeated the whole jar.) Obviously this creates something of a dilemma – you need to open the jar to burp but don’t want to let the air in. So, the key is to open the jar very quickly to release pressure then close immediately. With some types of fermentation jar you don’t need to worry.
Some Notes On Fermentation Equipment
You don’t need too much specialist equipment to ferment food. A kilner jar with a metal clip lid ‘self-burps’ – it allows CO2 to escape whilst not letting air (which can contain mould spores) in. You can get various fermentation vessels in varying sizes.
Salt should not have anti-caking properties.
You can get chilli flakes or gochujang in Asian supermarkets.
- RECIPE: How To Make Elderflower Champagne
- RECIPE Oyakodon Donburi
- Zero Waste Recipes Before Your Holiday
- RECIPE: Vegetable Biryani Tamil Nadu Style
- RECIPE: Vegan Wild Garlic Pesto
- Recipe: Venetian Pasta Sauce
- RECIPE: Biryani Raita Recipe
- RECIPE: How to Make Costa Rica’s Gallo Pinto
- Recipe: Japanese Simmered Pork Belly – Buta no Kakuni
Please note that this post contains affiliate links. If you click the link and decide to make a purchase we will earn a small commission, at no cost to you, which helps towards running this site.
Places To Visit In Chitwan, Nepal
Cooking Tharu Chitwan Nepal
The Chitwan area of Nepal is a national park that is located around 100km from Kathmandu. It takes around two to four hours to travel there from the capital (sometimes much longer if the roads are busy – our return journey took 10 hours!) depending on the route. But it’s a pleasantly scenic drive across the Nepalese countryside (we travelled there after spending a night at the Neydo monastery) once you have escaped the busy roads of the capital city. It is possible to fly from Kathmandu but this is a more expensive mode of transport. There are lots of places to visit in Chitwan. The area is best known for its wildlife but it is also possible to meet the local Tharu people and learn to cook with them.
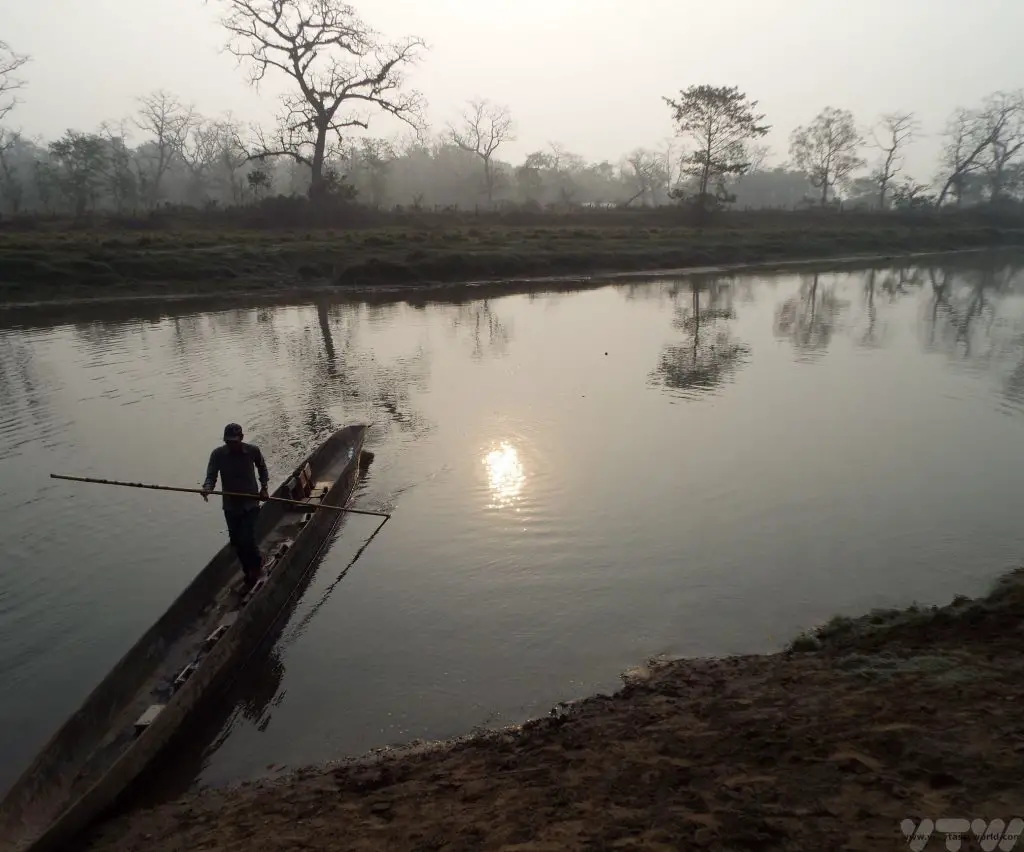
Wildlife Walking Safari in Chitwan National Park
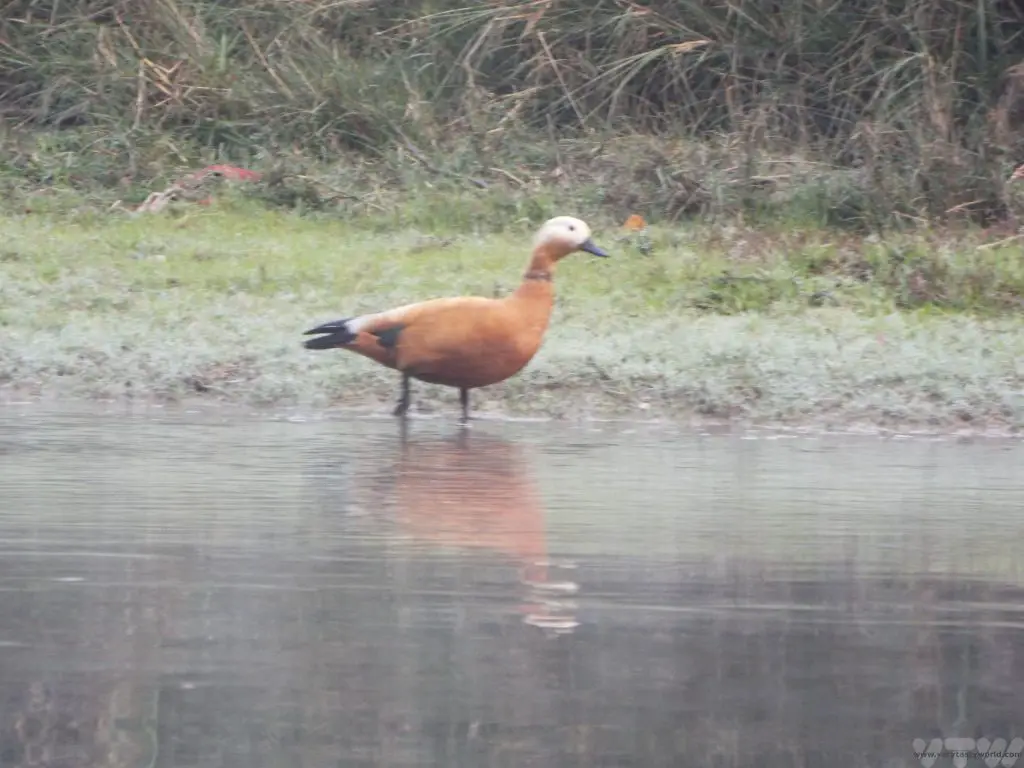
Chitwan is best known as a wildlife reserve where you can undertake a boat or walking safari and – if you are amazingly lucky – you may be able to see wild elephants, rhino, bears or even a tiger. If you’re merely lucky you will catch a glimpse of monkeys, deer and birds. And maybe chance upon some rhino poo to prove that they really were somewhere in the forest, honest.
We caught a jeep from our hotel to the river early in the morning and climbed aboard a long boat, so we could float serenely downriver.
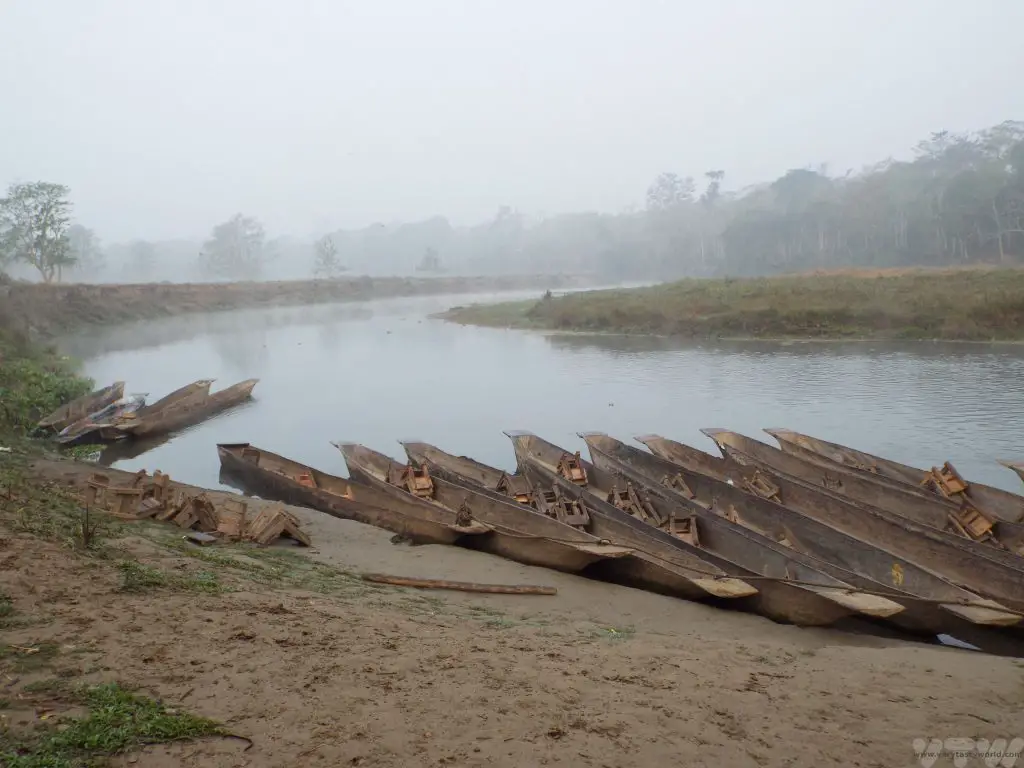
There were lots of birds to see, including brightly coloured kingfishers, and we passed by a crocodile, who was almost as long as our boat, also enjoying a leisurely time in the river.


After around an hour we disembarked and met our guide for a walking safari.
We were given a pep talk whereby we learned what to do if we were to encounter any of the amazing, but potentially dangerous, creatures. Basically, they can all outrun you, so:
Rhinos – Stand still if you are downwind from them, they have appalling eyesight and probably won’t see you. Back away. If they charge, run away in a zig zag pattern, climb a tree if you can.
Bears – Do not run, avoid eye contact, back away slowly.
Tigers – Stand your ground. Don’t run, all cats love a chase.
Elephants – If they’re in a strop, you’re doomed!
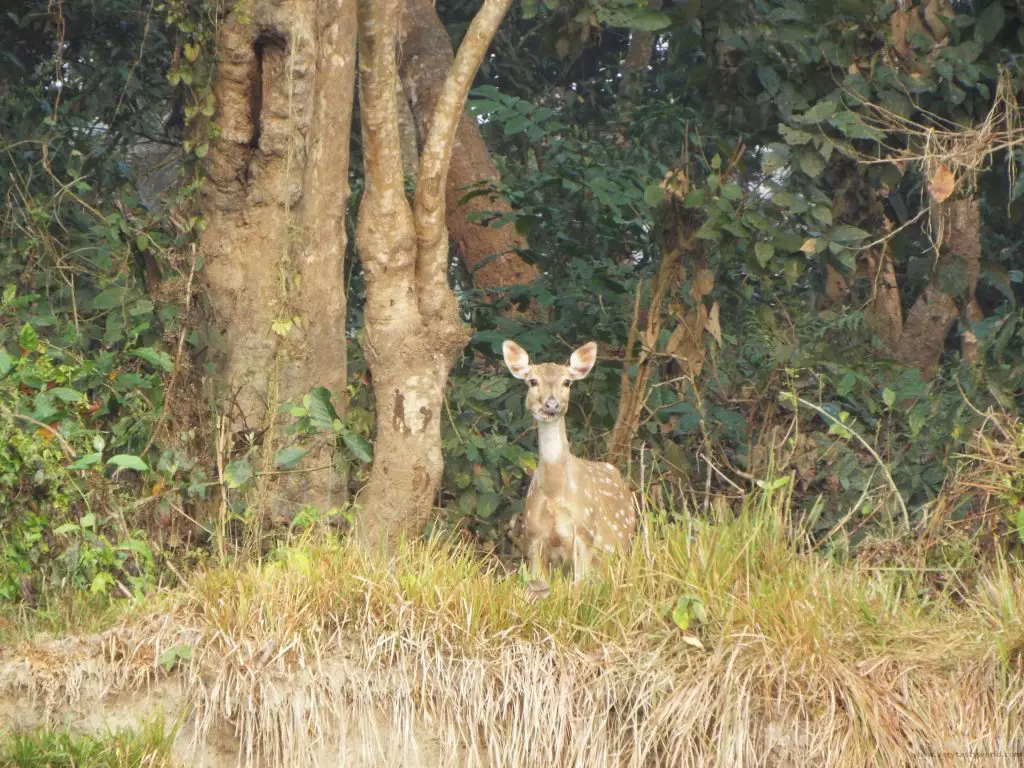
Sadly, we weren’t amazingly lucky and didn’t get to try any of these techniques as the wildlife had decided not to come out to play, but that’s okay, that’s why it’s called wildlife.We did see a strutting peacock, a monkey and some deer.


But whether you see spectacular creatures or not, walking through the forest or floating along the river makes for a very pleasant morning.
And did meet one tiger!

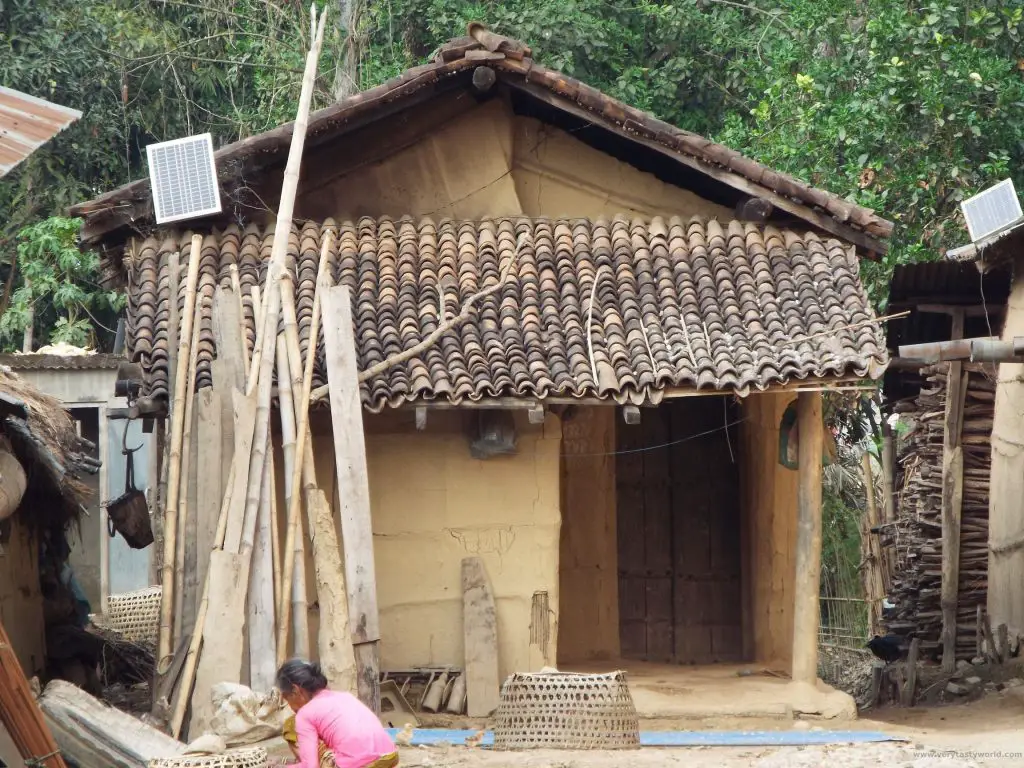
Places to Visit in Chitwan – A Tharu Village
A less well-known excursion is one which takes you to a nearby Tharu village. Local people welcome you and are happy to introduce you to their traditional way of life. This trip can be arranged via your hotel who will organise transport to the village, which is located just a few kilometres from the national park. All the villagers are very welcoming and are happy for you to wander round. Some of the local women have recently set up a home stay so that you can experience the local way of life first hand. If we were to return to Chitwan we would absolutely love to stay with them.
Cooking With the Tharu People
Even if you’re not staying overnight, you can spend a very pleasant afternoon learning to cook traditional dishes with them. We met our lovely hosts who made sure we had a hands-on approach to cooking, right from the start.
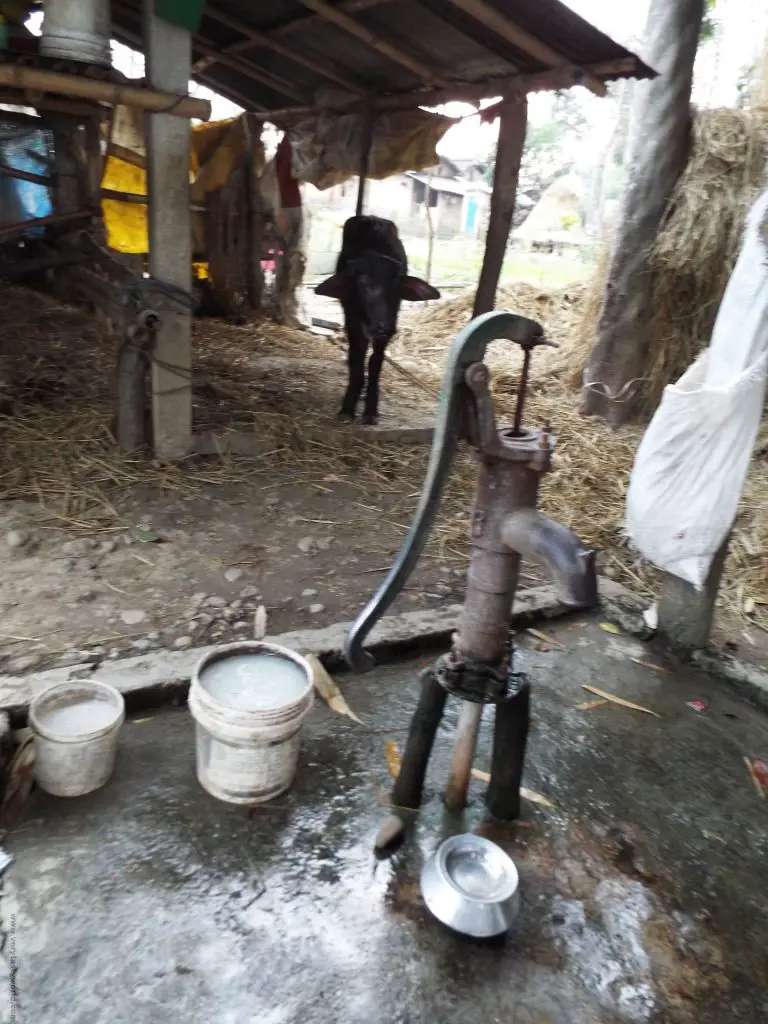
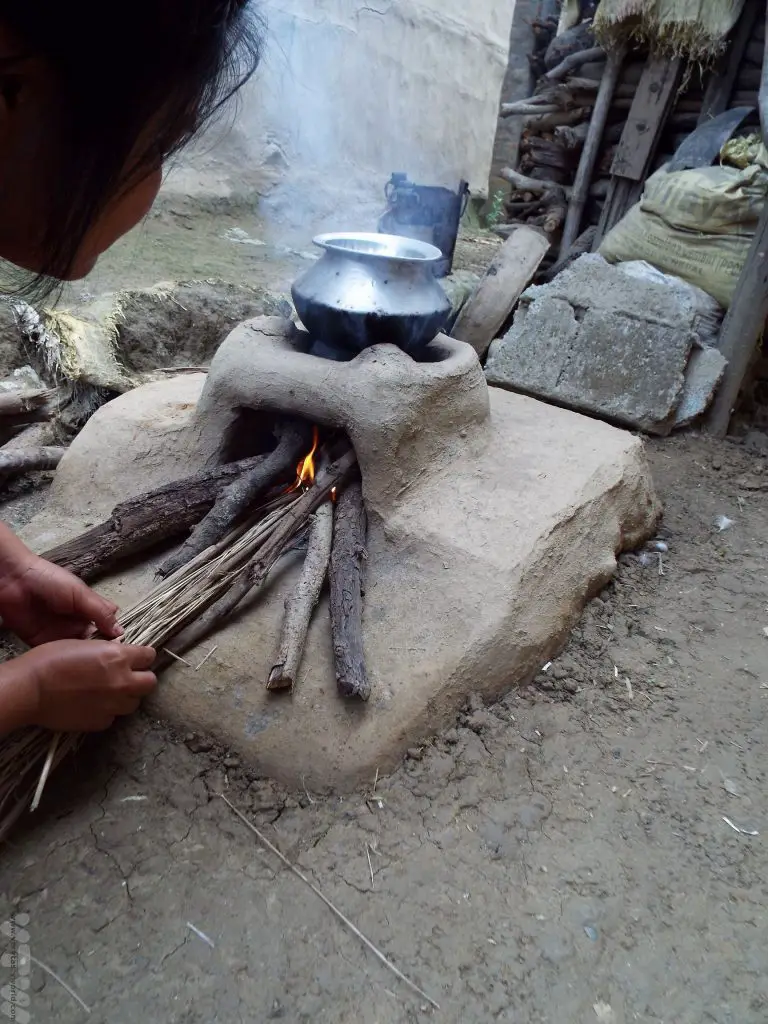
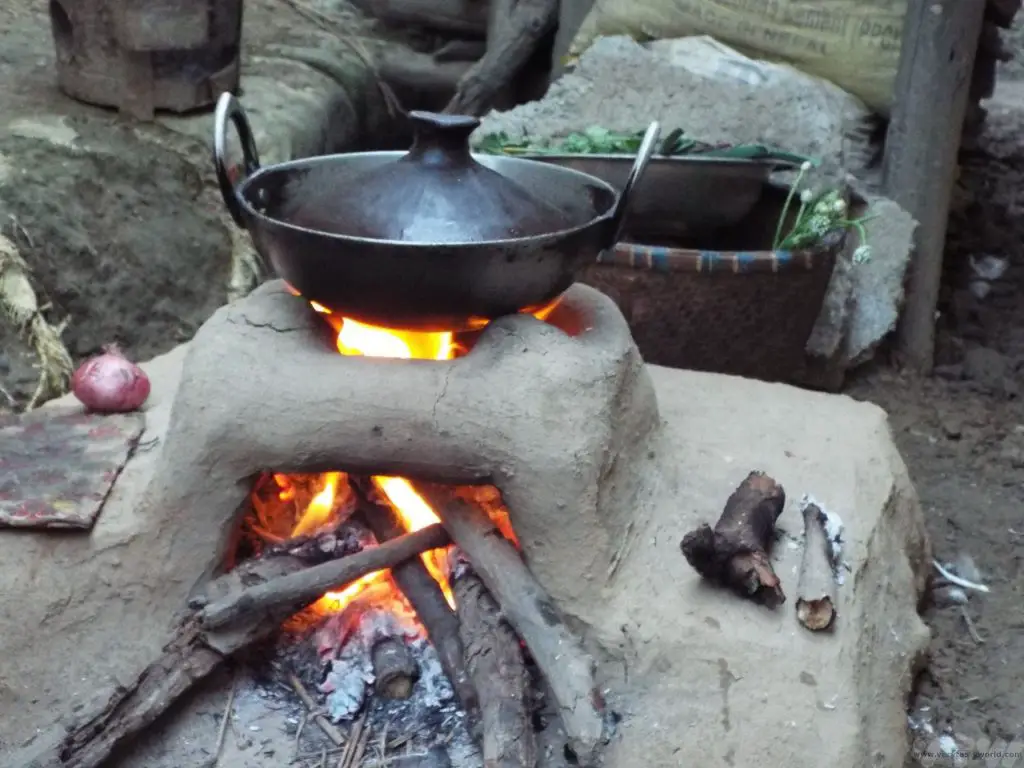
The first element of the meal to start cooking is the rice. First of all, get water. There is no running water in the houses so you have to go to the local pump. Wash the rice then add water to the urn. Next, start the fire. The Tharu use an outdoor clay oven fuelled with wood. The oven is located between the houses.
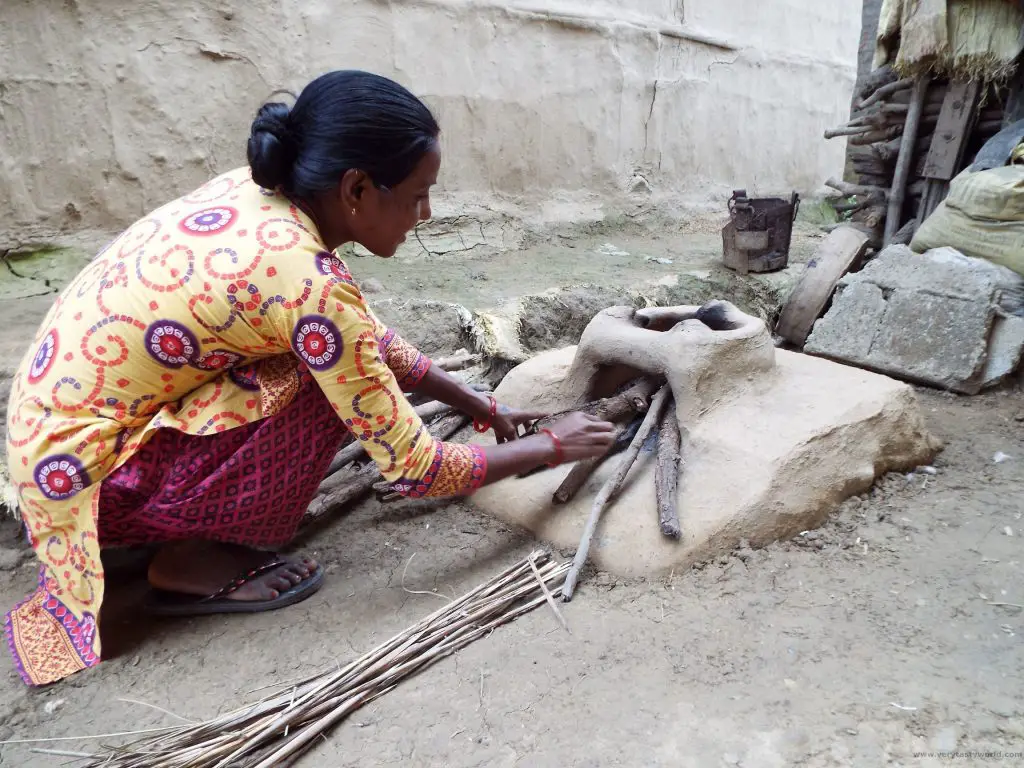
Some kindling starts the fire and then the wood burns slowly to create an intense but steady heat. Pop the rice into the water vessel, put it on the fire and let it start cooking.
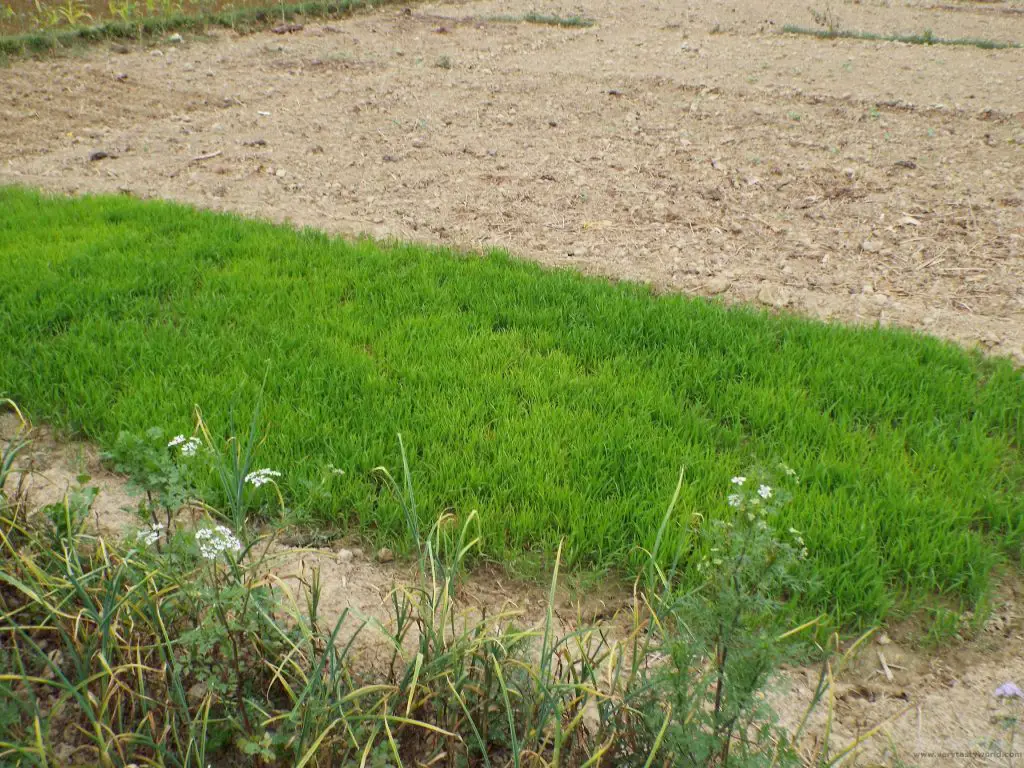
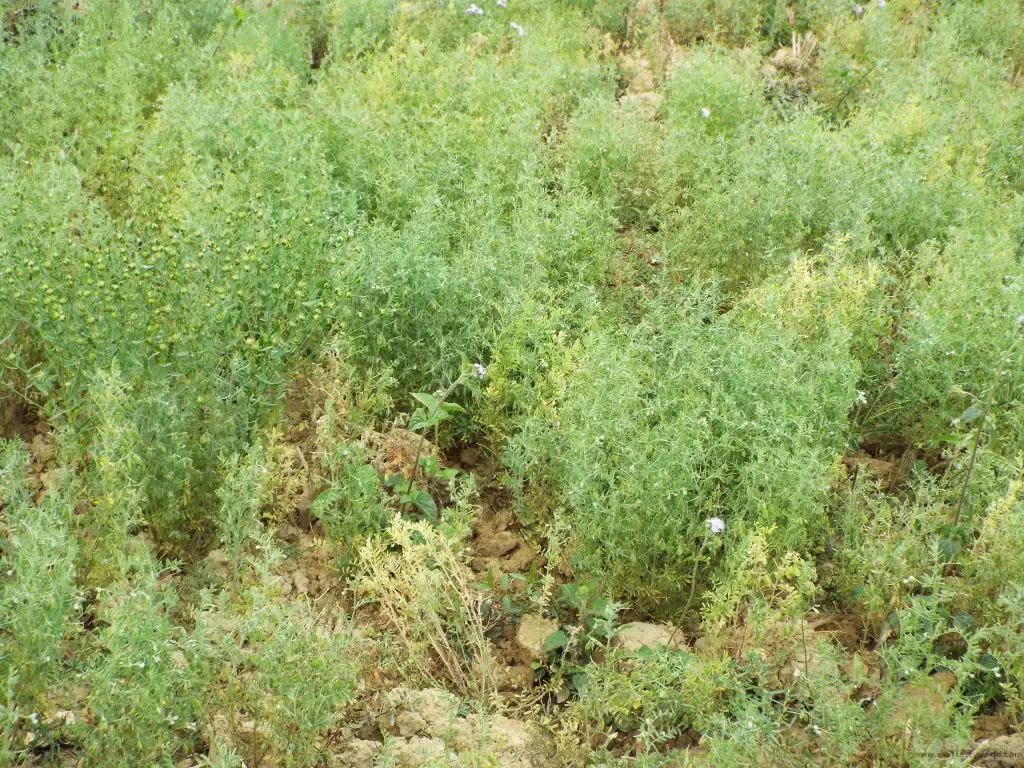
We then went for a walk in the local area to find ingredients. The Tharu grow a lot of their own vegetables on land adjacent to the village. These include onions, rice, beans, wheat and corn. It was particularly interesting to see lentils growing – we’d only ever seen them dried and they only ever came in packets from the supermarket.
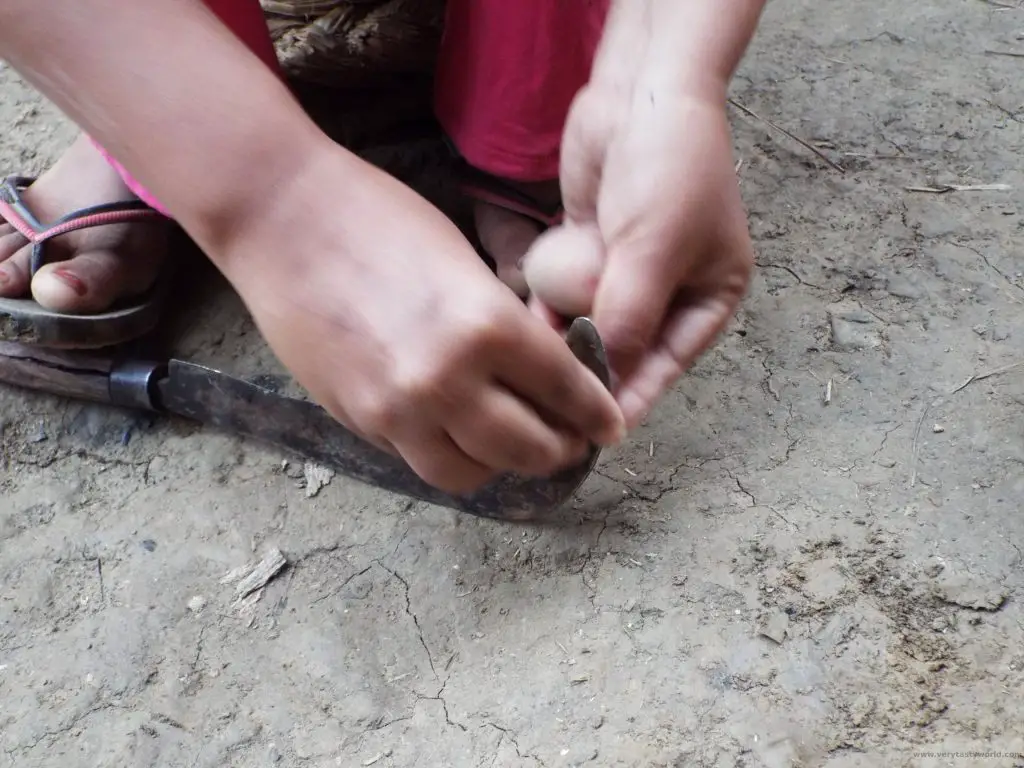
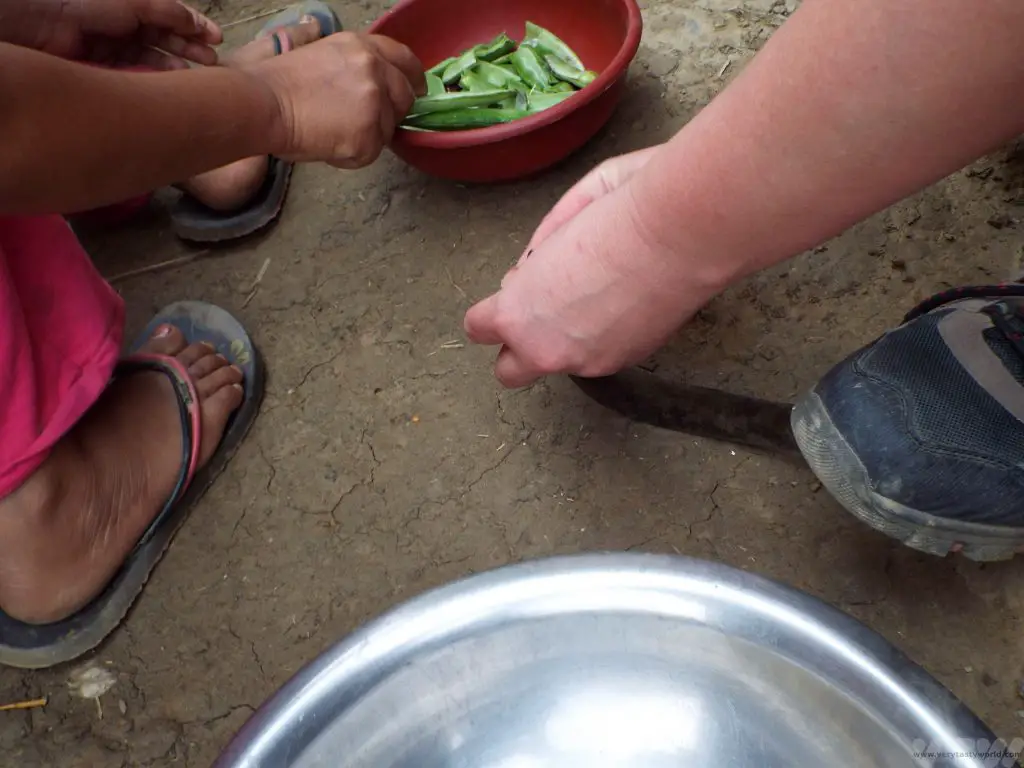
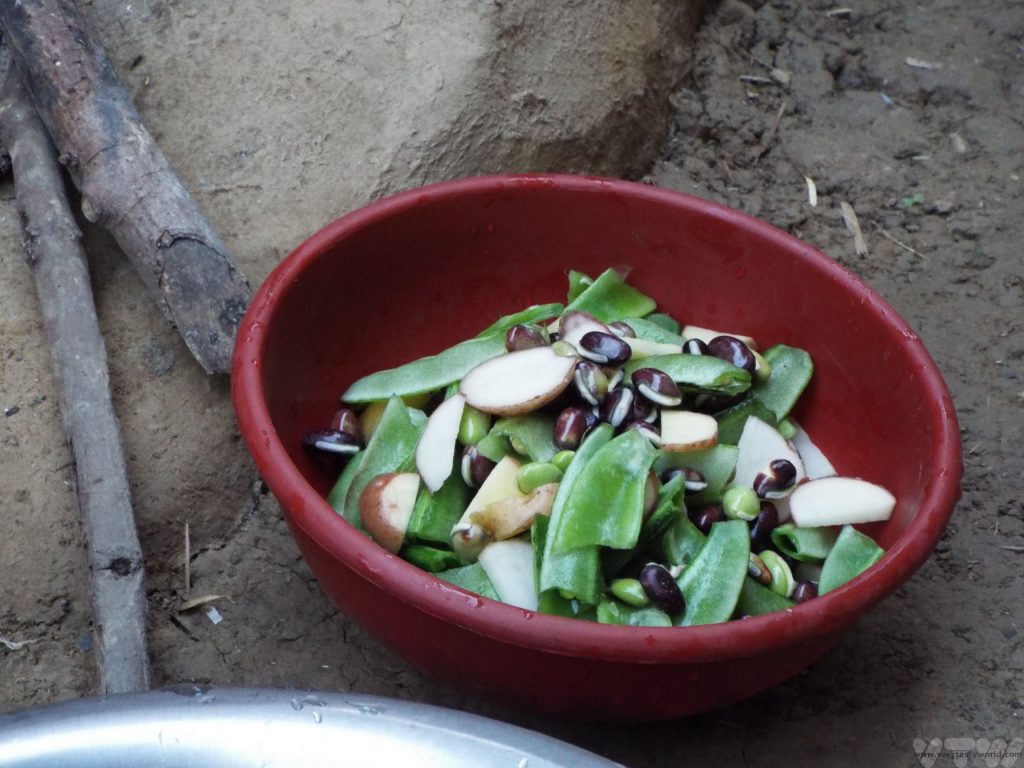
Then we started preparing the vegetarian dish that accompanied the rice which was boiling away merrily on the fire. Beans were sliced using a knife by steadying the handle with a foot and – carefully – slicing the beans using the inside of the blade. Other vegetables were added.
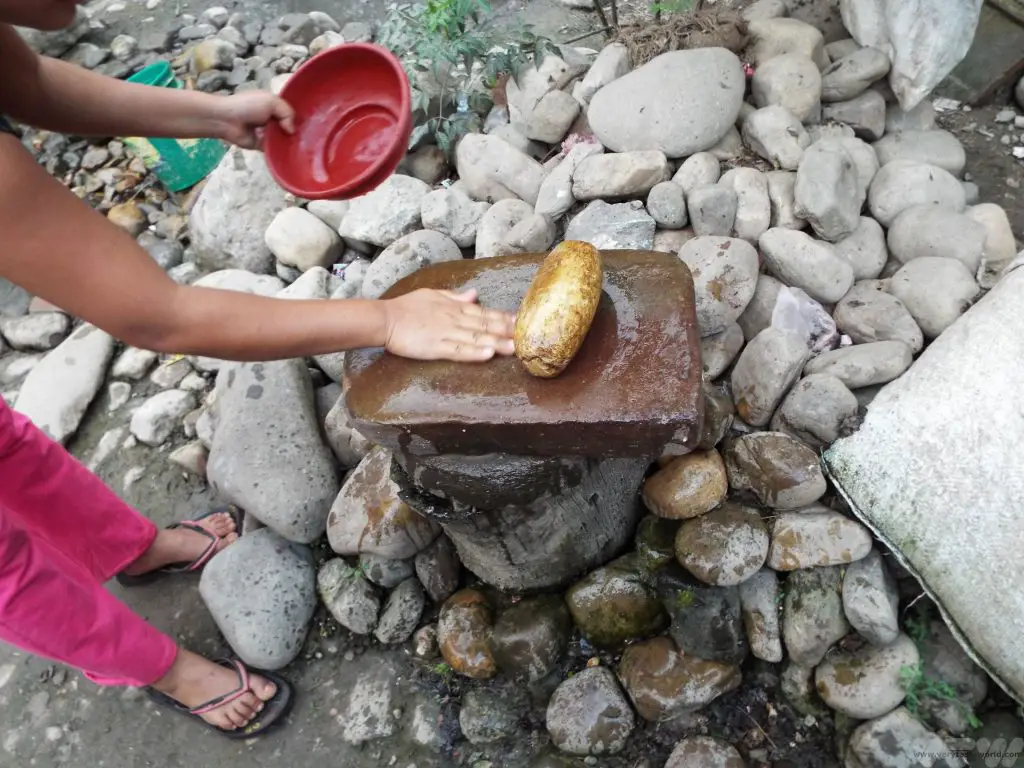
We then went onto flavouring and this was something of a revelation. At home we’re very accustomed to using gadgets to process our food. There’s nothing wrong with that – with busy lives, a food processor can save a few seconds with all sorts of routine kitchen preparation jobs. But, actually, crushing garlic with a stone on a rock took no time at all and produced a smoother paste than any garlic crusher we’ve come across.

We removed the rice, which remained piping hot inside its pot and cooked the main dish over the fire. We started by quickly frying off the garlic and then added the vegetables and a bit of water to simmer.
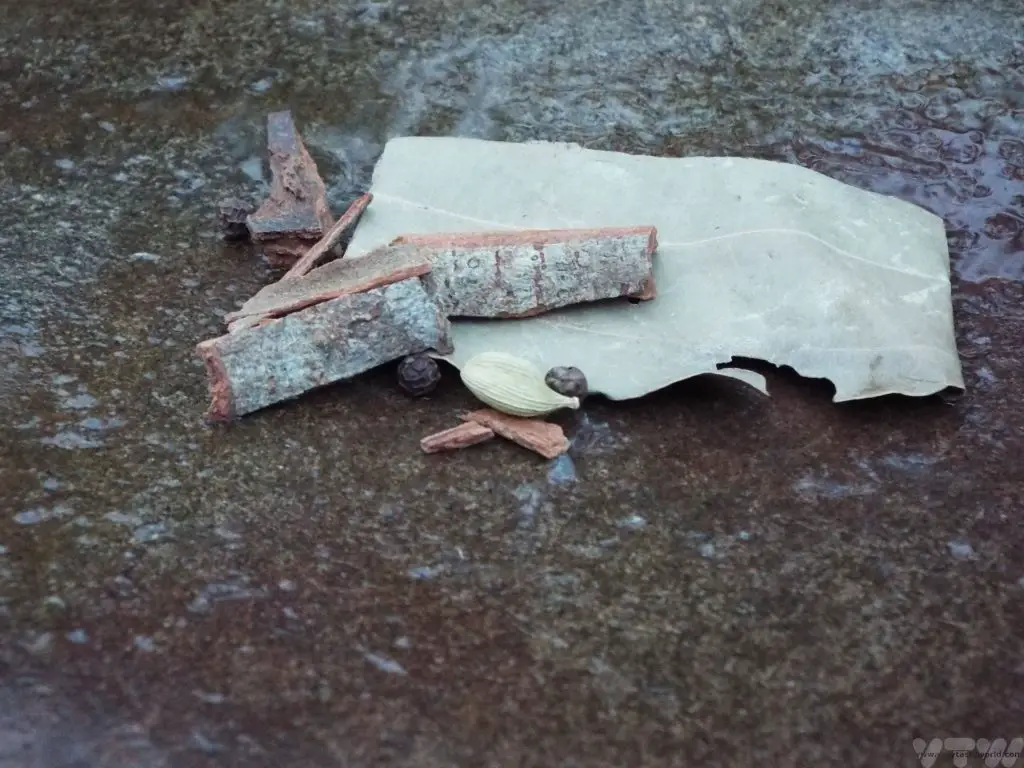
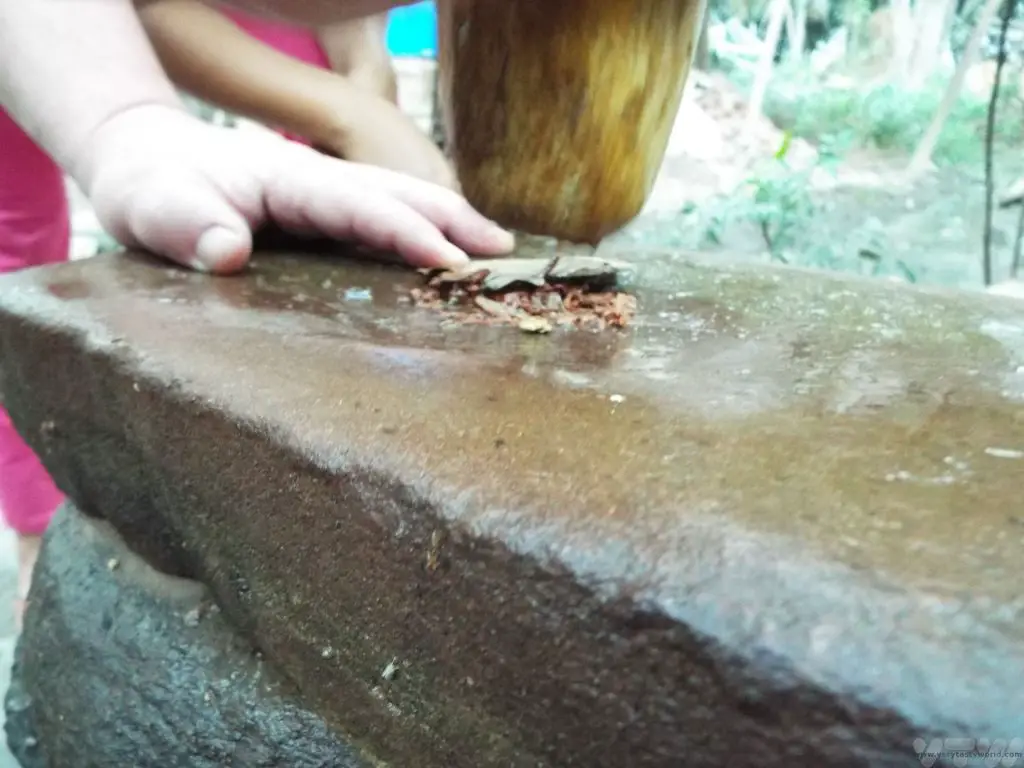
The other thing is that we are also very used to buying powdered spice mixes. Pick up a packet of garam masala, sprinkle into your cooking and… instant flavouring. But so many of us buy spice mixes that are often never fully used before their ‘best before’ dates and languish in a cupboard slowing turning into tasteless dust. And it really isn’t that much more effort grind whole spices. Again, we used a stone. In this instance some dalchini (cinnamon bark), a few peppercorns, a dried cinnamon leaf and a cardamon pod were quickly ground into a masala. And doing it this way also gave us the freedom to change the spice combination. We added this to the dish at the last moment to provide a very aromatic flavour. Which, of course, was delicious.
We shared it with our host family in their home.
The trip also included an opportunity for Mitch to dress up and dance with the local ladies. Photos of her wearing traditional dress and – shock, horror – make-up do exist, but we’ll spare you those. What was great about the trip was not only getting the opportunity to cook and taste delicious local food but also to meet so many lovely people. Our hosts were absolutely charming and the whole village was delighted to see us.
The afternoon with the Tharu was delightful but it also changed the way we think about using spices. After our visit we decided that we would buy whole spices and then we could develop our own flavourings. Much as we’d like to have a grinding stone and a rock it’s not very practical in a suburban English house, but we do use a good quality granite pestle and mortar. It gives us the opportunity to experiment with spice combinations as well as textures – sometime we want a fine grind, other times we prefer a coarser texture. The whole spices can be stored more easily and keep for a longer period of time – especially if using an airtight container.
Related Posts You May Enjoy


RECIPE: How to Make Vietnamese Spring Rolls
How to make Vietnamese Spring Rolls Summer Rolls
Vietnamese cuisine is amongst the most delicious in the world. It is also amongst the prettiest. We have a Vietnamese spring roll recipe. While most people think of spring rolls as being deep-fried, gỏi cuốn are actually served cold – at room temperature. In Western countries they are referred to as spring rolls, salad rolls or even summer rolls. They have slightly different names depending on the region of Vietnam: they are gỏi cuốn, meaning salad rolls in the south and nem cuốn in the north. Apparently they are called “rice paper” rolls in the central regions of the country, which is a simple description but accurate.
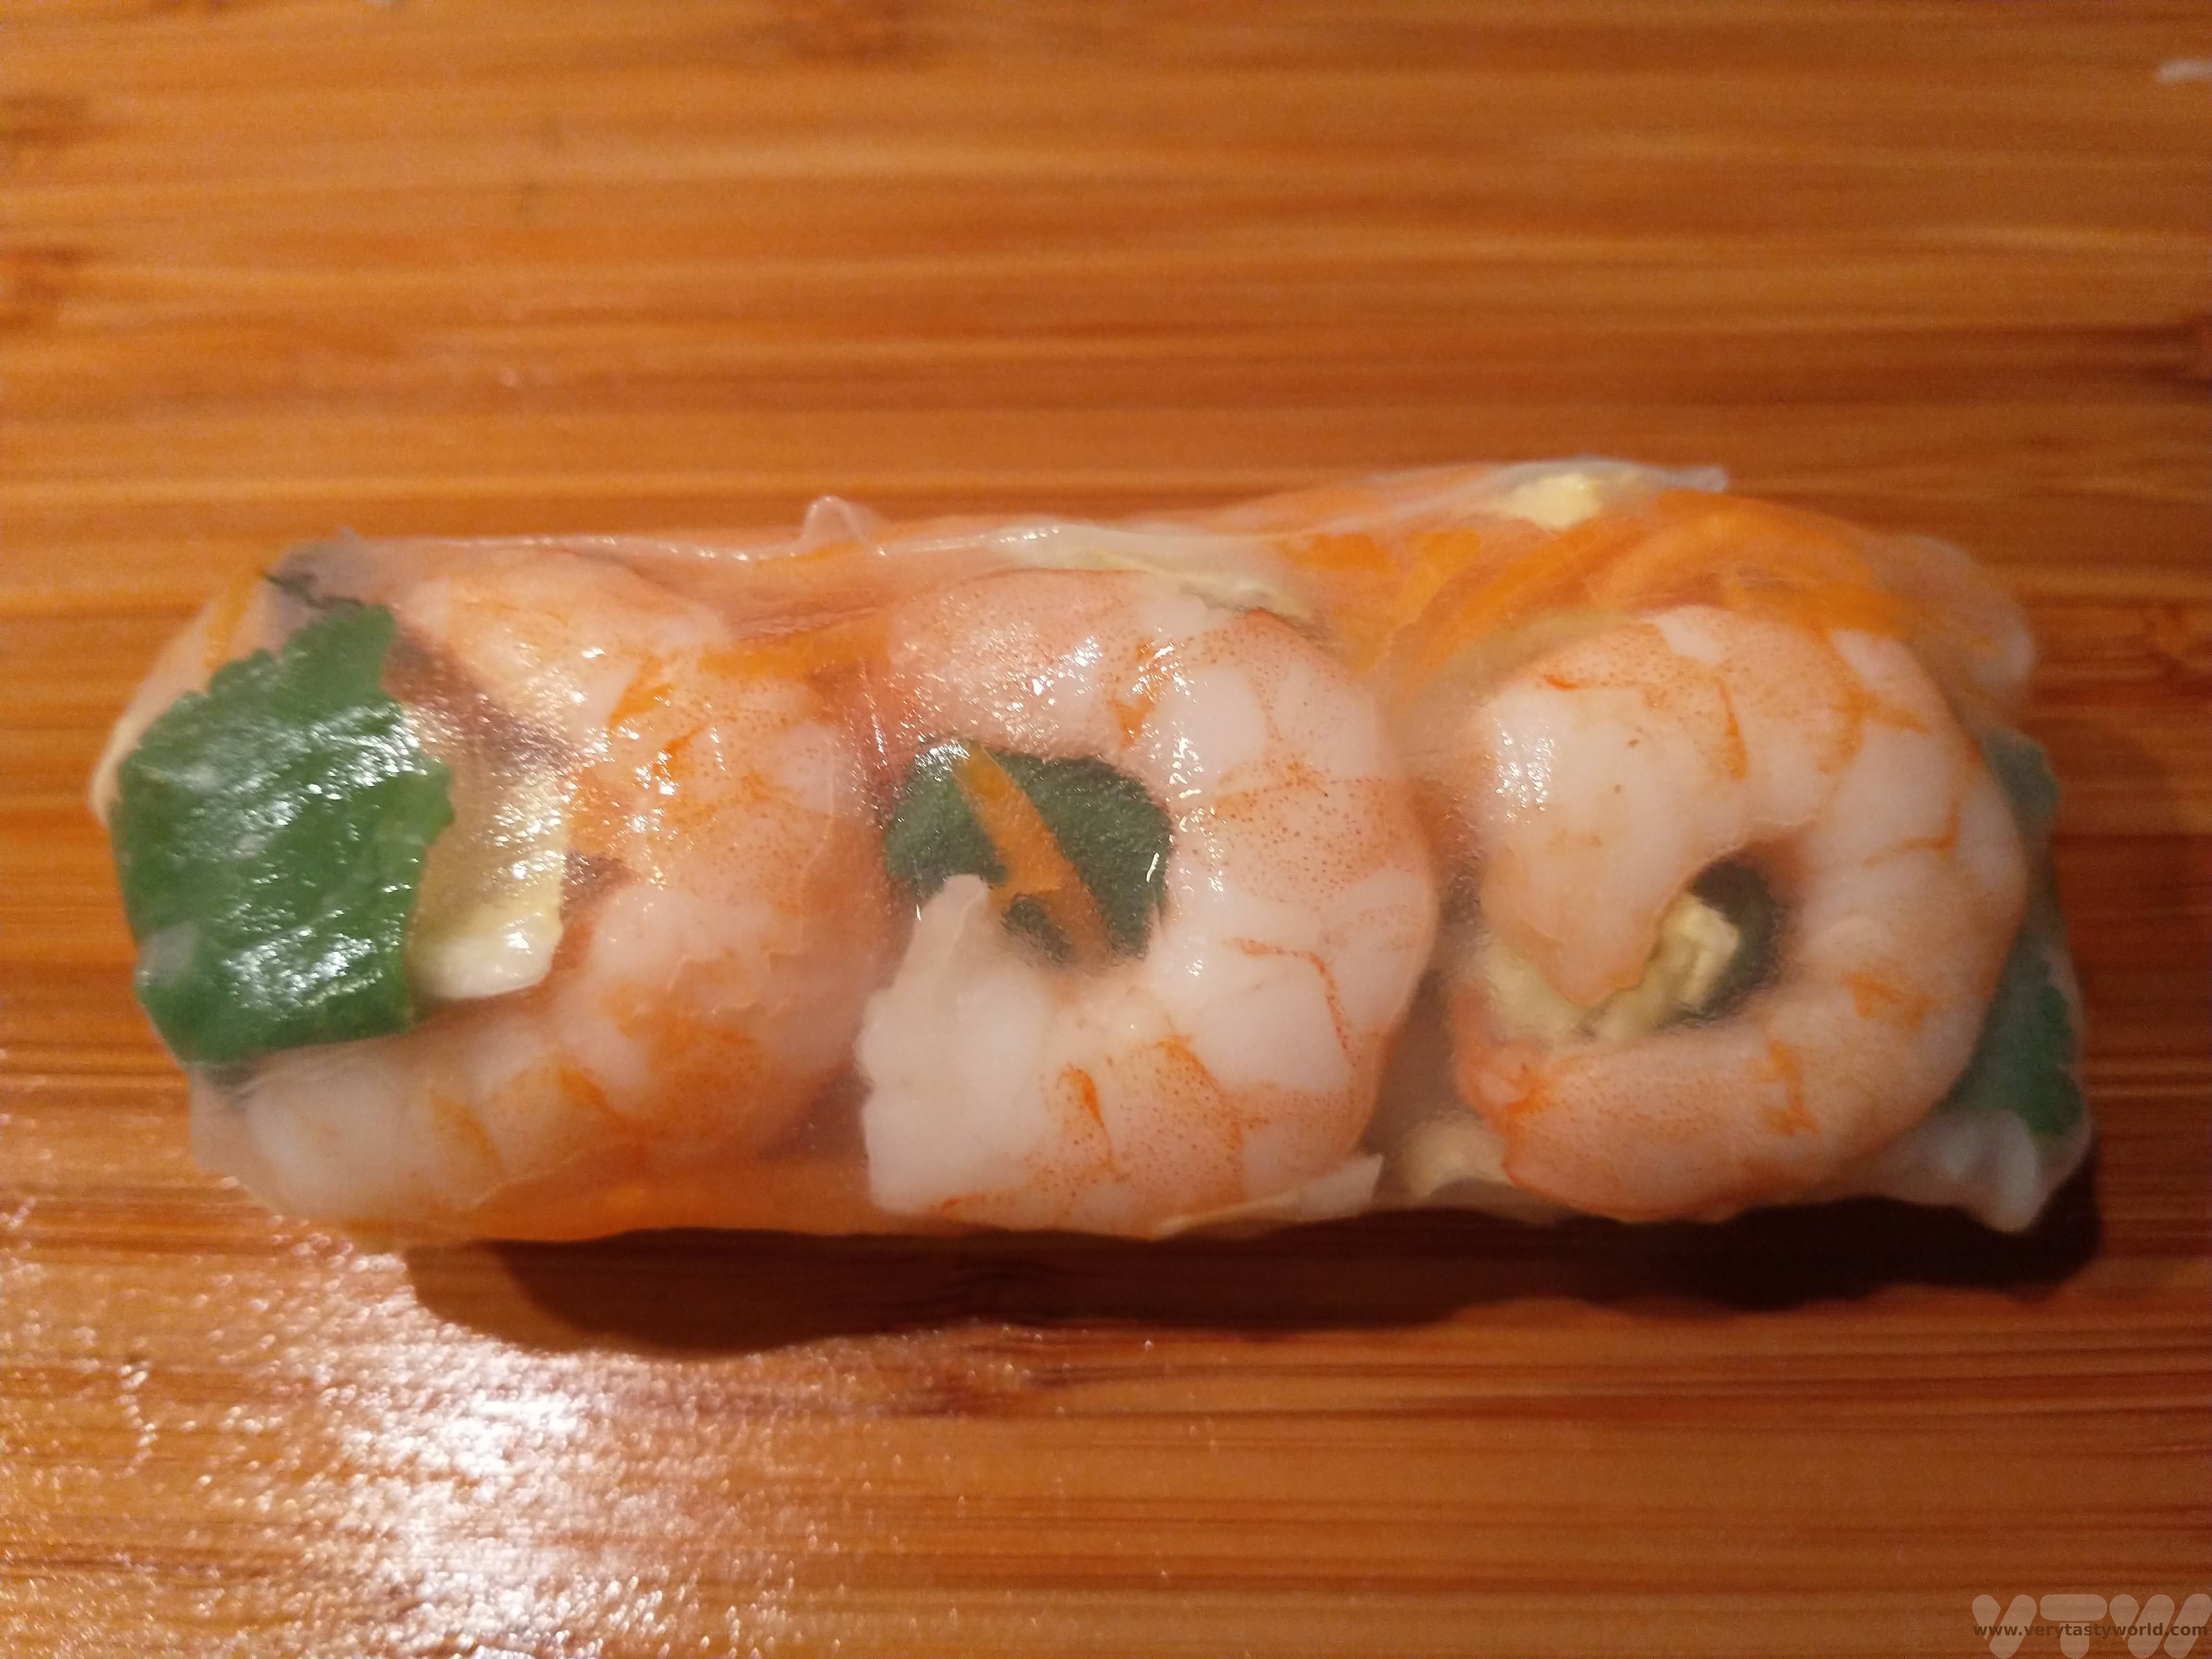
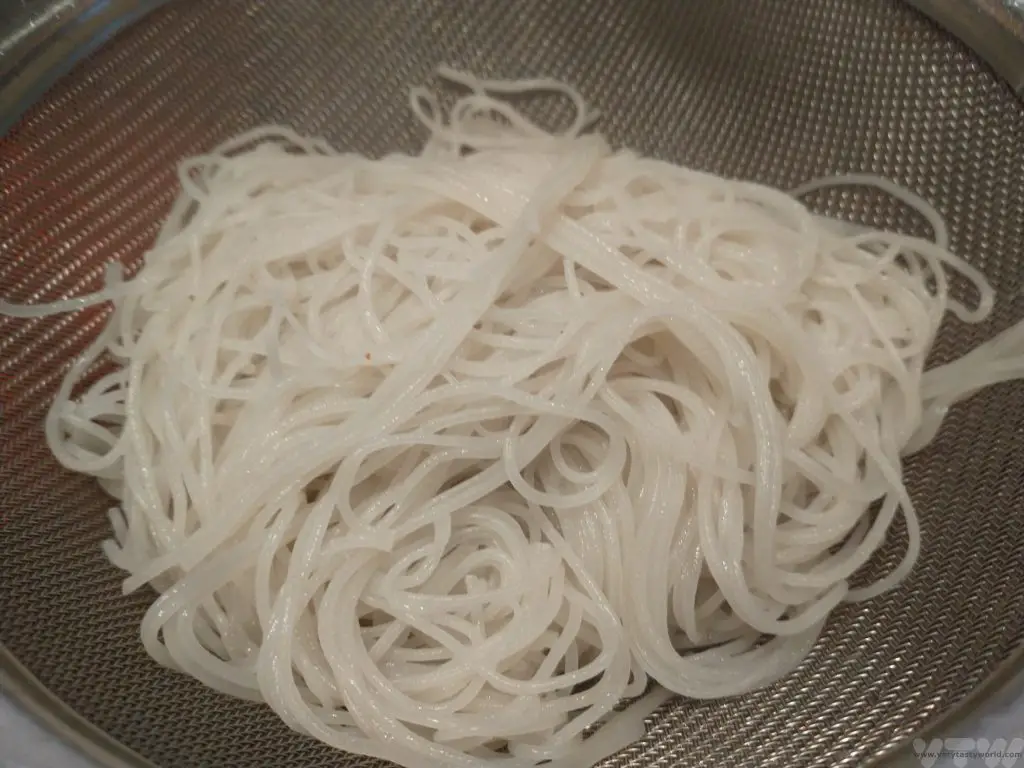
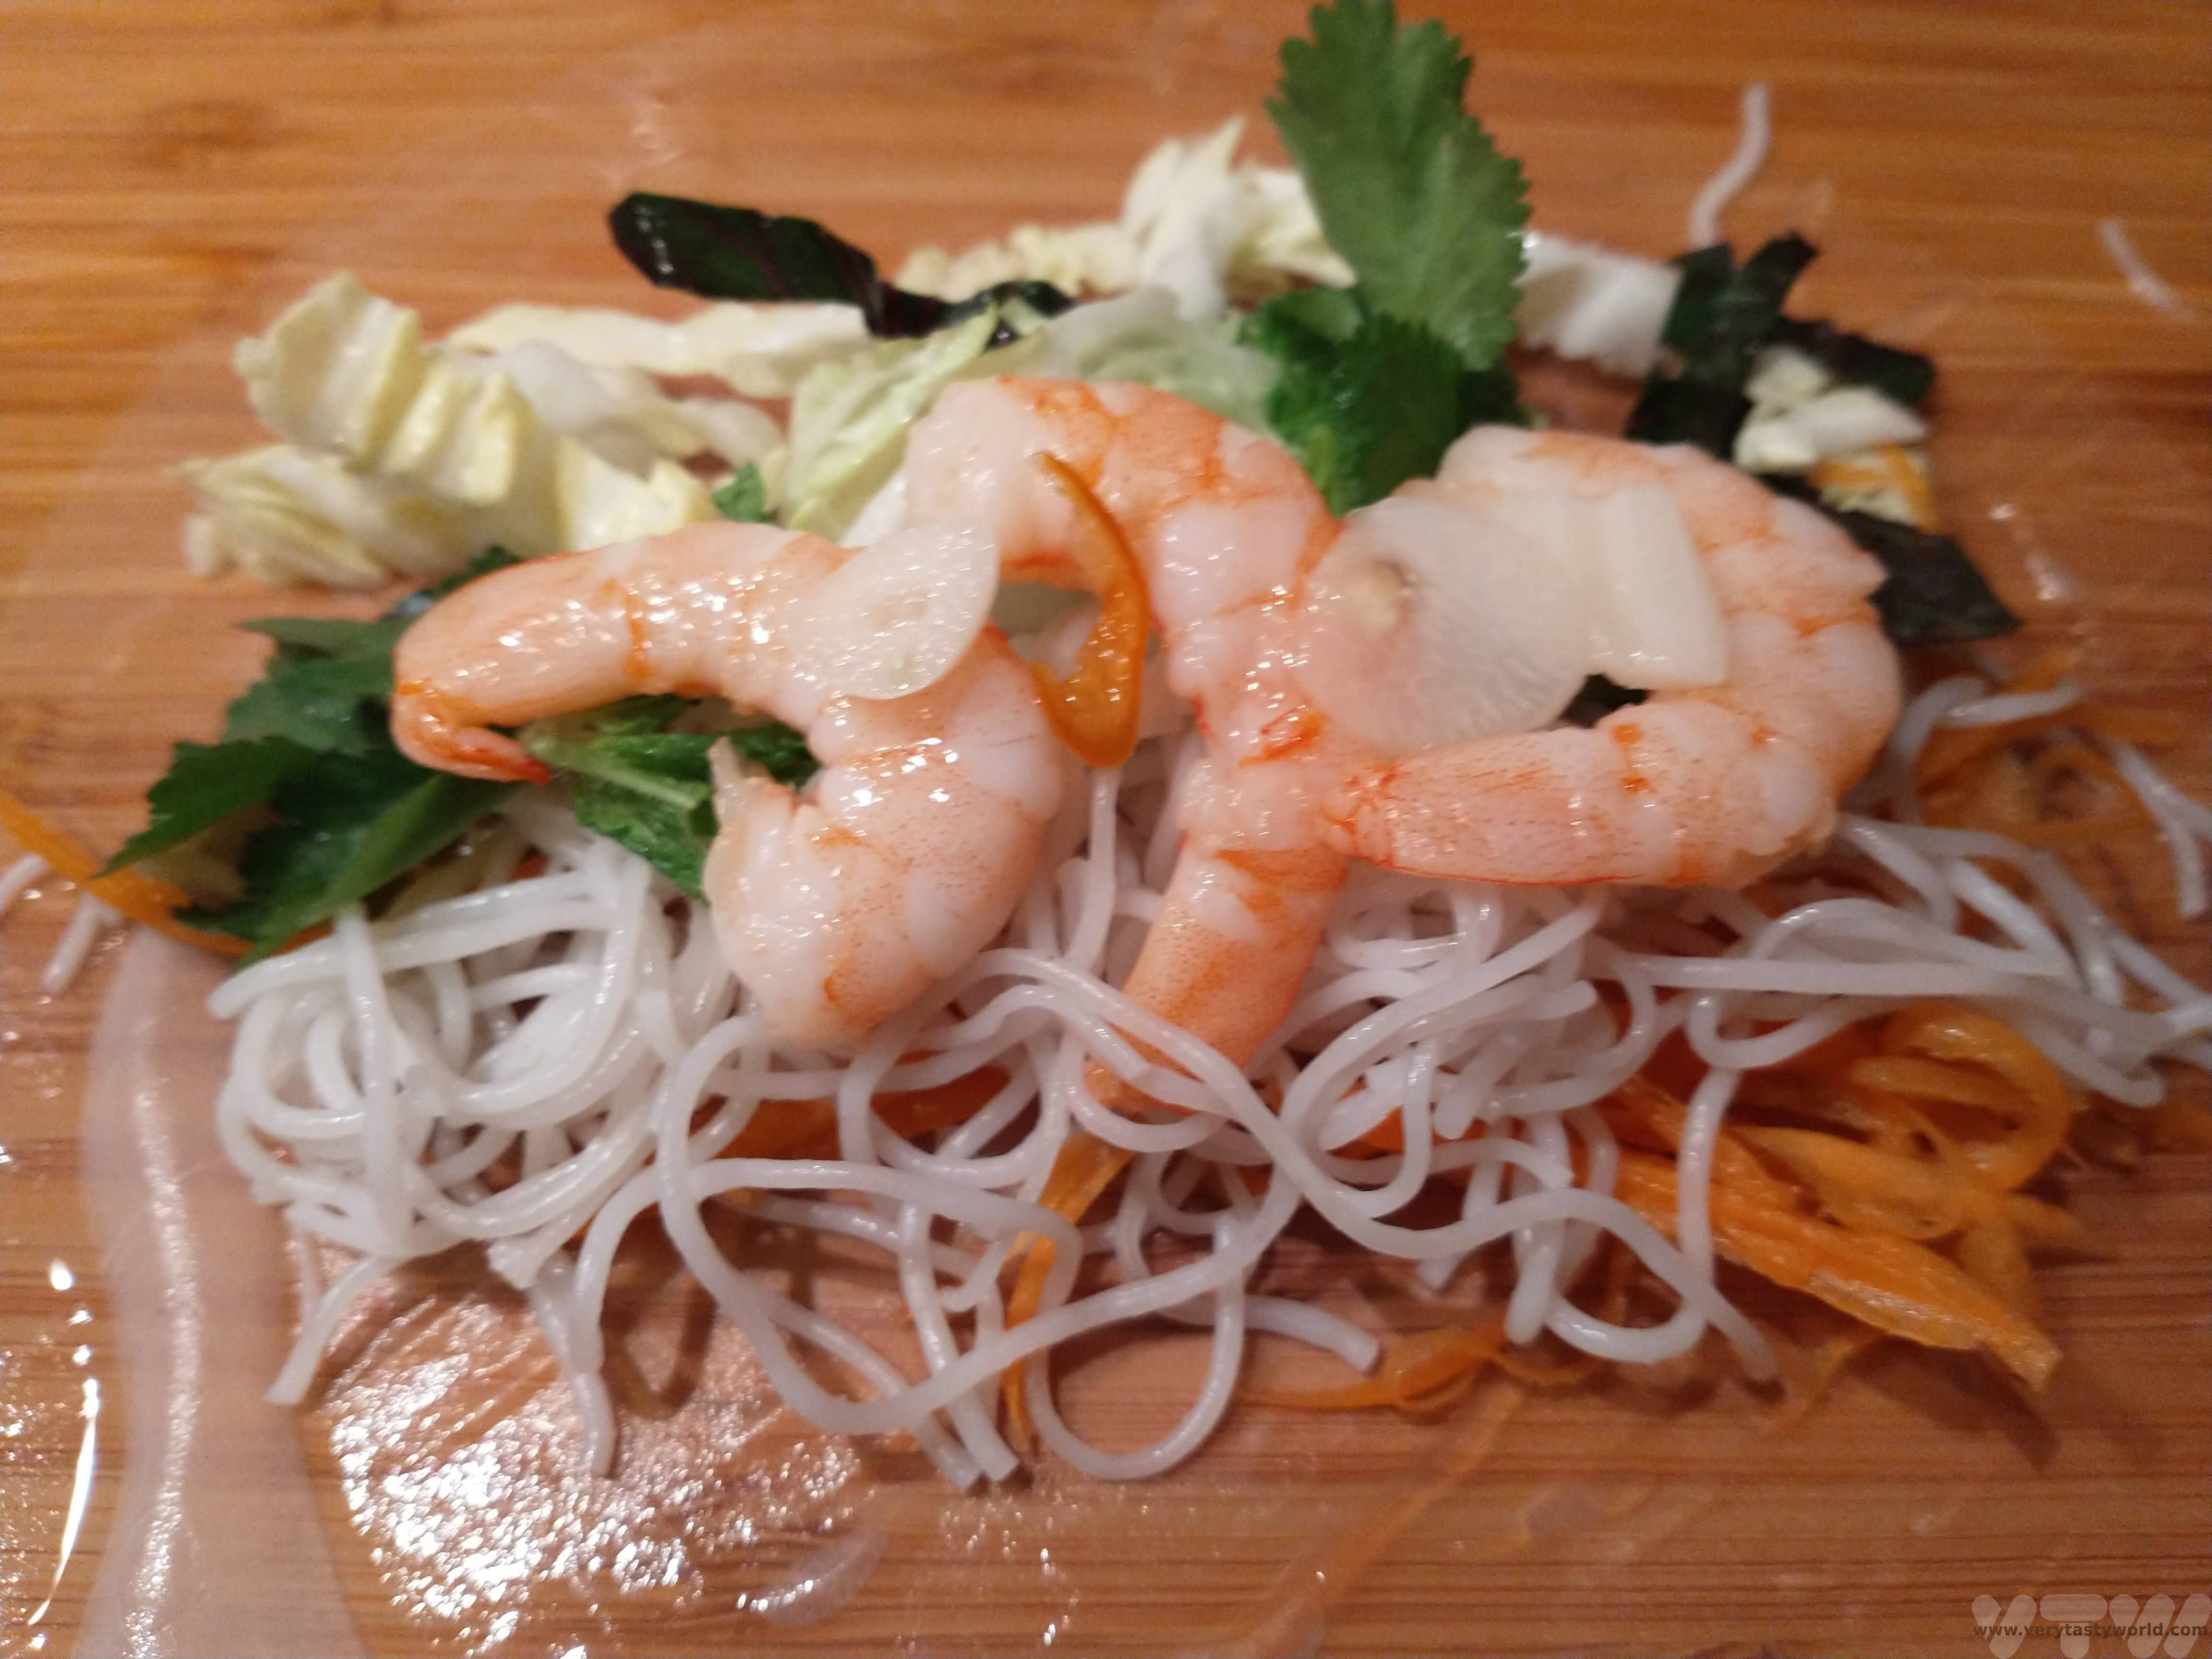
Gỏi cuốn comprise cold vermicelli noodles, salad, protein such as prawns or pork and herbs all wrapped up in rice paper, known as bánh tráng. They are usually served with a dipping sauce. Unlike fried spring rolls, these are really fresh and, like so much of Vietnamese food, full of flavour.
Vietnamese Spring Roll Recipe
- Makes 12 rolls
Ingredients
For the Rolls
Rice paper wrappers (you can get these from Asian supermarkets)
100g vermicelli rice noodles
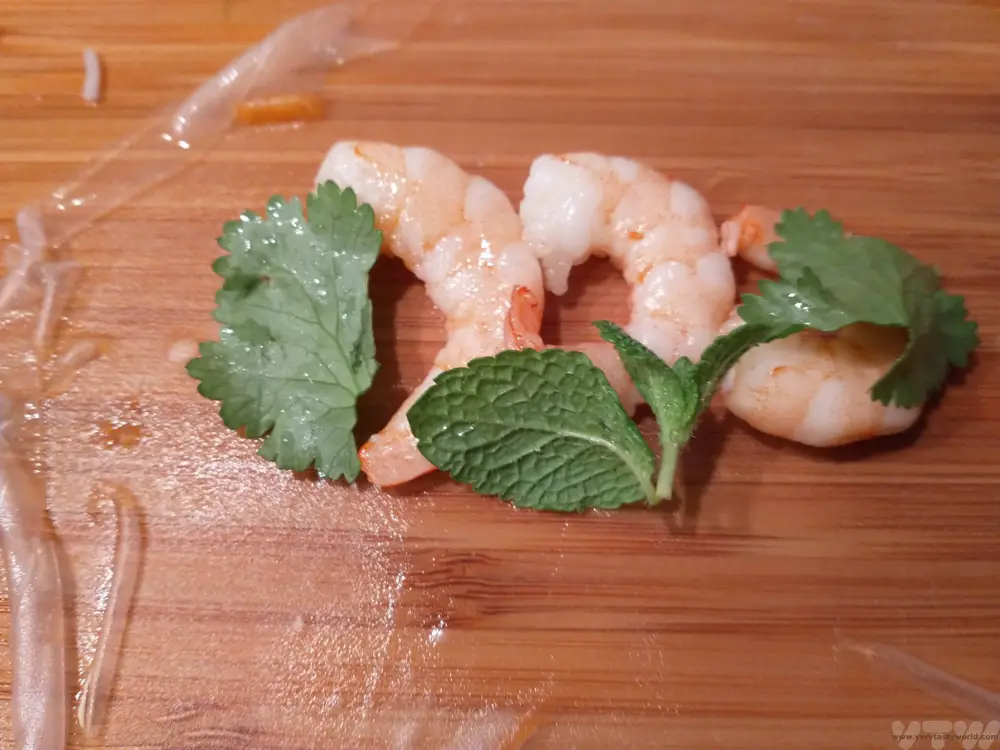
36 king prawns (3 per roll, or one more each if you are feeling greedy), cooked and peeled.
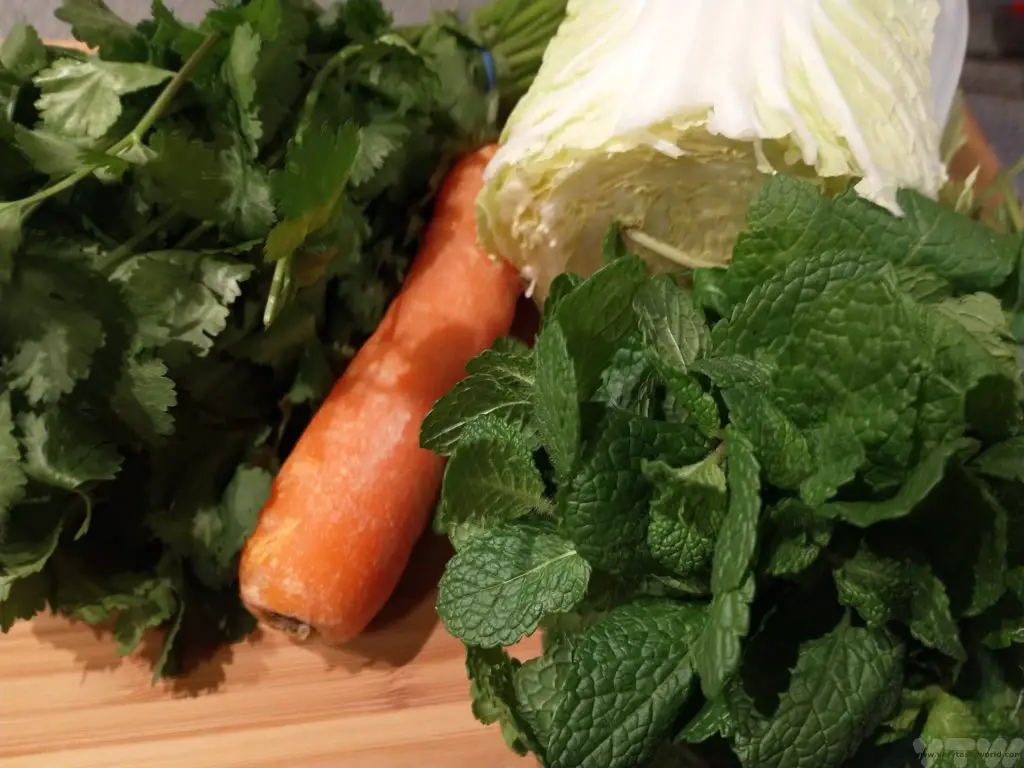
2 carrots
Shredded lettuce or cabbage
Handful of fresh mint and/or coriander (or a herb of your choice)
For the Dipping Sauce
2 tbs sweet chilli sauce
Juice of ½ a lime
Splash of fish sauce (or soy sauce for vegetarians)
 |
 |
How To Make Vietnamese Spring Rolls Method
Prepare the noodles. Pour boiling water over the vermicelli and leave for 5-7 minutes until they are soft. Drain and allow to cool.
Prepare the filling. Shred the lettuce/cabbage.
Finely slice the carrot. There is a tool that you can buy easily in South East Asia which is a little like a vegetable peeler that juliennes the carrot. If you don’t have one of those you could use a mandolin. And if you don’t have a mandolin a grater will do just fine.
The packaging on the paper skins – and many other recipes – states that you only have to soak them in warm water for a couple of seconds. We found that actually some of them need quite a bit longer soaking time. (And some just didn’t go soft at all- those should be discarded, these are not crunchy rolls and will not only not taste very nice, they will have a horrid texture and be really difficult to roll.)

When the paper is super-soft and totally translucent take it from the water and lay it flat on a clean surface. The skins are much more robust than they appear.
Start placing your filling onto the paper. You want to place it around 1/3 to 1/2 of the way up from the bottom of the paper and leave about 2 cm space on each side. Because the papers are partially transparent you can take your time to make the rolls look pretty. To do this make sure that the colourful items such as the prawns, herbs (try to keep the leaves whole for extra prettiness) or carrot are on the bottom of the pile, so that they can be seen through the wrapper.
Add a small handful of vermicelli, remembering that less is more – you don’t want to overstuff the rolls.
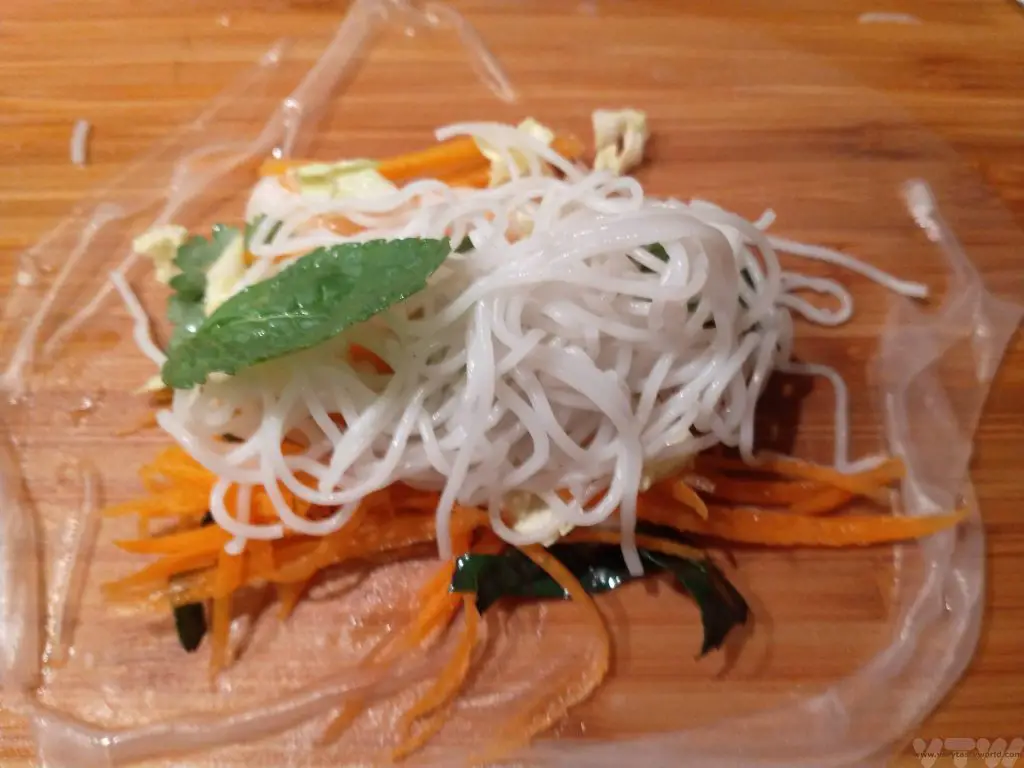
Variation: We also added some slices of home-made pickled garlic to some of the rolls to add an extra zingy flavour.
Now the tricky bit: the rolling of the rolls. It’s not as difficult as it might appear. Firstly, pull the filling together and fold the bottom of the paper over it, pressing gently into the filling so that the wrapping is tight.
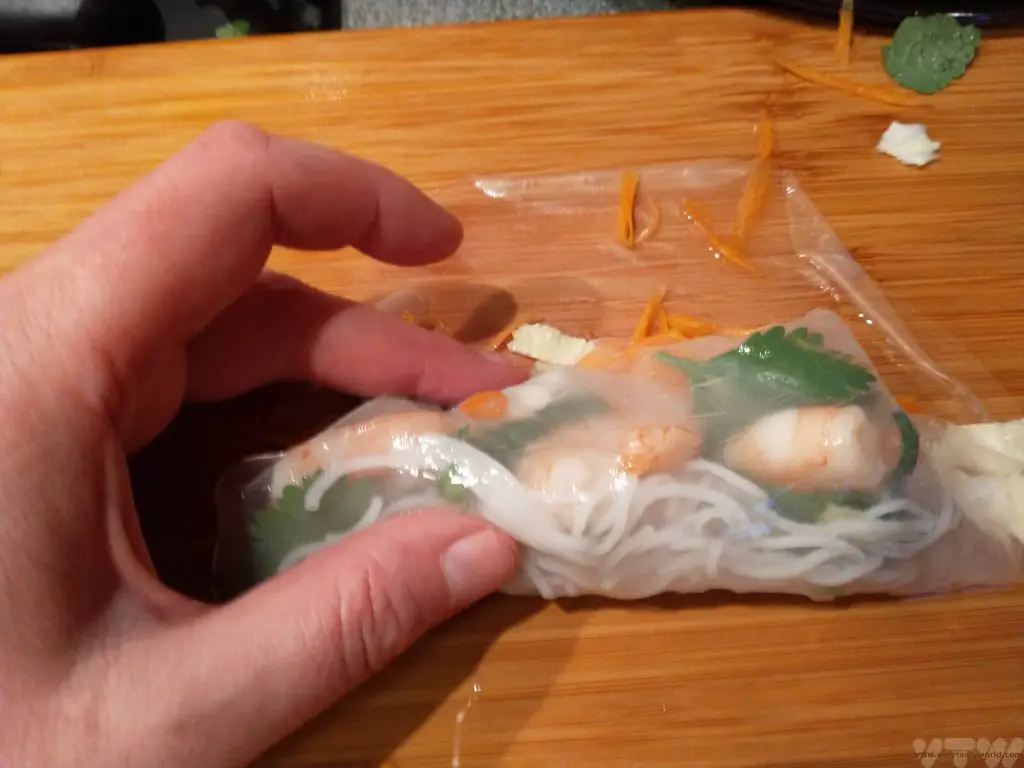
Next, fold each side in towards the centre of the wrapper to form a little parcel.
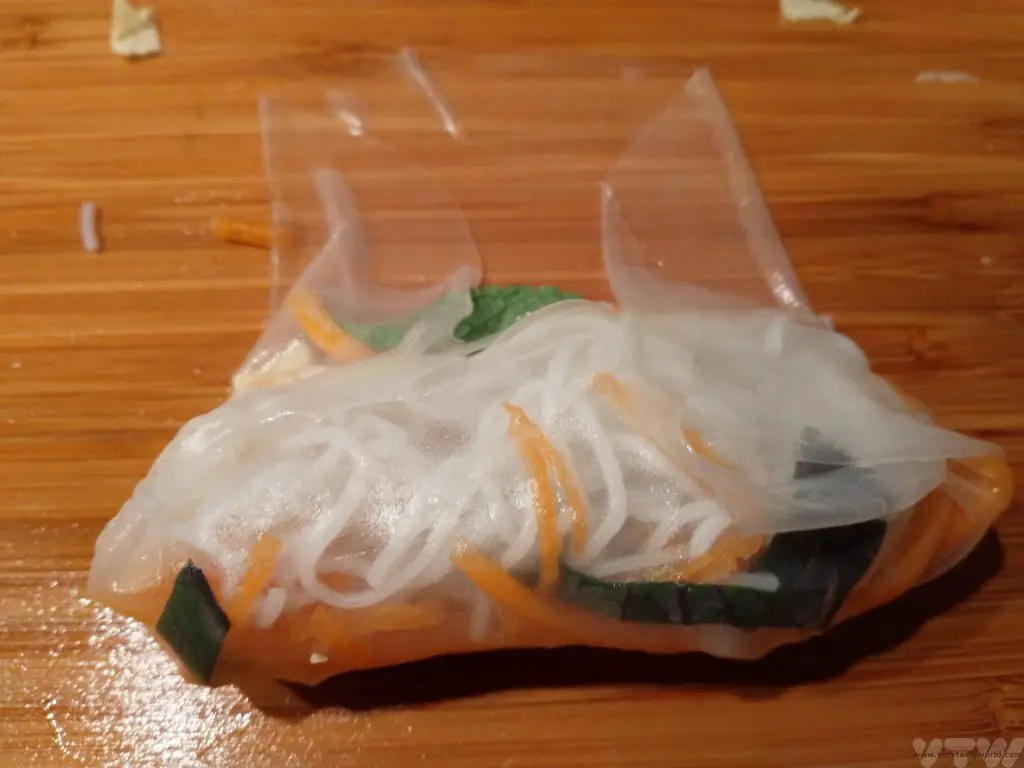
Then roll forwards to complete the spring roll, trying to keep the filling inside as tight as possible. The paper is soft so will stick at the end easily. When the rolling is completed, keep the seam on the underside which will also help it stick.

There are a variety of dipping sauces. A popular one is hoisin and crushed peanuts but we made a sweet chilli dipping sauce.
We used sweet chilli sauce, half a lime and a splash of fish sauce to give us that characteristic sweet, sour, salt and spice flavour. Just mix the ingredients together in a bowl. Then it was simply a case of serving the rolls, dipping and enjoying.

How to make Vietnamese spring rolls summer rolls
These are some of the tools and ingredients we used to make the summer rolls:
 |  |
|  |
Please note that this post contains affiliate links. If you click the link and decide to make a purchase we will earn a small commission, at no cost to you, which helps towards running this site.
- World’s Best Breakfasts -Breakfast of Champions!
- A One Day Hanoi Itinerary

- Mekong Meanderings

- A Chiang Rai Temple and A Country Retreat

- A Chiang Mai Tour in Northern Thailand

- Sunrise at Angkor Wat & Other Temples To Explore

- RECIPE: How To Make Elderflower Champagne
- RECIPE Oyakodon Donburi
- Zero Waste Recipes Before Your Holiday
- RECIPE: Vegetable Biryani Tamil Nadu Style
- RECIPE: Vegan Wild Garlic Pesto
- Recipe: Venetian Pasta Sauce
- RECIPE: Biryani Raita Recipe
- RECIPE: How to Make Costa Rica’s Gallo Pinto
- Recipe: Japanese Simmered Pork Belly – Buta no Kakuni